background image

Summary of Contents for MW3500XM

Page 1: ...COMPACT CROWAVE OVEN Model MW3500XM freezers Retrigerator Freezers tee Makers Dishwashers Bu lt ln Ovens and Surface Units Ranges Microwave Ovens Trash Compactors Room Air Condltloners Oehumldlffe ...

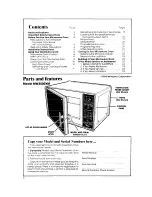
Page 2: ...krng InOneCYcle 10 If You Need Service or Assistance 23 High Cook Power Defrosting and Cooking at Lower 10 1 Before Calling for Assistance 23 2 If You Need Assistance 23 c ook Powers 11 3 If You Need Service 23 4 If You Have a Problem 23 Parts and features 01984 Whirlpool Corporatic Model MW350 TEMPERATURE PROBESOCKET LIFT UPDOOR HANDLE Copy your Model and Serial Numbers here If You need service o...

Page 3: ...4 Do not let cord hang over edge of table or counter for electric shock may result 15 See door surface cleaning instructions on page 22 J 3vI 1It WJlvuuLIJ 3ucII I uJ VVI IvIG gs and 16 To reduce the risk of fire in the oven sealed containers for example closed cavify glass jars may explode and should not a Do not overcook food Carefully attend be heated in this oven appliance if paper plastic or ...

Page 4: ...n an result In horm the oven door close qualified service personnel ful exposure to microwave properly and that there IS after a repair is made energy Tis Important not to defeat or tamper with the safety irqterlocks DO NOT place any object between the oven front face and the door or allow soil or cleaner residue to accumulate on sealing surfaces no damage to the I 1Door bent 2 Hinges and latches ...

Page 5: ...result At the end of the recom mended cooking time they should be slightly firm Wrap in foil and set aside for 5 minutes They will finish cooking while standing NEVER COOK OR REHEAT A WHOLE EGG Steam build up in whole eggs may cause them to burst and burn you and possibly damage the oven Slice hard boiled eggs before heating In rare instances poached eggs have been known to explode Cover poached e...

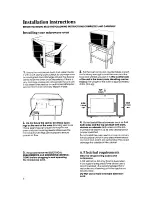
Page 6: ...re plugging in and operating the microwave oven 2 Put the oven on a cart counter table or shelf that is strong enough to hold the oven and the food and utensils you put in it The control side of the unit is the heavy side Handling can be tricky The weight of the oven is approximately 41 Ibs 18 6 kg SIDE 1 inch 4 Do not install the microwave oven so that both sides and the top are flush with walls ...

Page 7: ...e is up the water should be heated 9 Alternate grounding method If changing and properly grounding the wall receptacle is impossible and where local codes permit consult your electrical inspector a temporary adapter may be plugged into the existing 2 prong wall receptacle to mate with the 3 prong power supply cord THIS HOWEVER IS NOT RECOMMENDED If this is done you must connect the grounding eyele...

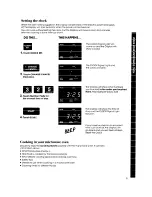
Page 8: ...ity was off for a while Reset the Clock Digital display clock and signal lights and shows you what number pads you touched Command pads a m q Touch Command Pads to tell the microwave oven what to do and in what order A few examples CLOCK SETtells the oven you are going to set the mm STARTtellsthe clock oven to start See page 21 for information on the tone you hear when touching any pad Each Comman...

Page 9: ...h START Cooking in your microwave oven Be sure to read the Cooking Guide packed with the microwave oven It contains Information about l What microwave energy is a How food is cooked by microwave energy l What affects cooking speed and cooking evenness 0 Safety tips 0 Utensils to use when cooking in a microwave oven l Cooking times for different foods The CLOCK Signal Light and the colon will blink...

Page 10: ... the oven will automatically stop cooking and maintain the time setting for up to 5 minutes until the door is closed and the STARTPad is touched High cook power DO THIS THIS HAPPENS 1 Put food in the oven and close the door 2 Touch COOK 1 2 once 3 Touch Number Pads for the cooking time you want 4 Touch START The COOK1 Signal Light will come on and the Display will show a colon The Display will sho...

Page 11: ... power MEDIUM LOW 8 80 of full power 2 20 of full power 7 70 of full power MEDIUM 1 10 of full power LOW 6 60 of full power 0 no power fan and light will be off 5 50 of full power DEFROST Use Cook Power 5 to DEFROST frozen food before cooking For suggested defrost times see the chart in your Cooking Guide DO THIS 1 Put food in the oven and close the door 2 Touch COOK I 2 once 3 Touch Number Pads f...

Page 12: ...ouch CHANGE CANCEL Pad once then touch STARTif you want to change a lower Cook Power to HIGH Faster or slower defrosting When you DEFROST at Cook Power 5 the microwave oven automatically uses 50 of full power For slower or faster defrosting l Use 30 of full power for slower defrosting l Use 60 of full power for faster defrosting Defrosting at Cook Powers higher than 50 can cause more cooking on th...

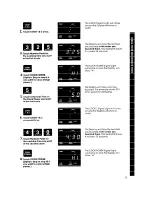
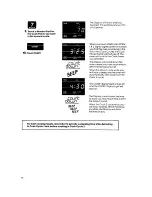
Page 13: ...he Display will show the numbers you touched in the order you touched them This example shows 3 minutes 25 seconds The COOK POWER Signal Light will come on and the Display will show HI The Display will show what you touched This example shows 50 of full power for defrosting The COOK 2 Signal Light will come on and the Display will show a colon The Display will show the numbers you touched in the o...

Page 14: ...time to show you how much time is left in the first Cook Cycle When the Cook 1cycle ends you will hear a beep and the oven will automatically start cooking in the Cook 2 cycle The COOK1 Signal Light will go off and the COOK 2 Signal Light will stay on The Display counts down the time to show you how much time is left in the Cook 2 cycle When the Cook 2 cycle ends you will hear 3 beeps When the bee...

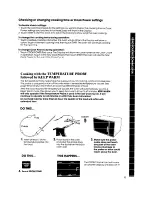
Page 15: ...by KEEP WARM The Temperature Probe helps take the guesswork out of cooking roasts and casseroles The probe is designed to turn off the oven when it senses the temperature you set See page18 for helpful information on cooking differenttypes of food After the food reaches the temperature you set the oven will automatically go into a Keep Warm cycle This allows you to keep food warm for up to 60 minu...

Page 16: ...not start until the probe plug is inserted The COOK1 Signal Light will stay on and the Display will show a 9OF This shows you the oven is cooking with the Temperature Probe and the food is cold The Cook Power Signal Light will go oft The oven 111cook in the Cook Power you selected After the food has reached 90 F 32 C the Display will show the temperature increase for every 5 To check set temperatu...

Page 17: ...new temperature setting Touch START Hints for using the temperature probe DO l use hot pads when removing probe from food or food from oven l stir foods during cooking when recommended l stir soups casseroles and drinks before serving l cover roasts with foil and let stand a few minutes after cooking Remove foil if you de cide to cook it longer l let probe cable or probe touch any part of the oven...

Page 18: ... bone marrow or a fat pocket oven may stop before reaching de sired end temperature Sensor in thickest part of breast First VZinch of sensor in the center of the filling Sensor in center of sauce Can touch dish bottom Sensor in thickest part of lobster or fish or center of seafood casserole Sensor can touch dish bottom Sensor in center of vegetables 150 160 F 150 F 150 F 150 F Beef Veal Lamb Rare ...

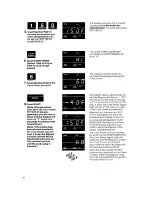
Page 19: ... 1minute 45 seconds The COOK POWER Signal Light will come on and the Display will show HI The Display will show 00 This tells you that oven will be operating at 0 power The COOK1 Signal Light will stay on to show you that the timer is running The Cook Power Signal Light will be off The Display counts down to show you how much time is left During the countdown the oven will be dark and the fan will...

Page 20: ...h START 20 THIS HAPPENS The COOK1 Signal Light will come on and the Display will show a colon The Display will show the numbers you touched in the order you touched them This example shows 60 minutes 1hour The COOK POWER Signal Light will come on and the Display will show HI The Display will show 00 This tells you that oven will be operating at 0 power The COOK 2 Signal Light will come on and the ...

Page 21: ...on l Opening the oven door during cooking does not cancel cooking instructions Programming tone Each time you touch a pad you will hear a tone If you don t hear a tone it is because the instruction is not correct EXAMPLE If you touch a Number Pad without touching the COOK1 2 or PROBE TEMl Pad first you will not hear a tone The instruction is not correct Other operating hints There are a number of ...

Page 22: ... the interior and exterior oven surfaces Use a soft cloth or a sponge with a mild detergent or spray glass cleaner 1 Unplug the power cord 2 Unsnap and remove the light cover by squeezing the top and bottom while pulling 3 Remove the light bulb from Its socket 4 Replace with a 25 watt T 8 candelabra base bulb 5 Replace the light cover 6 Plug in the power cord Replacing the light Building in your m...

Page 23: ...ook for thus symbol of quOllty whenever you need a replacement part for your Whirlpool appliance FSP replacement parts will fit rrght and work rrght because they are made to the same exachng specifrcatrons used to build every new Whrrlpool applrance Call the Whirlpool COOL LINE service as sistance telephone number Dial free from Continental U S 800 253 1301 Michigan 800 632 2243 Alaska Hawaii 800 ...

Page 24: ...Whirlpuol Home L Apphances Maklng your world a httle easier Part No 42091P011788009 c 1984 Whirlpool Corporation Printed in USA ...

Reviews: