11
Regional
Set regional preferences.
■
Language:
English, Spanish, or French
■
Temperature Units:
Fahrenheit and Celsius
Wi-Fi
■
Connect to Network:
Download the Whirlpool
®
app from
the app store on your mobile phone. See the “Connectivity
Features” section for more detailed instructions.
■
SAID Code:
The SAID code is used to sync a smart
device with your appliance. Enter the SAID code in the
Whirlpool
®
App.
■
MAC Address:
MAC Address is displayed for the Wi-Fi
module.
■
Wi-Fi Radio:
Turn Wi-Fi on or off.
Info
■
Service and Support:
Displays model number, Customer
Support contact info, and Diagnostics (Diagnostics is for
service technicians only).
■
Store Demo Mode:
Select Store Demo Mode to toggle Demo
mode off and on.
To Deactivate Demo Mode:
1.
Select TRY THE PRODUCT.
2.
Scroll and select EXPLORE.
3.
Select the Tools keypad.
4.
Scroll and select INFO.
5.
Select STORE DEMO MODE and then TURN OFF.
6.
On the confirmation screen, select YES.
■
Restore Factory:
This will restore your product to the original
factory default settings.
■
Wi-Fi Terms and Conditions:
www.whirlpool.com/connect
■
Software Terms and Conditions
■
FCC Notice:
Software Licensing Information.
Favorites
The Favorites feature stores the oven mode and temperature for
your favorite recipe.
NOTE:
A select set of Favorites and suggestions may be
automatically shown on the Home screen based on your meal
times.
To save a recipe, select the Favorites keypad, and follow the
prompts on the screen to customize your favorites.
Standby Mode
When no functions are working (12-hour clock is displayed or
if the clock has not been set), the microwave oven will switch
to Standby Power mode and dim the LCD brightness after
10 minutes. Touch any keypad or open/close the door, and the
display will return to the normal brightness.
Additional Features
CleanRelease
®
Cavity Coating (on some models)
The durable, nonstick coating resists soil buildup by making
cleaning easier. See the “Microwave Oven Care” section.
6th Sense™ System
A sensor in the microwave oven detects moisture released from
food as it heats and adjusts the cooking time accordingly.
Convection Element and Fan
The convection element and fan are embedded in the wall of the
microwave oven cavity, behind the metal screen.
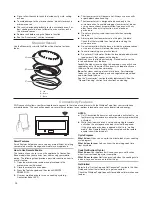
Turntable
NOTE:
By touching the Tools keypad, then TURNTABLE ON/OFF,
it is possible to switch the turntable on and off during manual
cooking cycles. This is helpful when cooking with plates that are
bigger than the turntable or when cooking with plates side by side.
The turntable rotates in both directions to help cook food more
evenly. Do not operate the microwave oven without having the
turntable in place. See the “Accessories” section to reorder any
of the parts.
The raised, curved lines in the center of the turntable bottom fit
between the three spokes of the hub. The hub turns the turntable
during microwave oven use. The rollers on the support should fit
inside the turntable bottom ridge.
Round Convection Rack
The round convection rack provides optimal heat circulation for
convection cooking.
■
The rack will become hot. Always use oven mitts or pot
holders when handling.
■
To avoid damage to the microwave oven, do not allow the rack
to touch the inside cavity walls, ceiling, or floor.
■
Always use the turntable.
■
To avoid damage to the microwave oven, do not store the rack
in the microwave oven.
■
Two-level cooking is not recommended.
■
For best results, do not place popcorn bags on the rack.
■
The rack is designed specifically for this microwave oven.
For best cooking results, do not attempt to use any other rack
in this microwave oven.
■
See the “Accessories” section to reorder.
Rectangular Cooking Rack
The rectangular cooking rack is ideal for two-level cooking. Insert
the rack securely into the rack supports on the side walls of the
oven.
■
The cooking rack will become hot. Always use oven mitts or
pot holders when handling.
A
B
C
A. Turntable
B. Support and rollers
C. Hub


