background image

Summary of Contents for RF014PXR

Page 1: ...Model RF014PXR ELECTRIC RANGE ...

Page 2: ...ve a Problem 01986 Whirlpool Corporation Page 11 11 12 12 13 14 14 14 14 15 15 Before you use your range Read this Use Care Guide and The Cooking Guide for important safety information You are personally responsible for l Reading and following all safety precautions in this Use Care Guide and the Cooking Guide l Installing the range where it is protected from the elements and on a floor strong eno...

Page 3: ... away from the you could be burned range when it is on The cooktop 9 DO NOT heat unopened containers and oven walls racks and door They could explode The hot con can get hot enough to cause tents could burn and container par burns titles could cause injury 5 DO NOT use theIange to heat a room Persons in the room could 10 When adding or removing be burned or injured or a fire food MAKE SURE to open...

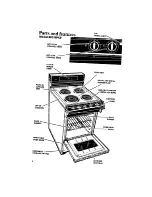
Page 4: ...TOP LEFTREAR CONTROL KNOB CLOCK MINUTE TIMER LEFT FRONT CONTROL K OVEN VFNT SERIAL ilE PLUG IN SURFACE UNIT CHROME R BOWL wr UP q COOKTOP BAKE ELEMENT REMOVABLE OVEN DOOR CONTROL PANEL BROIL ELEMENT OVEN RACK REMOVABLE STORAGE DRAW 4 ...

Page 5: ...to continue cooking Use HI to Use5or6 Use 4 for Use 2 or 3 Use SIM to start foods to hold a gravy pud to keep food keep food cooking to rapid boil to dings and cooking after warm until bring liquids fry chicken icing to cook starting it ready to to a boil or pancakes large amounts on a higher serve Set the of vegetables setting heat higher I or lower to CAUTION The use of the HI setting for long p...

Page 6: ...when turning Using the Minute Timer The Minute Timer does not start or stop the oven It works like a kitchen timer Set it in minutes up to an hour You will hear a buzzer when the set time is up DO NOT PUSH IN THE KNOB when setting the Minute Timer 1 Without pushing it in turn the Minute Timer Knob until the hand passes the setting you want 2 Without pushing in turn the knob back to the setting you...

Page 7: ...ld be placed so the top of the food will be centered in the oven Always leave at least IYz to 2 inches 4 5 cm between the sides of the pan and the oven walls and other pans for more information see the Cooking Guide 3 Put food in the oven NOTE Oven racks walls and door will be hot During baking the elements will turn on and off to keep the oven temperature at the setting The Oven Signal Light will...

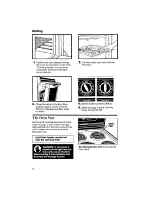
Page 8: ... will stay open by itself 2 Put the broiler pan and food on the rack 4 Set the Oven Control to BROIL 5 When broiling is done turn the Oven Control to OFF The Oven Vent Hot air and moisture escape from the oven through a vent under the right rear surface unit You can cook on the unit or keep food warm on it while the oven is on rCAUTION Plastic utensils lett over the vent can melt Do not block the ...

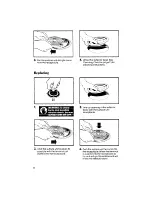
Page 9: ...n warm soapy water or use baking soda and a damp soft cloth or follow directions provided with glass cleaner Rinse well and dry CAUTION Do not soak or use abrasive cleansers They could rub off the markings Push the knobs straight back on Make sure they point to OFF Surface Units and Reflector Bowls Lift the edge of the unit opposite the receptacle just enough to clear the reflector bowl 9 ...

Page 10: ...o the receptacle 4 Lift out the reflector bowl See Cleaning Chart on page13 for cleaning instructions 2 Line up opening in the reflector bowl with the surface unit receptacle 4 Push the surface unit terminal into the receptacle When the terminal is pushed into the receptacle as far as it will go the surface unit will fit into the reflector bowl 10 ...

Page 11: ...can dlscoior it See Cooking Guide for further information Lift Up Cooktop 1 Lift front of cooktop at corners and swing up the support rod 2 Carefully lower the cooktop onto the support rod 3 Wipe surface under cooktop with warm soapy water Use soapy plastic scrub pad on stubborn spots The Oven Door Removing the oven door will help make it easierto clean the oven Open the door to the first stop pos...

Page 12: ... stop and slide drawer closed The Standard Oven has to be hand cleaned Use warm soapy water steel wool pads and a commercial oven cleaner See Cleaning Chart for further instructions Do not allow commercial oven cleaner to contact the oven seals or exterior surfaces of the range Damage will result Using Foil Using foil on the oven bottom is recommended to catch sugar and starchy spills from pies an...

Page 13: ...g utensils wool pad Control knobs Warm soapy water and l Wash rinse and dry well sofl cloth l Do not soak Control panel Warm soapy water or l Wash rinse and dry well spray glass cleaner l Follow directions provided with cleaner Oven racks Oven door glass Warm soapy water or soapy steel wool pads Spray glass cleaner Warm soapy water or plastic scrubbing pad l Wash rinse and dry Use soapy steel wool...

Page 14: ...re surface units plugged in all the way l Do the control knobs turn If surface unit control knob s will not turn l Did you push in before trying to turn If cooking results are not what you expected l Is the range level l Are you using pans recommended in the Cooking Guide l If baking have you allowed T Zto 2 inches 4 5 cm on all sides of the I4 pans for air circulation l Have you preheated the ove...

Page 15: ...ne of our Consultants or if you prefer write to Mr Robert Stanley Division Vice President Whirlpool Corporation 2000 US 33 North Benton Harbor Ml 49022 If you must call or write please pro vide model number serial number date of purchase and a Complete description of the problem This infor mation is needed in order to better respond to your request for assistance FSP is a registered trademark 0 01...

Page 16: ... Making your world a little easier Part No 75664 00 4157058 I986 Whirlpool Corporation Printed in U S A omatlc Washers Clolhes Dryers Freezers Relrqerator Freezers Ice Makers Olshwashers Bu ltbln Ovens and Surface Units Ranges h ...

Reviews: