background image

Summary of Contents for RF366BXD

Page 1: ... Range 7 Using Your Range 8 Using the Self Cleaning Cycle 22 Caring for Your Range 26 Troubleshooting 30 Requesting Assistance or Service 32 Index 35 Warranty 36 1 800 253 I 301 Call us with questlons or comments SELF CLEANING ELECTRIC RANGE PART NO 3189071 Rev C MODELS RF366BXD RF366PXD IO 95 ...

Page 2: ...the oven temperature control 14 Broiling 15 Broiling tips 17 Energy saving tips 17 Using the MEALTIMERTM clock 18 The oven vent 20 The storage drawer 20 The anti tip bracket 21 Optional door panel pat 21 Using the Self Cleaning Cycle 22 Before you start 22 Setting the controls 23 Special tips 25 How the cycle works 25 Caring for Your Range 26 Cleaning the cooktop 26 Cleaning other range parts 28 T...

Page 3: ...ppliance The card helps us notify you about any new information on your appliance Please record your model s information Whenever you call to request service for Model Number your appliance you need to know your complete model number and serial number Serial Number You can find this information on the model Purchase Date and serial number plate see diagram on Dealer Name page 7 for location of pla...

Page 4: ...ed anti tip bracket To check if the bracket is installed properly see The anti tip bracket on page 21 CAUTION Do not store things children might want above the range Children could be burned or injured while climbing on it Do not leave children alone or unattended in area where the range is in use They should never be allowed to sit or stand on any part of the range They could be burned or injured...

Page 5: ... The fumes could create an explosion and or fire hazard When using the cooktop ADO not cook on a broken cooktop If cooktop should break cleaning solutions and spillovers could penetrate the broken cooktop and create a risk of electrical shock Contact a qualified technician immediately Select a pan with a flat bottom that is about the same size as the surface unit If pan is smaller than the surface...

Page 6: ...e harm Exposure can be minimized by venting with a hood or open window and wiping out excess food spills prior to self cleaning Do not use oven cleaners No commercial oven cleaner or oven liner protective coating of any kind should be used in or around any part of the oven l Before self cleaning the oven remove broiler pan broiler grid oven racks and other utensils Do not use your oven to clean mi...

Page 7: ...racket for informatio on alternate wall mounted anti tip bracket see p 21 Removable storage drawer P 20 ceramic cooktop PP 9 26 Automatic oven light switch Broil RF366PXD only Control panel Left front Left rear control control MEALTIMEFP Manual oven clock minute timer Oven temperature Oven selector control knob P 12 pp 13 15 19 Surface unit marker P 6 Start ilme Stdp time Oven heatlAg Right rea Su...

Page 8: ...s One of the Hot Surface Indicator Lights on the cooktop will glow when a surface unit becomes too hot to touch The Indicator Light will continue to glow as long as the surface unit is too hot to touch even after it is turned off Fire Hazard Turn all controls off when done cooking Failure to do so can result in death fire or burns Until you get used to the settings use the following as a guide For...

Page 9: ...htly indented bottoms or very small expansion channels This cookware is specially designed to provide the good contact needed for best cooking results Also woks canners and teakettles with flat bottoms suitable for use on your cooktop are now available in most stores that sell housewares l The pan should have straight sides and a tight fitting lid l Choose medium to heavy gauge thick ness pans tha...

Page 10: ...pull out l Be sure the rack s is level l If rack s must be moved while oven is hot use pot holders or oven mitts to protect hands l For baking roasting with one rack place the rack so the top of the food will be centered in the oven l When baking on two racks arrange racks on the bottom and third level from the bottom Rack placement for specific foods FOOD RACK POSITION Frozen pies large Lowest le...

Page 11: ...ne pan Place in the center of the oven rack Two pans Place in opposite corners of the oven rack Three or four pans Place in opposite corners on each oven rack Stagger pans so no pan is directly over another Using aluminum foil for baking Use alumlnum foil to catch spillovers from pies or casseroles l Place the foil on the oven rack below the rack with the food Turn up foil edges and make sure foil...

Page 12: ...It works like a kitchen timer Set it in minutes up to an hour You will hear a buzzer when the set time is up NOTE Do not push in the knob when setting the Minute Timer or when stopping the buzzer Pushing in and turning the Minute Timer Knob changes the clock setting 2 Without pushing it in turn the knob back to the setting you want When the time is up a buzzer will sound To stop the buzzer turn th...

Page 13: ... goes off NOTE Do not preheat oven when roast ing or cooking items such as casseroles 3 Put food in oven During baking roasting the elements will turn on and off to keep the oven tempera ture at the setting The OVEN HEATING Indicator Light will turn on and off with the elements NOTE The top element helps heat during baking roasting but does not turn red 4 After cooking turn off oven Turn both the ...

Page 14: ...it over Locking Tooth Note hes 2 Loosen the locking screws inside the control knob Note the position of the notches 3 To lower the temperature hold knob handle firmly and move the tooth a notch counterclockwise Each notch equals about 5 F 2 5 4 To raise the temperature hold knob handle firmly and move the tooth a notch clockwise Each notch equals about 5 F 2 5 5 Tighten the locking screws and repl...

Page 15: ...way from the broil element See Broiling rack position chart on page 16 2 Put food on broiler pan and place in center of oven rack 3 Position door Close the door to the Broil Stop position open about 4 inches lo cm The door will stay open by itself 4 Set Oven Selector and Oven Temperature Control Knob to BROIL The OVEN HEATING Indicator Light will come on 5 When broiling is done turn off oven Turn ...

Page 16: ...oil heating element to cycle and to slow cook ing The lower the temperature the slower the cooking NOTE Fish and chicken are some foods that may cook better if you use lower broiling temperatures Broiling rack position chart RACK POSITION TYPE OF FOOD FROM BOlTOM DONENESS Hamburger patties and thin steaks thick or cb less 0 Quickly searing food 0 rare and medium 0 steaks medium patties ham slices ...

Page 17: ... tight fitting lids Match the pan to the surface unit size l Cook with a minimum of liquid or fat to help shorten cooking time l Preheat pans only when recommended and for the shortest time possible l Start food on higher heat settings then set surface unit control on low or off to finish cooking Use retained heat for cooking when possible l Use the more efficient surface units instead of the oven...

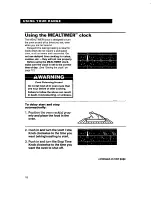
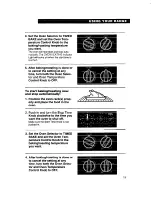
Page 18: ... sure the clock is set to the correct time of day See Setting the clock on page 12 Food Poisoning Hazard Do not let food sit in oven more than one hour before or after cooking Failure to follow the above can result in death food poisoning or sickness To delay start and stop automatically 1 Position the oven rack s prop erly and place the food in the oven 2 Push in and turn the Start Time Knob cloc...

Page 19: ...n when the start time is reached 5 After baking roasting is done or to cancel the setting at any time turn both the Oven Selec tor and Oven Temperature Control Knob to OFF To start baking roasting now and stop automatically 1 Position the oven rack s prop erly and place the food in the oven 3 Set the Oven Selector to TIMED BAKE and set the Oven Tem perature Control Knob to the baking roasting temp...

Page 20: ...u have one Use care when handling the drawer Removing the storage drawer Replacing the storage drawer Drawer slide rail 1 Empty drawer of any pots and pans before removing drawer Pull drawer straight out to the first stop Lift front and pull out to the second stop 2 Lift back slightly and slide drawer all the way out 1 Fit ends of drawer slide rails into the drawer guides on both sides of opening ...

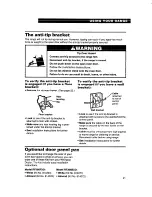
Page 21: ... panel Floor bracket l Look to see if the anti tip bracket is attached to floor with screws l Make sure one rear leveling leg is posi tioned under the anti tip bracket l See Installation Instructions for further details l Look to see if the anti tip bracket is attached with screws to the wall behind the control panel l Make sure the cable on the back of the range is secured by the two hooks on the...

Page 22: ...OTE DO NOT clean move or bend the seal Poor cleaning baking and roasting may result l Remove the broiler pan and grid and any pots and pans being stored in the oven NOTE You can clean the broiler pan without grid in the oven if you have first removed most of the soil by hand cleaning or in a dishwasher If most of the soil is not removed too much smoking will occur The chrome broiler pan grid will ...

Page 23: ...The oven light will not work during the best cleaning results Self Cleaning cycle Setting the controls 1 Move the Lock Lever to the right the Clean position When the oven temperature goes above normal baking roasting temperatures the door cannot be opened and the Lock Lever must not be moved 2 Set the Oven Selector and Oven Temperature Control Knob to CLEAN 4 Push in and turn the Stop Time Knob cl...

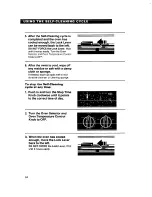
Page 24: ...ctor and Oven Temperature Control Knob to OFF 6 After the oven is cool wipe off any residue or ash with a damp cloth or sponge If needed touch up spots with a mild abrasive cleanser or cleaning sponge 2 Turn the Oven Selector and Oven Temperature Control Knob to OFF 3 When the oven has cooled enough move the Lock Lever back to the left DO NOT FORCE the Lock Lever Wait until it moves easily 24 ...

Page 25: ...prepared the oven properly Set the Self Cleaning cycle longer the next time and hand clean areas noted on page 22 How the cycle works The Self Cleaning cycle uses very high heat to burn away soil and grease During the cycle the oven gets much hotter than it does for normal baking or broiling This high heat breaks up the soil or grease and burns it away You can adjust the cycle time to the amount o...

Page 26: ...w them after each use to ensure top performance and to preserve that uniquely elegant look NOTE Let cooktop cool before cleaning To avoid damaging the cooktop follow these instructions l Sugar spills and soils such as jellies and candy syrups can cause pitting on the cooktop if not removed while the ceramic surface is still warm Remove as soon as possible after the spill occurs l Do not use the co...

Page 27: ...scraper Part No 3183488 write to Whirlpool Corporation Attention Customer Service Dept 1900 Whirlpool Drive LaPorte IN 46350 OR Call l 800 253 1301 to order You must have a major credit card to order by phone How to keep your cooktop looking like new IF THERE ARE WHAT TO DO Sugary spills To prevent pitting on and soils such the cooktop wipe up as jellies and with paper towel or candy syrups clean ...

Page 28: ...directly on panel glass cleaner Apply cleaner to paper towel Exterior surfaces Sponge and warm l Wash wipe with clean water and dry other than cooktop soapy water thoroughly Use nonabrasive plastic and control panel scrubbing pad on heavily soiled areas l Do not use abrasive or harsh cleansers They may damage the finish Broiler pan and grid clean after each use Oven racks Steel wool pad and warm s...

Page 29: ...or is closed press the Oven Light Switch on the control panel Electrical Shock Hazard 3 Remove the light bulb from its socket Unplug oven before changing light Replace the bulb with a 40 watt appli bulb ance bulb Replace light bulb cover before using the oven Failure to do so can result in death or electrical shock To replace the oven light 1 Unplug appliance or disconnect at the main power supply...

Page 30: ... BAKE or BROIL l You have set a delayed start time Wait for the start time to be reached or cancel and reset the control l You have not turned the Oven Temperature Control Knob to a temperature setting l You have not set the MEALTIMERTM clock correctly See Using the MEALTIMER clock on page 18 l You have not set the MEALTIMER clocks Stop or Start Time Knobs to the correct time of day If a delay sta...

Page 31: ...ns l The oven temperature seems too low or too high See Adjusting the oven temperature control on page 14 to adjust oven temperature l You did not preheat the oven before baking if called for in recipe l The recipe you are using may need to be altered to improve the taste or appearance of the food l You are using a pan that is not the correct type or size Refer to a reliable cookbook or recipe for...

Page 32: ...MACHINES h MAJOR SERVICE L REPAIR DRYERS SERVICE I REPAIR See Whirlpool Appliances or See Whirlpool Appliances or Authorized Whirlpool Service Aulhorimd Whirlpool Swviae Example XYZ ssfvice CO Example XYZ Service Co 3 If you need FSP replacement parts FSP is a registered trademark of Whirlpool Corporation for quality parts Look for this symbol of quality whenever you need a replacement part for yo...

Page 33: ...KWARE Canning 10 Tips 9 ENERGY SAVING TIPS 17 FEATURES 7 LIGHT 29 LOCK LEVER 23 24 MEALTIMERTM CLOCK Delaying start and stop automatically 18 TOPIC PAGE Starting now and stopping automatically 19 MINUTE TIMER 12 MODEL AND SERIAL NUMBER 3 OPTIONAL DOOR PANEL PAC 21 OVEN TEMPERATURE Adjusting 14 Setting 13 15 19 OVEN VENT 20 PANS 10 ll PARTS 7 RACKS 10 ROASTING Pans 10 ll Racks 10 Setting cycle 13 S...

Page 34: ...signed to be repaired in the home D Damage to your range caused by accident misuse fire flood acts of God or use of products not approved by Whirlpool E Repairs to CLEANTOP ceramic cooktop if it has not been cared for as recommended in this Use and Care Guide F Repairs to parts or systems caused by unauthorized modifications made to the appliance a95 WHIRLPOOL CORPORATION SHALL NOT BE LIABLE FOR I...

Reviews: