background image

Summary of Contents for RJE-385P

Page 1: ...t r i i I ca l i itll a qllt tlc l dodt l Nc nt i r ilw I ir olIT4t I dCil 1 Complete Mndii i cy 5erlal Numbers from tile ScrlLll N lln T platt iwst behl ld tile top ot VIV over door 1 2 Purchase date from sales slop or date Irlstalled Copv this Irlformatlon 111 these spaces Keep this hrt ilsc d Ilstd htlon rh book your warranty and sales slop together in a handy place Srri cv Companp and Phone Nu...

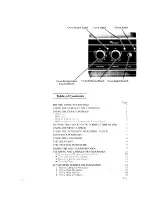
Page 2: ...ETTING THE CLOCK TO THE CORRECT TIME OF DAY USING THE MINUTE TIMER USING THE AUTOMATIC MEALTIMER CLOCK OVEN RACK POSITIONS USING THE OVEN LIGHT THE OVEN VENT THE OPTIONAL ROTISSERIE USING THE SELF CLEANING OVEN CLEANING AND CARING FOR YOUR RANGE l Rt rn IVII dnd RtJplaclny Control Knobs l Clt a r y llndu tile Cooktop 9 Rrmov r y the Stcjraye Drtlwer l Cl nr iiny Chart IF YOU NEED SERVICE OR ASSIST...

Page 3: ...you are personally responsible for making sure that it l IS properly Installed and leveled on a floor that will hold the weight and in a well vrntllated room l IS connected only t i the right kind of outlet with the rtght electric supply and grounding l IS used only for loba expected of home ranges l IS out of the weather l IS properly rnalntalned l 1snot used by children or others who may not und...

Page 4: ...To bake turn the Oven Selector Knob to BAKE To broil turn the Oven Selector Knob to BROIL ...

Page 5: ...without the user really noticing the change Your new oven is properly adlusted to provide accurate temperatures but when compared to your old range the new design may give you different baking results If you think that the temperature setting on your range needs to be hotter or colder you can adjust the Oven Temperature Control Knob by yourself To adjust the setting first pull the Oven Temperature...

Page 6: ...ion It can PLAIT r erninri you of other things like when to add softener to the washer For the most accurate timing turn the knob past the time you want Then turn it back to the setting Do not push in on the knob while setting the Minute Timer Pushing in the knob while turning will change the setting on the clock Using the automatic MEALTIMER clock With thi AutonlCltlc MI iAL TIMER Clock 1t 5 easy...

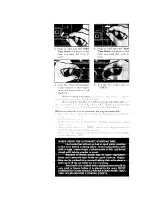
Page 7: ... the time you want the oven to start 4 Push in and turn the Stop Time Knob clockwise to the time you want the oven to stop 5 Turn the Oven Temperature Conrrol Knot ICI tht temper aturc you want TO II C tcl cook the tood 6 Set the O ren Selector to TIMED ...

Page 8: ...the door pu5 h the oven lryht swtch Push It aydrrl tc tIlrr ttic Iryh off To replace the oven light bulb Iiw I e iqhr bulb has a giass cover h hIch IS held 011 by a wart h lder This cover must be in place ichen the oven IS berny usrti To replace the oven light remove glass cover The oven vent 9 r 1 lt ri Ii z k I L ie l i no t Ll 7 ttdCY PIiJIl t l lkz l tht oi t z c r1l 11 ii il t SCc lt thtt Lig...

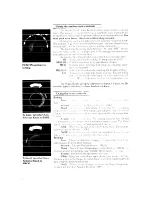
Page 9: ...The optional rotisserie Stlttiny the oiitrol I0 Ihe Self c leaning cycle 1 Set the Oven Selector Knob 2 Set the Oven Temperature tr CLEPIN Control Knob to CLEAN ...

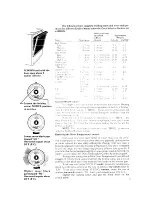
Page 10: ... hours as you want for the clean ing cycle For a lightly soiled oven two hours ahead may be enough For heavay soil three hours ahead nray be about right If some soil does not get removed during the cleaning cycle see Special Tips later in this svc tion 6 The oven will shut off when the preset stop time is reached but the oven door will stay locked until the oven has cooled When the Lock Light turn...

Page 11: ... 200 7 hr 1 hr 1 hr 2 hr 24 hr Special tips l If ttlc clean ny cltl doesn t yet the oL en as clean as It should be the time set for cleaning was probably not long enough Set the cleanlny tlmr longer next time You can set It for more than 3 hours tf you ivant l Plan to clear the o en before it gets too heavily solled Other wise you may riotIce more smoke than you would expect com Ing from the ol tm...

Page 12: ...ull it stralyht out 4 LZ ayh ttlk kni lb and trlrn rinys In warm sudsy water 3 Rtaplacv th J tr rl rings first If the control spring was removed put it back exactlv as shown on the left small end first Removing and replacing oven control knobs 1 Be sure the knobs are wt t OFF 2 Pull t a in k ll b itralght of 3 lYash tht IIO Y 11 1 4 arrn LIC S i4c ter 4 Th J knot are I ot Interchangcablt Make sure...

Page 13: ...e cooktop at the center Rarse the swing up rod to hold it Be sure the tip of the rod is in the notch in the cooktop Use warm soapy water and a sponge or cloth Scouring powders or any other abrasive cleaner may harm porcelarn enamel finishes and can scratch chrome Be careful not to raise the cooktop so high that it touches the control console And don t drop it Dropping the cooktop can chip or crack...

Page 14: ...hwasher or l Wash with other cooking utensils rings warm soapy water or plastic scrubbing pad l Do not place in Self Cleaning Oven Porcelain Warm soapy water or soapy l Wash with other cooking utensils broiler pan and steel wool pads grid l Do not place in Self Cleaning Oven Control panel Warm soapy water l Wash rinse and dy with soft cloth Commercial glass cleaner l Follow directions provided wit...

Page 15: ...1 1I o rc ctl as 5hoLc n on pagtx 12 in the Cleaning lii cltlriq I vi 21 tL3rx st ctll III l I td VC Ipui i III tkltc rtl ttt llly to turll If the Self Cleaning Cycle will not operate l Are the jcl Sttlec tar Knob and the Oven Temperature Control KllOb St i to I I Ah i l 1 the i l lck L e r illi iIt S C L to tht right iThe Clean Light will come II If cooking results aren t what you expect Is the d...

Page 16: ...HOUSEHOLD ELECTRICAL APPLIANCES WASHING MACHINES DRYERS MAJOR SERVICE 8 REPAIR MAJOR REPAIRING 8 PARTS 8 IRONERS SERVICING k vHlRLPOOLAPFtlAN t OR Sr R POOLA PLlANCtS OR NHIRLPOOLAP LIANCES FHANCh SFDTELY Atit R l ANCHISEL F H AYE ER JL i FRPNCHISEDTFCH CARESERVICE 4 If you have a problem Call our COOLLINE service asststance telephone number see Step 2 and talk with one of our Consultants or if yo...

Reviews: