background image

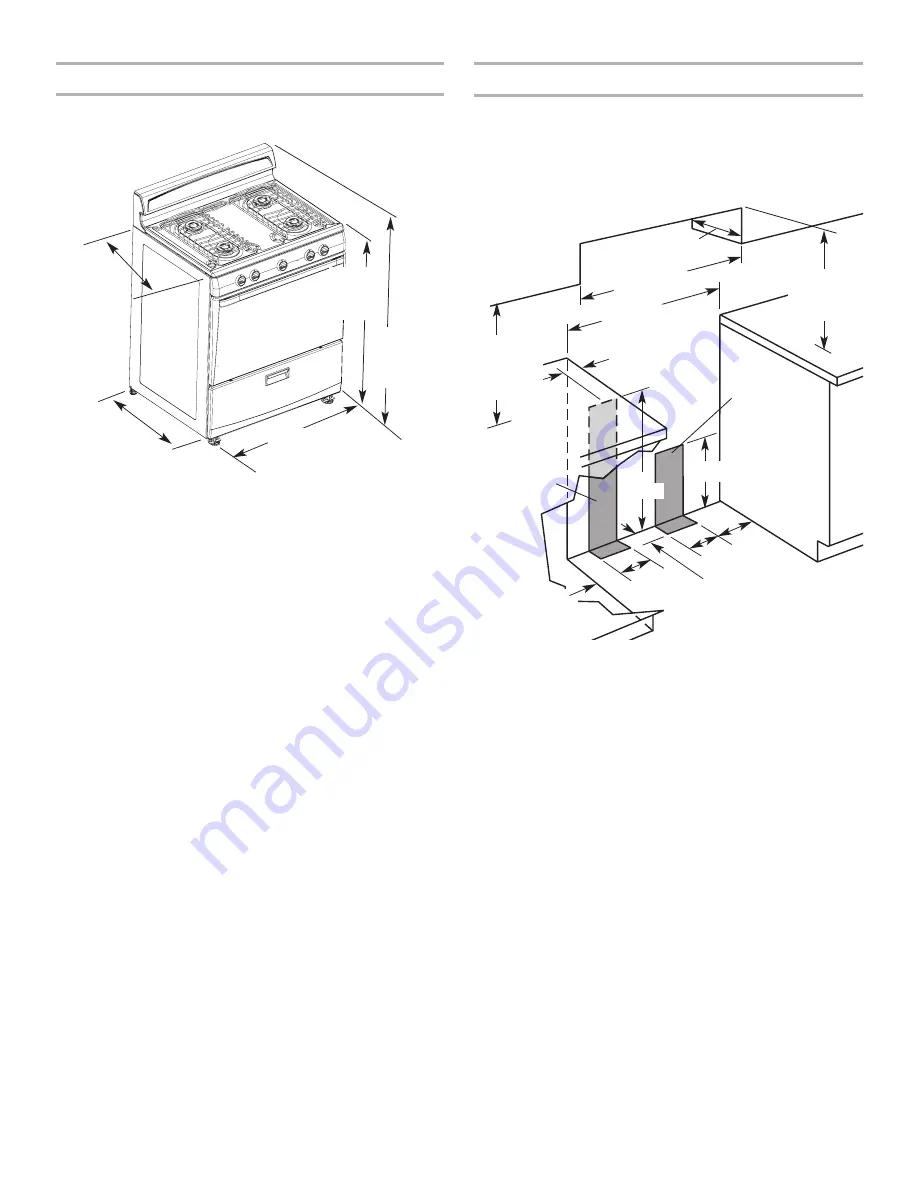
Installation Clearances

Cabinet opening dimensions shown are for 25" (64 cm) counter-
top depth, 24" (61 cm) base cabinet depth and 
36" (91.4 cm) countertop height.

If the cabinet depth is greater than 24" (61 cm), the oven frame
must extend beyond cabinet fronts by 

¹⁄₂

" (13 mm) minimum.

NOTE:

24" (61 cm) minimum when bottom of wood or metal cab-

inet is protected by not less than 

¹⁄₄

" (0.64 cm) flame retardant

millboard covered with not less than No. 28 MSG sheet steel,
0.015" (0.4 mm) stainless steel, 0.024" (0.6 mm) aluminum or
0.020" (0.5 mm) copper.

30" (76.2 cm) minimum clearance between the top of the cooking
platform and the bottom of an unprotected wood or metal cabi-
net.

If installing a range hood or microwave hood combination above
the range, follow the range hood or microwave hood combination
installation instructions for dimensional clearances above the
cooktop surface. 

5

For minimum
clearance to
top of cooktop,
see 

NOTE

.

This shaded area

recommended for

installation 

of gas pipe.

This shaded area

recommended for

electrical outlet.

18" (45.7 cm)
min. clearance
upper side
cabinet to
countertop

13" (33.0 cm) max.
upper cabinet depth

30-1/8" (76.5 cm)
opening width

30" (76.2 cm) min. cabi-
net opening width

8" 

(20.3 cm)

2" 

(5.1 cm)

3" 

(7.6 cm)

5"

(12.7 cm)

5"

(12.7 cm)

10" (25.4 cm)

2" (5.1 cm) min. coun-
tertop space to side
wall or other com-
bustible material

Product Dimensions

29-7/8" (75.9 cm)

width

42" 

(106.7 cm)

overall

height 

24-1/4"

(61.6 cm)

36" 

(91.4 cm)

cooktop

height

26-3/4"
(67.9 cm)
depth with
handle

24" 

(61.0 cm)

Summary of Contents for TGP305TQ

Page 1: ...leave this instruction book with the unit To the consumer Please read and keep this book for future reference INSTALLATION INSTRUCTIONS 30 76 2 CM FREESTANDING GAS RANGE with standard clean oven W10130752A Table of Contents 2 ...

Page 2: ...mbol This symbol alerts you to potential hazards that can kill or hurt you and others All safety messages will follow the safety alert symbol and either the word DANGER or WARNING These words mean follow instructions instructions DANGER WARNING TABLE OF CONTENTS RANGE SAFETY 2 INSTALLATION REQUIREMENTS 4 Tools and Parts 4 Location Requirements 4 Electrical Requirements 6 Gas Supply Requirements 6 ...

Page 3: ... and service must be performed by a qualified installer service agency or the gas supplier Do not use any phone in your building In the State of Massachusetts the following installation instructions apply Installations and repairs must be performed by a qualified or licensed contractor plumber or gasfitter qualified or licensed by the State of Massachusetts If using a ball valve it shall be a T ha...

Page 4: ...clearances The floor anti tip bracket must be installed To install the anti tip bracket shipped with the range see Install Anti Tip Bracket section Grounded electrical supply is required See Electrical Requirements section Proper gas supply connection must be available See Gas Supply Requirements section Contact a qualified floor covering installer to check that the floor covering can withstand at...

Page 5: ...metal cabi net If installing a range hood or microwave hood combination above the range follow the range hood or microwave hood combination installation instructions for dimensional clearances above the cooktop surface 5 For minimum clearance to top of cooktop see NOTE This shaded area recommended for installation of gas pipe This shaded area recommended for electrical outlet 18 45 7 cm min cleara...

Page 6: ...ersonnel and authorized service personnel Failure to do so can result in death explosion or fire Electrical Requirements IMPORTANT The range must be electrically grounded in accor dance with local codes and ordinances or in the absence of local codes with the National Electrical Code ANSI NFPA 70 latest edition If codes permit and a separate ground wire is used it is recom mended that a qualified ...

Page 7: ...lve The valve is for turning on or shutting off gas to the range Gas Pressure Regulator The gas pressure regulator supplied with this range must be used The inlet pressure to the regulator should be as follows for proper operation Natural Gas Minimum pressure 5 WCP Maximum pressure 14 WCP LP Gas Minimum pressure 11 WCP Maximum pressure 14 WCP Contact local gas supplier if you are not sure about th...

Page 8: ... Reconnect the anti tip bracket if the range is moved Failure to follow these instructions can result in death or serious burns to children and adults Install Anti Tip Bracket Contact a qualified floor covering installer for the best procedure for drilling mounting holes through your type floor covering If the cabinet opening is wider than specified in the Location Requirements section adjust the ...

Page 9: ...0 elbow C Black iron pipe D Union E Nipple F Manual shutoff valve G to gas pipe B 8 Move the range close to the opening Remove the shipping base cardboard or hardboard from under the range 9 Open the broiler door Use a 3 8 drive ratchet to lower the rear leveling legs one half turn Use flip joint pliers to lower the front leveling legs one half turn 10 Adjust the leveling legs to the correct heigh...

Page 10: ...igh If the low flame needs adjusting 1 Turn control knob to the LO setting and remove control knob 2 Insert a small flat blade screwdriver into the valve stem Turn the valve adjusting screw to obtain the smallest flame that will not go out when the control of a cold burner is quickly turned from HI to LO Turn right to decrease flame height Turn left to increase flame height Repeat for other cookto...

Page 11: ... Open oven door and remove oven racks oven tray flame spreader and set aside 3 Locate the air shutter near the rear wall of oven and loosen the shutter screw 4 Adjust the air shutter B C A A Oven tray lift up at area shown to remove B Screws C Flame spreader A A Shutter screw B Air shutter B A Complete Installation 1 Check to be sure all parts are now installed If there is an extra part go back th...

Page 12: ...nnected to LP have a qualified person make sure gas pressure does not exceed 14 36 cm water column Examples of a qualified person include licensed heating personnel authorized gas company personnel and authorized service personnel Failure to do so can result in death explosion or fire LP Gas Conversion To Convert Gas Pressure Regulator 1 Ensure that the manual shutoff valve is in the closed positi...

Page 13: ...TANT Do not over tighten 6 Place natural gas oven burner spud in plastic parts bag along with natural gas cooktop burner spuds for future use and keep with bag containing literature 7 Reinstall oven burner 8 Reinstall oven racks oven tray and flame spreader Complete Conversion 1 Refer to the Make Gas Connection section for properly connecting the range to the gas supply 2 Turn the manual shutoff v...

Page 14: ...ect power 3 Open broiler door and remove broiler pan The gas pressure regulator is located in the back right hand corner of the broiler compartment IMPORTANT Do not remove the gas pressure regulator NOTE Do not remove the spring beneath the cap 4 Remove the cap from the gas pressure regulator using a flat blade screwdriver WARNING Tip Over Hazard A child or adult can tip the range and be killed Co...

Page 15: ...long with LP gas cooktop burner spuds for future use and keep with bag containing literature 7 Reinstall oven burner 8 Reinstall oven racks oven tray and flame spreader Complete Conversion 1 Refer to the Make Gas Connection section for properly connecting the range to the gas supply 2 Turn the manual shutoff valve in the gas supply line to the open position 3 Refer to the Check Operation section f...

Page 16: ...W10130752A 2007 Whirlpool Corporation All rights reserved Printed in Mexico 03 2007 ...

Reviews: