background image

31

GARANTIE 

DU CONGÉLATEUR

Garant : WC Wood Company Inc., 677 Woodland Drve, Ottawa, OH 45875

GARANTIE LIMITÉE DE UN AN

Pendant un an à compter de la date d'achat, lorsque ce gros appareil ménager est utilisé et entretenu conformément aux instructions 
jointes à ou fournies avec le produit, le garant paiera pour les pièces de rechange FSP

®

 et la main-d'oeuvre pour corriger les vices de 

matériaux ou de fabrication. Le service doit être fourni par une compagnie de service désignée par Whirlpool.

LE GARANT NE PRENDRA PAS EN CHARGE

1.

Les visites de service pour rectifier l'installation du gros appareil ménager, montrer à l'utilisateur comment utiliser l'appareil, 
remplacer ou réparer des fusibles ou rectifier le câblage ou la plomberie du domicile. 

2.

Les visites de service pour réparer ou remplacer les ampoules électriques de l'appareil, les filtres à air ou les filtres à eau. Ces 
pièces consomptibles ne sont pas couvertes par la garantie.

3.

Les réparations lorsque le gros appareil ménager est utilisé à des fins autres que l'usage unifamilial normal.

4.

Les dommages imputables à : accident, modification, usage impropre ou abusif, incendie, inondation, actes de Dieu, installation
fautive ou installation non conforme aux codes d'électricité ou de plomberie, ou l'utilisation de produits non approuvés par le
garant.

5.

Toute perte d'aliments due à une défaillance du réfrigérateur ou du congélateur.

6.

Le coût des pièces de rechange et de la main-d'œuvre pour les appareils utilisés hors des États-Unis ou du Canada.

7.

Le ramassage et la livraison. Ce gros appareil ménager est conçu pour être réparé à domicile.

8.

Les réparations aux pièces ou systèmes résultant d'une modification non autorisée faite à l'appareil.

9.

Les frais de transport pour le service d'un produit dans les régions éloignées.

10.

La dépose et la réinstallation de votre appareil si celui-ci est installé dans un endroit inaccessible ou n'est pas installé 
conformément aux instructions d'installation fournies.

CLAUSE D'EXONÉRATION DE RESPONSABILITÉ AU TITRE DES GARANTIES IMPLICITES; LIMITATION DES RECOURS

LE SEUL ET EXCLUSIF RECOURS DU CLIENT DANS LE CADRE DE LA PRÉSENTE GARANTIE LIMITÉE CONSISTE EN LA 
RÉPARATION PRÉVUE CI-DESSUS. LES GARANTIES IMPLICITES, Y COMPRIS LES GARANTIES APPLICABLES DE QUALITÉ 
MARCHANDE ET D'APTITUDE À UN USAGE PARTICULIER, SONT LIMITÉES À UN AN OU À LA PLUS COURTE PÉRIODE AUTORISÉE 
PAR LA LOI. LE GARANT N'ASSUME AUCUNE RESPONSABILITÉ POUR LES DOMMAGES FORTUITS OU INDIRECTS. CERTAINES 
JURIDICTIONS NE PERMETTENT PAS L'EXCLUSION OU LA LIMITATION DES DOMMAGES FORTUITS OU INDIRECTS, OU LES 
LIMITATIONS DE LA DURÉE DES GARANTIES IMPLICITES DE QUALITÉ MARCHANDE OU D'APTITUDE À UN USAGE PARTICULIER, 
DE SORTE QUE CES EXCLUSIONS OU LIMITATIONS PEUVENT NE PAS S'APPLIQUER DANS VOTRE CAS. CETTE GARANTIE VOUS 
CONFÈRE DES DROITS JURIDIQUES SPÉCIFIQUES ET VOUS POUVEZ ÉGALEMENT JOUIR D'AUTRES DROITS QUI PEUVENT 
VARIER D'UNE JURIDICTION À UNE AUTRE.

À l'extérieur du Canada et des 50 États des États-Unis, cette garantie ne s'applique pas. Contacter votre marchand Whirlpool autorisé 
pour déterminer si une autre garantie s'applique.

Si vous avez besoin de service, voir d'abord la section “Dépannage” du Guide d'utilisation et d'entretien. Après avoir vérifié la section 
“Dépannage”, de l'aide supplémentaire peut être trouvée en vérifiant la section “Assistance ou service” ou en appelant le garant. Aux     
É.-U., composer le 

1-800-253-1301

. Au Canada, composer le 

1-800-807-6777

.

1/06

Conservez ce manuel et votre reçu de vente ensemble pour 
référence ultérieure. Pour le service sous garantie, vous 
devez présenter un document prouvant la date d'achat ou 
d'installation.

Inscrivez les renseignements suivants au sujet de votre gros 
appareil ménager pour mieux vous aider à obtenir assistance ou 
service en cas de besoin. Vous devrez connaître le numéro de 
modèle et le numéro de série au complet. Vous trouverez ces 
renseignements sur la plaque signalétique située sur le produit.

Nom du marchand ______________________________________________

Adresse ________________________________________________________

Numéro de téléphone ___________________________________________

Numéro de modèle______________________________________________

Numéro de série ________________________________________________

Date d’achat____________________________________________________

Summary of Contents for UPRIGHT FREEZER

Page 1: ...Canada call for assistance 1 800 807 6777 or visit our website at www whirlpool com or www whirlpool com canada CONGÉLATEUR VERTICAL Guided utilisation etd entretien Au Canada pour assistance composez le 1 800 807 6777 ou visitez notre site web à www whirlpool com canada Table of Contents Table des matières 2 1 82738 001 ...

Page 2: ...WARRANTY 16 TABLE DES MATIÈRES SÉCURITÉ DU CONGÉLATEUR 17 Mise au rebut appropriée de votre vieux congélateur ou réfrigérateur 17 INSTRUCTIONS D INSTALLATION 18 Déballage 18 Emplacement d installation 18 Spécifications électriques 18 Spécifications de l alimentation en eau 19 Raccordement de la canalisation d eau 19 Freezer Doors 20 Ajustement de porte 23 UTILISATION DU CONGÉLATEUR 23 Pour s assur...

Page 3: ... your appliance Always read and obey all safety messages This is the safety alert symbol This symbol alerts you to potential hazards that can kill or hurt you and others All safety messages will follow the safety alert symbol and either the word DANGER or WARNING These words mean follow instructions instructions DANGER WARNING IMPORTANT SAFETY INSTRUCTIONS To reduce the risk of fire electric shock...

Page 4: ...o the door can open wider NOTE This freezer may be installed side by side with another refrigerator or freezer Allow for a 3 7 5 cm clearance at the top and sides and a 0 64 cm clearance between the appliances ElectricalRequirements Recommended grounding method A 115 Volt 60 Hz AC only 15 or 20 amp fused grounded electrical supply is required It is recommended that a separate circuit serving only ...

Page 5: ...ply Connection Connect to Water Line 1 Unplug freezer or disconnect power 2 Turn OFF main water supply Turn ON nearest faucet long enough to clear line of water 3 Locate a to 1 12 7 mm to 3 18 cm vertical cold water pipe near the freezer IMPORTANT Make sure it is a cold water pipe Horizontal pipe will work but drill on the top side of the pipe not the bottom This will help keep water away from the...

Page 6: ...d hinge screws and bottom hinge assembly See Bottom Hinge Graphic 1D Reverse Door optional on some models IMPORTANT If you want to reverse your door so that it opens in the opposite direction continue with Reverse Door optional instructions If you are not reversing the door see Replace Door and Hinges Cabinet 1 Remove the cabinet hinge hole plugs from the cabinet top and move them to the opposite ...

Page 7: ...arts of the top hinge as shown in the Top Hinge Graphic 1B Do not tighten the screws completely 8 Line up the door so that the bottom aligns evenly with the cabinet The top and bottom hinges can be adjusted if the doors are not straight Tighten all screws Final Steps 1 Check all holes to make sure that hole plugs and screws are in place Reinstall top hinge cover See Top Hinge Graphic 1B 2 Replace ...

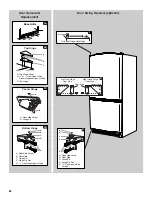
Page 8: ...el C Top Hinge A B C Base Grille 1 A Door Stop Screw B Hinge Pin 1A 1B 1C Bottom Hinge C Hinge Pin A Door Stop Screw B Door Stop E 5 16 Hex Head Hinge Screws D Hinge Pin Nut 1D A B 3 Right Hand Hinge Door Stop Left Hand Hinge Door Stop Lower Hinge Lower Hinge Door Stop 2 E C D A B A Door Stop Screw B Door Stop C Hinge Pin E 5 16 Hex Head Hinge Screws D Hinge Pin Nut E C D A B ...

Page 9: ...7 8 C under normal operating conditions Allow the freezer to cool 6 to 8 hours before filling with frozen food Let the freezer cool overnight before adding large amounts of unfrozen food Never add more than 2 to 3 lbs 907 to 1 350 g of unfrozen food per cubic foot 28 32 L of freezer space NOTE When the freezer is first started the compressor will run constantly until the freezer is cooled It may t...

Page 10: ...the kit with the longer one supplied with the freezer Portable Ice Bin The ice bin may be used as a storage container or a portable ice bucket The lid must be open when used as an ice bin Close the lid to use as a portable ice bucket or storage container Ice Production Rate The ice maker should produce approximately 7 to 9 batches of ice in a 24 hour period If ice is not being made fast enough tur...

Page 11: ...th the openings in the refrigerator compartment liner Lift straight up and pull the shelf out the rest of the way Replace the shelf by lowering the shelf stops through the openings in the refrigerator compartment liner Slide the shelf in the rest of the way DoorBin To remove and replace the bin 1 Remove the bin by tipping the front of the bin up and sliding out 2 Replace the bin by sliding it in a...

Page 12: ...ce wax or auto paste wax with a clean soft cloth Do not wax plastic parts Stainless steel finish Wash with a clean sponge or soft cloth and a mild detergent in warm water Do not use abrasive or harsh cleaners Dry thoroughly with a soft cloth To keep your stainless steel refrigerator looking like new and to remove minor scuffs or marks it is suggested that you use the manufacturer s approved Stainl...

Page 13: ...of an unnecessary service call Your freezer will not operate Is the power supply cord unplugged Plug into a grounded 3 prong outlet Has a household fuse blown or circuit breaker tripped Replace the fuse or reset the circuit breaker Is the Temperature Control turned to the OFF position See Using the Control Is the freezer defrosting on some models Recheck to see whether the freezer is operating in ...

Page 14: ...s not producing ice or not enough ice on some models Has the ice maker just been installed Wait 72 hours for full ice production to begin Once your freezer is cooled the ice maker should produce 70 120 cubes every 24 hours Is the freezer temperature cold enough to produce ice Wait 24 hours after hookup for ice production See Using the Control Is the wire shutoff arm in the OFF arm up position Lowe...

Page 15: ... run Has the local power failed Unplug the freezer for 30 minutes to allow the refrigeration system to equalize During this time keep the door closed whenever possible ASSISTANCE OR SERVICE Before calling for assistance or service please check Troubleshooting It may save you the cost of a service call If you still need help follow the instructions below When calling please know the purchase date a...

Page 16: ...F REMEDIES CUSTOMER S SOLE AND EXCLUSIVE REMEDY UNDER THIS LIMITED WARRANTY SHALL BE PRODUCT REPAIR AS PROVIDED HEREIN IMPLIED WARRANTIES INCLUDING WARRANTIES OF MERCHANTABILITY OR FITNESS FOR A PARTICULAR PURPOSE ARE LIMITED TO ONE YEAR OR THE SHORTEST PERIOD ALLOWED BY LAW WARRANTOR SHALL NOT BE LIABLE FOR INCIDENTAL OR CONSEQUENTIAL DAMAGES SOME STATES AND PROVINCES DO NOT ALLOW THE EXCLUSION O...

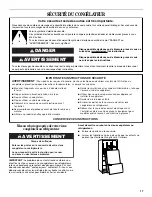
Page 17: ...e symbole d alerte de sécurité Ce symbole d alerte de sécurité vous signale les dangers potentiels de décès et de blessures graves à vous et à d autres Tous les messages de sécurité suivront le symbole d alerte de sécurité et le mot DANGER ou AVERTISSEMENT Ces mots signifient IMPORTANTES INSTRUCTIONS DE SÉCURITÉ Pour réduire les risques d incendie de choc électrique ou des blessures lors de l util...

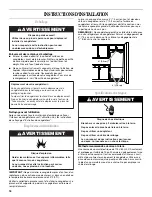
Page 18: ...ngélateur Permet un dégagement de 3 7 5 cm sur le dessus et les côtés et un dégagement de 0 64 cm entre les appareils Spécificationsélectriques Méthode recommandée de mise à la terre Une source de courant électrique de 115 V 60 Hz CA seulement et protégée par fusible de 15 ou 20 ampères adéquatement mise à la terre est nécessaire Il est recommandé d utiliser un circuit distinct pour alimenter uniq...

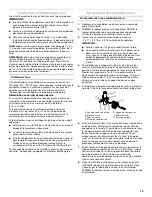
Page 19: ...tions au sujet de la pression de votre eau consulter Dépannage ou appeler un plombier qualifié agréé Raccordementdelacanalisationd eau Raccordement à une canalisation d eau 1 Débrancher le congélateur ou déconnecter la source de courant électrique 2 FERMER le robinet principal d arrivée d eau OUVRIR le robinet de puisage le plus proche pendant une période suffisante pour que la canalisation d eau ...

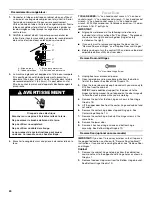
Page 20: ...remove food and adjustable door or utility bins from door Remove Door and Hinges Hex Head Hinge Screw 1 Unplug freezer or disconnect power 2 Open lower door and remove base grille from the bottom front of the freezer See Base Grille Graphic 1A 3 Close the lower door and keep it closed until you are ready to lift it free from the cabinet NOTE Provide additional support for the door while the hinges...

Page 21: ...s NOTE Graphic may be reversed if door swing is reversed 1 Replace the parts for the bottom hinge as shown and tighten screws See Bottom Hinge Graphic 1D 2 Rotate and install center hinge See Center Hinge Graphic 1C 3 Replace the lower door NOTE Provide additional support for the door while the hinges are being moved Do not depend on the door magnets to hold the door in place while you are working...

Page 22: ...del C Top Hinge A B C Base Grille 1 A Door Stop Screw B Hinge Pin 1A 1B 1C Bottom Hinge C Hinge Pin A Door Stop Screw B Door Stop E 5 16 Hex Head Hinge Screws D Hinge Pin Nut 1D A B 3 Right Hand Hinge Door Stop Left Hand Hinge Door Stop Lower Hinge Lower Hinge Door Stop 2 E C D A B A Door Stop Screw B Door Stop C Hinge Pin E 5 16 Hex Head Hinge Screws D Hinge Pin Nut E C D A B ...

Page 23: ...C dans des conditions normales d utilisation Laisser le congélateur refroidir pendant 6 à 8 heures avant de le remplir d aliments congelés Laisser le congélateur refroidir une nuit avant d ajouter de grandes quantités d aliments non congelés Ne jamais ajouter plus de 2 à 3 lb 907 à 1350 g d aliments non congelés par pied cube 28 32 L d espace de congélation REMARQUE Lors de la mise en marche initi...

Page 24: ... ice cubes fill the ice storage bin and the ice cubes will raise the wire shutoff arm to the OFF arm up position To manually turn the ice maker off lift the wire shutoff arm to the OFF arm up position and listen for the click to make sure the ice maker will not continue to operate Shut Off Arm When installing an ice maker kit it is necessary to replace the shut off arm that is included with the ki...

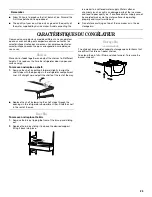
Page 25: ...tiques peuvent ne pas correspondre au modèle que vous avez Shelves Store similar foods together and adjust the shelves to fit different heights This reduces the time the refrigerator door is open and saves energy To remove and replace a shelf 1 Remove the shelf by pulling it forward slightly to align the shelf stops with the openings in the refrigerator compartment liner Lift straight up and pull ...

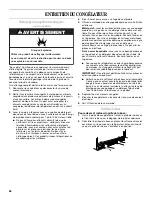
Page 26: ...térieures avec une éponge propre ou un linge doux et un détergent doux dans de l eau tiède Ne pas utiliser de nettoyant fort ou abrasif ni de nettoyant conçu pour l acier inoxydable Sécher à fond avec un linge doux Pour mieux protéger les surfaces métalliques extérieures peintes contre les dommages appliquer une cire pour appareil électroménager ou cire en pâte pour automobiles avec un linge propr...

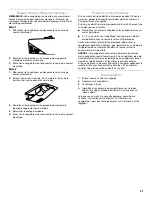
Page 27: ...s de 24 heures faire l une des choses suivantes Retirer tous les aliments congelés et les entreposer dans un casier frigorifique S il n y a pas de casier frigorifique consommer ou mettre immédiatement en conserve les aliments périssables Après avoir rétabli l alimentation électrique débrancher le congélateur pendant 30 minutes pour permettre au système de réfrigération de se stabiliser Pendant ce ...

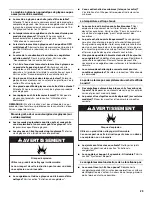
Page 28: ...congélateur L addition d une grande quantité d aliments réchauffe le congélateur Il est normal que le moteur fonctionne plus longtemps afin de refroidir de nouveau le congélateur La porte est elle ouverte fréquemment Prévoir que le moteur fonctionnera plus longtemps dans ce cas Afin de conserver l énergie essayer de sortir tout ce dont vous avez besoin à la fois garder les aliments organisés de so...

Page 29: ...tre nettoyés Voir la section Entretien du congélateur L eau contient elle des minéraux tels que le soufre L installation d un filtre peut être requise afin d enlever les minéraux La température est trop chaude Les ouvertures d aération sont elles bloquées Ceci empêche le mouvement de l air froid Enlever les objets devant les ouvertures Voir la section Pour s assurer d une circulation d air appropr...

Page 30: ... pièces spécifiées par l usine Les pièces spécifiées par l usine conviendront et fonctionneront bien car elles sont fabriquées selon la même précision utilisée pour fabriquer chaque nouvel appareil WHIRLPOOL Pour savoir où trouver des pièces spécifiées par l usine dans votre région nous appeler ou contacter le centre de service désigné le plus proche Téléphoner au service de clientèle des États Un...

Page 31: ...S LE SEUL ET EXCLUSIF RECOURS DU CLIENT DANS LE CADRE DE LA PRÉSENTE GARANTIE LIMITÉE CONSISTE EN LA RÉPARATION PRÉVUE CI DESSUS LES GARANTIES IMPLICITES Y COMPRIS LES GARANTIES APPLICABLES DE QUALITÉ MARCHANDE ET D APTITUDE À UN USAGE PARTICULIER SONT LIMITÉES À UN AN OU À LA PLUS COURTE PÉRIODE AUTORISÉE PAR LA LOI LE GARANT N ASSUME AUCUNE RESPONSABILITÉ POUR LES DOMMAGES FORTUITS OU INDIRECTS ...

Page 32: ...ark TM Trademark of Whirlpool U S A Manufactured under license by W C Wood Company Incorporated Ottawa OH 45875 Marque déposée TM Marque de commerce de Whirlpool U S A Fabriqué sous licence par W C Wood Company Incorporated Ottawa OH 45875 5 06 Printed in U S A Imprimé aux É U ...

Reviews: