background image

14

WHIRLPOOL CORPORATION MAJOR APPLIANCE WARRANTY

ONE YEAR LIMITED WARRANTY

For one year from the date of purchase, when this major appliance is operated and maintained according to instructions attached to or 
furnished with the product, Whirlpool Corporation or Whirlpool Canada LP (hereafter “Whirlpool”) will pay for Factory Specified Parts 
and repair labor to correct defects in materials or workmanship. Service must be provided by a Whirlpool designated service company. 
This limited warranty applies only when the major appliance is used in the country in which it was purchased.

ITEMS WHIRLPOOL WILL NOT PAY FOR

1.

Service calls to correct the installation of your major appliance, to instruct you how to use your major appliance, to replace or repair 
house fuses or to correct house wiring or plumbing. 

2.

Service calls to repair or replace appliance light bulbs, air filters or water filters. Those consumable parts are excluded from warranty 
coverage.

3.

Repairs when your major appliance is used for other than normal, single-family household use.

4.

Damage resulting from accident, alteration, misuse, abuse, fire, flood, acts of God, improper installation, installation not in 
accordance with electrical or plumbing codes, or use of products not approved by Whirlpool.

5.

Any food loss due to refrigerator or freezer product failures.

6.

Replacement parts or repair labor costs for units operated outside the United States or Canada.

7.

Pickup and delivery. This major appliance is designed to be repaired in the home.

8.

Repairs to parts or systems resulting from unauthorized modifications made to the appliance.

9.

Expenses for travel and transportation for product service in remote locations.

10.

The removal and reinstallation of your appliance if it is installed in an inaccessible location or is not installed in accordance with 
published installation instructions.

11.

Replacement parts or repair labor costs when the major appliance is used in a country other than the country in which it was 
purchased.


DISCLAIMER OF IMPLIED WARRANTIES; LIMITATION OF REMEDIES

CUSTOMER'S SOLE AND EXCLUSIVE REMEDY UNDER THIS LIMITED WARRANTY SHALL BE PRODUCT REPAIR AS PROVIDED 
HEREIN. IMPLIED WARRANTIES, INCLUDING WARRANTIES OF MERCHANTABILITY OR FITNESS FOR A PARTICULAR PURPOSE, 
ARE LIMITED TO ONE YEAR OR THE SHORTEST PERIOD ALLOWED BY LAW. WHIRLPOOL SHALL NOT BE LIABLE FOR 
INCIDENTAL OR CONSEQUENTIAL DAMAGES. SOME STATES AND PROVINCES DO NOT ALLOW THE EXCLUSION OR LIMITATION 
OF INCIDENTAL OR CONSEQUENTIAL DAMAGES, OR LIMITATIONS ON THE DURATION OF IMPLIED WARRANTIES OF 
MERCHANTABILITY OR FITNESS, SO THESE EXCLUSIONS OR LIMITATIONS MAY NOT APPLY TO YOU. THIS WARRANTY GIVES 
YOU SPECIFIC LEGAL RIGHTS AND YOU MAY ALSO HAVE OTHER RIGHTS, WHICH VARY FROM STATE TO STATE OR PROVINCE 
TO PROVINCE.


Outside the 50 United States and Canada, this warranty does not apply. Contact your authorized Whirlpool dealer to determine if 
another warranty applies.

If you need service, first see the “Troubleshooting” section of the Use & Care Guide. After checking “Troubleshooting,” additional help 
can be found by checking the “Assistance or Service” section or by calling Whirlpool. In the U.S.A., call 

1-800-253-1301

. In Canada, 

call 

1-800-807-6777

.

12/05

Keep this book and your sales slip together for future 
reference. You must provide proof of purchase or installation 
date for in-warranty service.

Write down the following information about your major appliance 
to better help you obtain assistance or service if you ever need it. 
You will need to know your complete model number and serial 
number. You can find this information on the model and serial 
number label located on the product.

Dealer name____________________________________________________

Address ________________________________________________________

Phone number __________________________________________________

Model number __________________________________________________

Serial number __________________________________________________

Purchase date __________________________________________________

Summary of Contents for W10029770A

Page 1: ...CTIONS POUR UTILISATION RÉSIDENTIELLE UNIQUEMENT IMPORTANT Installer Leave installation instructions with the homeowner Homeowner Keep installation instructions for future reference Save installation instructions for local electrical inspector s use IMPORTANT Installateur Remettre les instructions d installation au propriétaire Propriétaire Conserver les instructions d installation pour référence ...

Page 2: ...arge à l extérieur uniquement 22 Raccordement électrique 23 Achever l installation 23 Installation des filtres 24 Contrôle du fonctionnement 24 UTILISATION DE LA HOTTE DE CUISINIÈRE 24 Fonctionnement 24 ENTRETIEN DE LA HOTTE DE CUISINIÈRE 24 Nettoyage et entretien 24 SCHÉMA DE CÂBLAGE 26 ASSISTANCE OU SERVICE 27 GARANTIE 28 RANGE HOOD SAFETY You can be killed or seriously injured if you don t imme...

Page 3: ...aust air be sure to duct air outside do not vent exhaust air into spaces within walls ceilings attics crawl spaces or garages WARNING TO REDUCE THE RISK OF FIRE USE ONLY METAL DUCTWORK WARNING TO REDUCE THE RISK OF A RANGE TOP GREASE FIRE Never leave the surface units unattended at high settings Boilovers cause smoking and greasy spillovers that may ignite Heat oils slowly on low or medium setting...

Page 4: ...cian install the range hood It is the installer s responsibility to comply with installation clearances specified on the model serial rating plate The model serial rating plate is located behind the left filter on the rear wall of the vent hood Canopy hood location should be away from strong draft areas such as windows doors and strong heating vents Cabinet opening dimensions that are shown must b...

Page 5: ...ld be on the cold air side of the thermal break The break should be as close as possible to where the vent system enters the heated portion of the house Makeup air Local building codes may require the use of make up air systems when using ventilation systems greater than specified CFM of air movement The specified CFM varies from locale to locale Consult your HVAC professional for specific require...

Page 6: ...st Pleasant Valley Road Cleveland OH 44131 5575 A 120 Volt 60 Hz AC only 15 amp fused electrical circuit is required Do not ground to a gas pipe Check with a qualified electrician if you are not sure range hood is properly grounded Do not have a fuse in the neutral or ground circuit The range hood must be connected with copper wire only The range hood should be connected directly to the fused disc...

Page 7: ...ed recirculating installations 7 Tape template in place aligning the template centerline and bottom of template with hood bottom line and with the centerline marked on the wall 8 Mark centers of the 6 fastener locations through the template to the wall IMPORTANT All screws must be installed into wood Remove the template 9 Drill 2 75 mm pilot holes at all locations where screws are being installed ...

Page 8: ...ssemble the 3 parts of the deflector with two 3 5 x 9 5 mm screws provided The assembled deflector should be sized to fit the width of the vent cover bracket installed earlier 2 Connect the deflector to the vent cover bracket using four 3 5 x 9 5 mm screws provided 3 Measure length of 6 15 2 cm vent needed to connect the transition to the deflector NOTE Vent should fit up inside deflector a minimu...

Page 9: ... UL listed wire connectors and connect white wires together 7 Connect ground wire to green and yellow ground wire in terminal box using UL listed wire connectors A Mounting hooks B Mounting screws C Leveling screws D Centerline on wall E Transition F 3 5 x 9 5 mm screws G Terminal box A Vent system B Transition piece WARNING Excessive Weight Hazard Use two or more people to move and install range ...

Page 10: ...o turn off the blower 5 If range hood does not operate check to see whether a circuit breaker has tripped or a household fuse has blown 6 Disconnect power supply 7 Check that the wiring is correct 8 Replace all parts and panels before operating 9 Reconnect power NOTE To get the most efficient use from your new range hood read the Range Hood Use section RANGE HOOD USE Operation The canopy hood is d...

Page 11: ...grease filters by pushing handle toward the rear and pull downward 3 Pull filter toward front and set aside 4 Repeat to remove other metal filter 5 Install charcoal filter over grille on blower housing and turn filter handle clockwise 6 Repeat to install other charcoal filter To Replace Metal Grease Filters 1 Insert back edge of filter into rear channel of the filter opening 2 Push handle toward t...

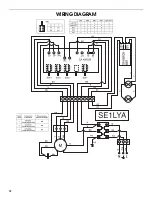
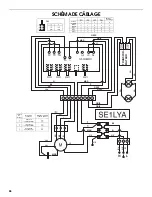
Page 12: ...12 WIRING DIAGRAM ...

Page 13: ...warranty service anywhere in the United States To locate the Whirlpool designated service company in your area you can also look in your telephone directory Yellow Pages For further assistance If you need further assistance you can write to Whirlpool Corporation with any questions or concerns at Whirlpool Brand Home Appliances Customer eXperience Center 553 Benson Road Benton Harbor MI 49022 2692 ...

Page 14: ... appliance is used in a country other than the country in which it was purchased DISCLAIMER OF IMPLIED WARRANTIES LIMITATION OF REMEDIES CUSTOMER S SOLE AND EXCLUSIVE REMEDY UNDER THIS LIMITED WARRANTY SHALL BE PRODUCT REPAIR AS PROVIDED HEREIN IMPLIED WARRANTIES INCLUDING WARRANTIES OF MERCHANTABILITY OR FITNESS FOR A PARTICULAR PURPOSE ARE LIMITED TO ONE YEAR OR THE SHORTEST PERIOD ALLOWED BY LA...

Page 15: ...as de non respect des instructions Votre sécurité et celle des autres est très importante Nous donnons de nombreux messages de sécurité importants dans ce manuel et sur votre appareil ménager Assurez vous de toujours lire tous les messages de sécurité et de vous y conformer AVERTISSEMENT DANGER Voici le symbole d alerte de sécurité Ce symbole d alerte de sécurité vous signale les dangers potentiel...

Page 16: ...e pas décharger l air aspiré dans un espace vide du bâtiment comme une cavité murale un plafond un grenier un vide sanitaire ou un garage AVERTISSEMENT POUR RÉDUIRE LE RISQUE D INCENDIE UTILISER UNIQUEMENT DES CONDUITS MÉTALLIQUES AVERTISSEMENT POUR MINIMISER LE RISQUE D UN FEU DE GRAISSE SUR LA CUISINIÈRE Ne jamais laisser un élément de surface fonctionner à puissance de chauffage maximale sans s...

Page 17: ...nts en vigueur Confier l installation de la hotte à un technicien qualifié C est à l installateur qu incombe la responsabilité de respecter les distances de séparation exigées spécifiées sur la plaque signalétique de l appareil La plaque signalétique de l appareil est située derrière le filtre de gauche sur la paroi arrière de la hotte On doit toujours installer la hotte à distance des sources de ...

Page 18: ... nombre de coudes Ne pas utiliser plus de trois coudes à 90 Veiller à ce qu il y ait une section droite de conduit de 24 61 cm ou plus entre deux coudes si on doit utiliser plus de un raccord coudé Ne pas installer 2 coudes ensemble Au niveau de chaque jointure du conduit de décharge assurer l étanchéité avec des brides Autour de la bouche de décharge à l extérieur assurer l étanchéité avec un pro...

Page 19: ...n et des turbulences de l air ce qui réduit considérablement la performance La sortie à l extérieur du circuit d évacuation peut se faire à travers le toit ou à travers un mur Pour la sortie à travers un mur on doit employer un raccord coudé à 90 Décharge par l arrière Le raccord coudé à 90 peut être installé immédiatement au dessus de la hotte Installation sans décharge à l extérieur recyclage S ...

Page 20: ...lements en vigueur Un serre câble de 12 7 mm homologation UL ou CSA doit être installé à chaque extrémité du câble d alimentation sur la hotte et sur le boîtier de distribution INSTRUCTIONS D INSTALLATION Préparationdel emplacement On recommande que le circuit d évacuation soit installé avant l installation de la hotte On ne doit couper un poteau de colombage ou une solive que si c est absolument ...

Page 21: ...ent terminé l installation 14 Fixer 2 crochets de montage au mur aux emplacements marqués sur le gabarit Installation de la bride de cache conduit Installation avec utilisation de télescope et des sections supérieure et inférieure du cache conduit 1 Positionner la bride de cache conduit sur le mur à environ 3 mm du plafond 2 Faire des repères aux emplacements des trous 3 Percer des trous de 9 5 mm...

Page 22: ...de la hotte utiliser les vis de réglage de l aplomb dans les crochets de montage ou les ouvertures rectangulaires placer un niveau en travers du bas de la hotte pour le contrôle 3 Immobiliser la hotte avec 4 vis de 5 x 35 mm placées dans les 4 trous restants de la hotte 4 Installer le raccord de transition avec 2 vis Installationduconduitd évacuation pourinstallationsavecdéchargeàl extérieur uniqu...

Page 23: ... section inférieure du cache conduit vers le bas sur la hotte et soulever la section supérieure du cache conduit vers le plafond et installer les 2 vis de 2 9 x 9 5 mm Connecter les sections supérieure et inférieure du cache conduit avec 2 vis de 3 5 x 9 5 mm pour chaque section à partir de l intérieur de la hotte A Serre câble homologation UL ou CSA B Conduit de C Boîte de connexion D Conducteurs...

Page 24: ...cuisson Pour obtenir les meilleurs résultats mettre le ventilateur de la hotte en marche avant d entreprendre une cuisson et laisser le ventilateur fonctionner pendant plusieurs minutes après l achèvement d une cuisson pour pouvoir évacuer de la cuisine toute trace d odeur de cuisson vapeur ou fumée Tableau de commande de la hotte Les commandes de la hotte sont situées à l avant de la hotte Comman...

Page 25: ... bord arrière du filtre dans la rainure arrière de l ouverture d installation du filtre 2 Pousser la manette vers l arrière et pousser le filtre vers le haut 3 Tirer le filtre vers l avant pour l insérer dans la rainure avant Remplacement des filtres à charbon 1 Commander l arrêt du ventilateur et l extinction des lampes Vérifier que la lampe à halogène est froide 2 Retirer les filtres à graisse m...

Page 26: ...OR MATEUR Vitesse du moteur Broches de connexion Résistance ohms entre les broches rouge noir conn jaune blanc rouge jaune conn jaune blanc rouge jaune conn jaune noir BL BL BL BL BL MAR MAR MAR MAR GRIS GRIS GRIS GRIS GRIS GRIS N N N JA JA JA JA JA JA JA N N J V J V J V J V ...

Page 27: ...clientèle de Whirlpool Canada LP au 1 800 807 6777 Nos consultants vous renseigneront sur les sujets suivants Caractéristiques et spécifications sur toute notre gamme d appareils électroménagers Consignes d utilisation et d entretien Ventes d accessoires et pièces de rechange Références aux marchands locaux aux distributeurs de pièces de rechange et aux compagnies de service Les techniciens de ser...

Page 28: ...té CLAUSE D EXONÉRATION DE RESPONSABILITÉ AU TITRE DES GARANTIES IMPLICITES LIMITATION DES RECOURS LE SEUL ET EXCLUSIF RECOURS DU CLIENT DANS LE CADRE DE LA PRÉSENTE GARANTIE LIMITÉE CONSISTE EN LA RÉPARATION PRÉVUE CI DESSUS LES GARANTIES IMPLICITES Y COMPRIS LES GARANTIES APPLICABLES DE QUALITÉ MARCHANDE ET D APTITUDE À UN USAGE PARTICULIER SONT LIMITÉES À UN AN OU À LA PLUS COURTE PÉRIODE AUTOR...

Reviews: