background image

2

INSTALLATION REQUIREMENTS

Tools and Parts

Gather the required tools and parts before starting installation. 
The parts supplied are in the washer basket. 

Tools needed for connecting the drain hose and water 
inlet hoses: 

Parts supplied: 

Tools needed for securing the drain hose and leveling 
the washer:

Parts supplied:  

Alternate Parts

Your installation may require additional parts. For information on 
ordering, please refer to the toll-free phone numbers on the front 
page of the Washer User Instructions.  

Location Requirements

Selecting the proper location for your washer improves 
performance and minimizes noise and possible washer “walk.”
Your washer can be installed in a basement, laundry room, closet, 
or recessed area. See “Drain System.”
IMPORTANT: Do not install or store the washer where it will be 
exposed to the weather.
Proper installation is your responsibility.

You will need:

A water heater set to deliver 49°C (120°F) water to the washer.

An earthed electrical outlet located within 1.2 m (4 ft) of where 
the power cord is attached to the back of the washer. See 
“Electrical Requirements.”

Hot and cold water faucets located within 90 cm (3 ft) of the 
hot and cold water fill valves, and water pressure of 34.5-
690 kPa (5-100 psi). Washers with triple dispensers require 
138-690 kPa (20-100 psi) for best performance.

A level floor with a maximum slope of 2.5 cm (1") under entire 
washer. Installing the washer on carpeting is not 
recommended. Ventilation openings in the base must not be 
obstructed by carpet.

A sturdy floor to support the washer weight (washer, water 
and load) of 143 kg (315 lbs).

Do not store or operate your washer in temperatures at or below 
0°C (32°F). Some water can remain in the washer and can cause 
damage in low temperatures. See “Washer Care” in the Washer 
User Instructions for winterizing information.

Pliers that open to 
3.95 cm (1

⁹⁄₁₆

") 

Flashlight (optional)

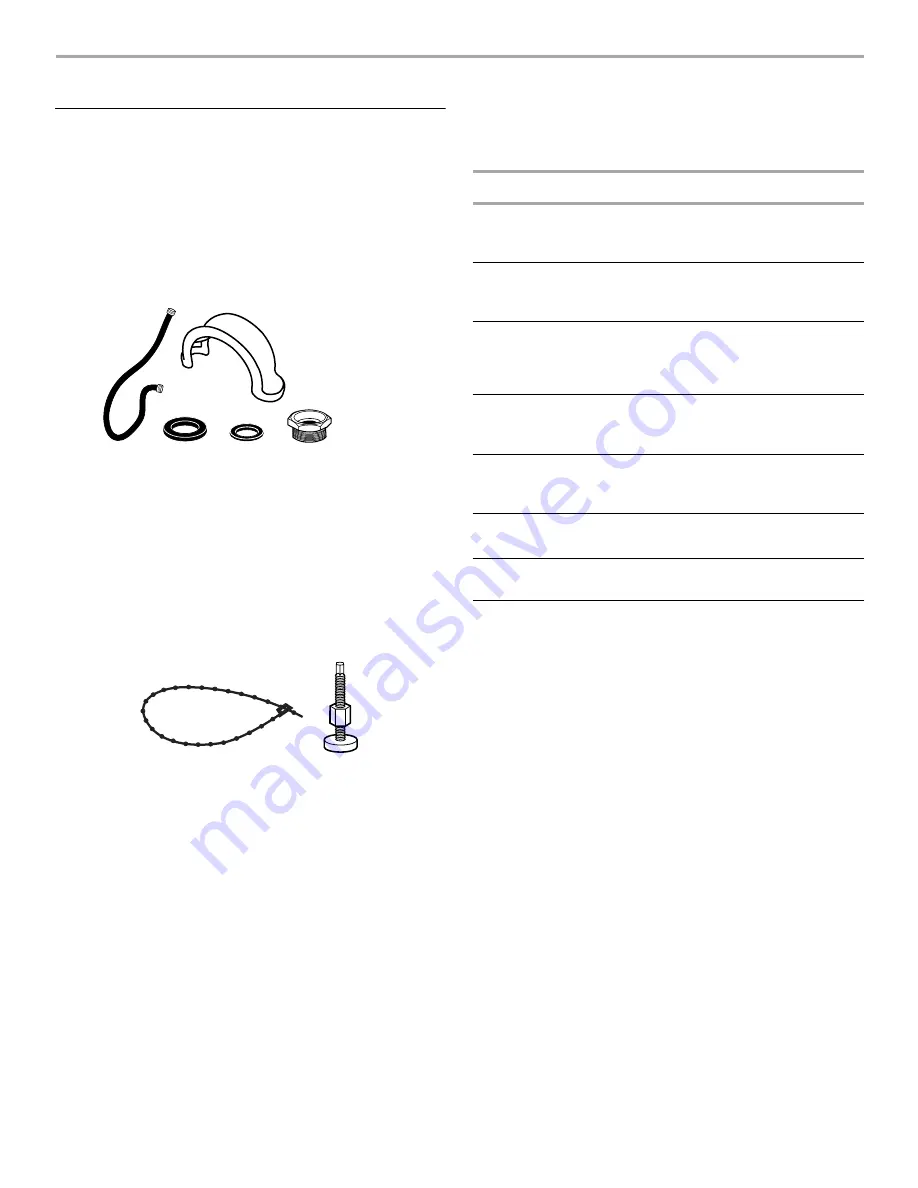
A. Water inlet hose (2)
B. Drain hose form

C. Large flat washer (4)

D. Small flat washer (2)

E. Inlet hose adapter

Adjustable or open end 
wrench 14 mm (

⁹⁄₁₆

")

Level

Wood block

Ruler or measuring tape

A. Beaded tie strap
B. Front leveling feet with nuts (2)

A

B

C

D

E

A

B

If You Have:

You Will Need to Buy:

Laundry tub or 
standpipe taller 
than 2.4 m (96")

Sump pump system (if not already 
available)

2.5 cm (1") 
diameter 
standpipe

3.2 cm (1

¹⁄₄

") diameter to 2.5 cm (1") 

diameter standpipe adapter kit, 
Part Number 280130

Overhead sewer

Standard 76 L (20 gal.) 99 cm (39") tall 
drain tub or utility sink, sump pump and 
connectors (available from local 
plumbing suppliers)

Floor drain

Siphon break kit, Part Number 280129; 
additional drain hose, 
Part Number 3357090

Water faucets 
beyond reach of fill 
hoses

2 longer water fill hoses: 
1.8 m (6 ft) Part Number 76314, 
3.0 m (10 ft) Part Number 350008 

Drain hose too 
short

Drain hose kit, Part Number 280131

Lint clogged drain

Drain protector, Part Number 367031

Summary of Contents for W10038080

Page 1: ...d or seriously injured if you don t follow All safety messages will tell you what the potential hazard is tell you how to reduce the chance of injury and tell you what can happen if the instructions are not followed Your safety and the safety of others are very important We have provided many important safety messages in this manual and on your appliance Always read and obey all safety messages Th...

Page 2: ...e A level floor with a maximum slope of 2 5 cm 1 under entire washer Installing the washer on carpeting is not recommended Ventilation openings in the base must not be obstructed by carpet A sturdy floor to support the washer weight washer water and load of 143 kg 315 lbs Do not store or operate your washer in temperatures at or below 0 C 32 F Some water can remain in the washer and can cause dama...

Page 3: ...m 1 diameter standpipe adapter kit is provided The top of the standpipe must be at least 99 cm 39 high and no higher than 244 cm 96 from the bottom of the washer Laundry tub drain system view C The laundry tub needs a minimum 76 L 20 gal capacity The top of the laundry tub must be at least 99 cm 39 above the floor and no higher than 244 cm 96 from the bottom of the washer Floor drain system view D...

Page 4: ...ing materials on the rear of the machine near the bottom Follow the steps for your particular model either the one with the straight power cord and cord restraint or the looped power cord version Straight power cord 1 Remove power plug and yellow strap from machine base to release the rear leveling system EARTHING INSTRUCTIONS For an earthed cord connected washer This washer must be earthed In the...

Page 5: ...ely removed from washer 2 Check that two 2 cotter pins were removed with the shipping strap ConnectDrainHose Proper connection of the drain hose protects your floors from damage due to water leakage Read and follow these instructions The drain hose is connected to your washer and is stored inside the washer cabinet Remove drain hose from washer cabinet Gently pull the corrugated drain hose out of ...

Page 6: ...cets Make sure the washer basket is empty 1 Attach the end of the hose with the adapter labeled hot to the hot water faucet Screw on coupling by hand until it is seated on the washer 2 Attach the end of the hose with the adapter labeled cold to the cold water faucet Screw on coupling by hand until it is seated on the washer 3 Using pliers tighten the couplings with an additional two thirds turn NO...

Page 7: ...nce If you connect only one water hose you must cap off the remaining water inlet port Periodically inspect and replace hoses if bulges kinks cuts wear or leaks are found SecuretheDrainHose 1 Remove the shipping strap from the power cord Drape the power cord over the console 2 Remove any cardboard used to move washer 3 Wrap the drain hose to the laundry tub leg or drain standpipe with the beaded t...

Page 8: ...asher may vibrate CompleteInstallation 1 Check the electrical requirements Be sure that you have the correct electrical supply and the recommended earthing method See Electrical Requirements 2 Check that all parts are now installed If there is an extra part go back through the steps to see which step was skipped 3 Check that you have all of your tools 4 Check that the yellow shipping strap was com...

Reviews: