background image

15

WHIRLPOOL CORPORATION MAJOR APPLIANCE WARRANTY

ONE YEAR LIMITED WARRANTY

For one year from the date of purchase, when this major appliance is operated and maintained according to instructions attached to or 
furnished with the product, Whirlpool Corporation or Whirlpool Canada LP (hereafter “Whirlpool”) will pay for Factory Specified Parts 
and repair labor to correct defects in materials or workmanship. Service must be provided by a Whirlpool designated service company. 
This limited warranty applies only when the major appliance is used in the country in which it was purchased.

ITEMS WHIRLPOOL WILL NOT PAY FOR

1. Service calls to correct the installation of your major appliance, to instruct you how to use your major appliance, to replace or repair 

house fuses or to correct house wiring or plumbing. 

2. Service calls to repair or replace appliance light bulbs, air filters or water filters. Those consumable parts are excluded from warranty 

coverage.

3. Repairs when your major appliance is used for other than normal, single-family household use.

4. Damage resulting from accident, alteration, misuse, abuse, fire, flood, acts of God, improper installation, installation not in 

accordance with electrical or plumbing codes, or use of products not approved by Whirlpool.

5. Any food loss due to refrigerator or freezer product failures.

6. Replacement parts or repair labor costs for units operated outside the United States or Canada.

7. Pickup and delivery. This major appliance is designed to be repaired in the home.

8. Repairs to parts or systems resulting from unauthorized modifications made to the appliance.

9. Expenses for travel and transportation for product service in remote locations.

10. The removal and reinstallation of your appliance if it is installed in an inaccessible location or is not installed in accordance with 

published installation instructions.

11. Replacement parts or repair labor costs when the major appliance is used in a country other than the country in which it was 

purchased.


DISCLAIMER OF IMPLIED WARRANTIES; LIMITATION OF REMEDIES

CUSTOMER'S SOLE AND EXCLUSIVE REMEDY UNDER THIS LIMITED WARRANTY SHALL BE PRODUCT REPAIR AS PROVIDED 
HEREIN. IMPLIED WARRANTIES, INCLUDING WARRANTIES OF MERCHANTABILITY OR FITNESS FOR A PARTICULAR PURPOSE, 
ARE LIMITED TO ONE YEAR OR THE SHORTEST PERIOD ALLOWED BY LAW. WHIRLPOOL SHALL NOT BE LIABLE FOR 
INCIDENTAL OR CONSEQUENTIAL DAMAGES. SOME STATES AND PROVINCES DO NOT ALLOW THE EXCLUSION OR LIMITATION 
OF INCIDENTAL OR CONSEQUENTIAL DAMAGES, OR LIMITATIONS ON THE DURATION OF IMPLIED WARRANTIES OF 
MERCHANTABILITY OR FITNESS, SO THESE EXCLUSIONS OR LIMITATIONS MAY NOT APPLY TO YOU. THIS WARRANTY GIVES 
YOU SPECIFIC LEGAL RIGHTS AND YOU MAY ALSO HAVE OTHER RIGHTS, WHICH VARY FROM STATE TO STATE OR PROVINCE 
TO PROVINCE.


Outside the 50 United States and Canada, this warranty does not apply. Contact your authorized Whirlpool dealer to determine if 
another warranty applies.

If you need service, first see the “Troubleshooting” section of the Use & Care Guide. After checking “Troubleshooting,” additional help 
can be found by checking the “Assistance or Service” section or by calling Whirlpool. In the U.S.A., call 1-800-253-1301. In Canada, 
call 1-800-807-6777.

12/05

Keep this book and your sales slip together for future 
reference. You must provide proof of purchase or installation 
date for in-warranty service.

Write down the following information about your major appliance 
to better help you obtain assistance or service if you ever need it. 
You will need to know your complete model number and serial 
number. You can find this information on the model and serial 
number label located on the product.

Dealer name____________________________________________________

Address ________________________________________________________

Phone number __________________________________________________

Model number __________________________________________________

Serial number __________________________________________________

Purchase date __________________________________________________

Summary of Contents for W10110357

Page 1: ...rísticas funcionamiento rendimiento piezas accesorios o servicio técnico llame al 1 800 253 1301 o visite nuestro sitio web en www whirlpool com Table of Contents Índice 2 W10110357 To the installer Please leave this instruction book with the range To the consumer Please read and keep this book for future reference Para el instalador favor de dejar este manual de instrucciones con la estufa Para e...

Page 2: ...A ESTUFA 17 El soporte anti vuelco 18 USO DE LA SUPERFICIE DE COCCIÓN 19 Controles de la superficie de cocción 19 Quemadores exteriores 20 Comal 20 Enlatado casero 20 Utensilios de cocina 21 CONTROL ELECTRÓNICO DEL HORNO 21 Pantalla 21 Luces indicadoras del horno 21 Start Inicio 22 Cancel Off Cancelar Apagar 22 Reloj 22 Tonos 22 Fahrenheit y centígrados 22 Temporizador 22 Bloqueo del control 22 Co...

Page 3: ...l injury or death Do not store or use gasoline or other flammable vapors and liquids in the vicinity of this or any other appliance WHAT TO DO IF YOU SMELL GAS Do not try to light any appliance Do not touch any electrical switch Do not use any phone in your building Immediately call your gas supplier from a neighbor s phone Follow the gas supplier s instructions If you cannot reach your gas suppli...

Page 4: ...WARNING NEVER cover any slots holes or passages in the oven bottom or cover an entire rack with materials such as aluminum foil Doing so blocks air flow through the oven and may cause carbon monoxide poisoning Aluminum foil linings may also trap heat causing a fire hazard CAUTION Do not store items of interest to children in cabinets above a range or on the backguard of a range children climbing o...

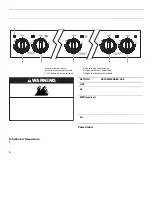
Page 5: ...of prolonged power failure the surface burners can be lit manually Hold a lit match near a burner and turn knob counterclockwise to LITE After burner lights turn knob to setting A Surface burner locator B Left rear burner control knob C Left front burner control knob D Center burner control knob E Right rear burner control knob F Right front burner control knob E D C A B F WARNING Fire Hazard Do n...

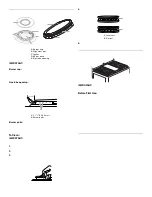
Page 6: ... the burner needs to be adjusted contact a trained repair specialist 4 Replace the burner cap making sure the alignment pins are properly aligned with the burner cap 5 Turn on the burner If the burner does not light check cap alignment If the burner still does not light do not service the burner yourself Contact a trained repair specialist Griddle IMPORTANT To avoid damage to the griddle the gridd...

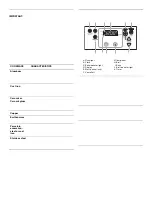
Page 7: ...Lights The indicator lights are located on both sides of the display The indicator lights light up or flash when the oven is in one of the following modes Bake Broil or Timer Start The START pad begins any oven function If the START pad is not pressed within 5 seconds after pressing a function pad the Push to Start PSH indicator light will flash and the push to start tone will sound as a reminder ...

Page 8: ...R pad or TEMP HOUR arrow pads the PSH indicator light will flash and the push to start tone will sound as a reminder The timer can be reprogrammed to change the time while it is running To Reprogram 1 Press TIMER 2 Press TEMP HOUR up or down arrow pads to adjust time 3 Press START ControlLock The Control Lock function blocks the control panel pads to avoid unintended use of cook functions When the...

Page 9: ... cooking results Follow manufacturer s recommendations and use the bakeware size recommended in the recipe Use the following chart as a guide OvenVent A Oven vent The oven vent releases hot air and moisture from the oven and should not be blocked or covered Blocking or covering the oven vent will cause poor air circulation affecting cooking and cleaning results Do not set plastics paper or other i...

Page 10: ... Bakeware section To Bake or Roast 1 Touch BAKE Touch TEMP up or down arrow pads to set a temperature other than 350 F 177 C in 5 F 3 C amounts The bake range can be set between 170 F and 500 F 77 C and 260 C 2 Touch START The temperature can be changed at any time after this step by touching the TEMP HOUR up or down arrow pads START does not need to be touched again If baking roasting ...

Page 11: ...e cool These spills may affect the finish To avoid chipping do not bang grates and caps against each other or hard surfaces such as cast iron cookware Do not reassemble caps on burners while they are wet Cleaning Method Nonabrasive plastic scrubbing pad and mildly abrasive cleanser Clean as soon as cooktop grates and caps are cool Dishwasher grates only not caps Use the most aggressive cycle Cooke...

Page 12: ...nge hangers Do not remove the pins while the door is removed from the range 2 Grasp the door on the sides with your fingers on the front of the door and your thumbs on the inside surface 3 Pull door straight up then toward you Do not remove hinge pins until the door is replaced on the range To Replace 1 Grasp the door on the sides with your fingers on the front of the door and your thumbs on the i...

Page 13: ...as the surface cooking area element or surface burner Cookware should not extend more than 1 3 cm outside the cooking area Oven will not operate Is the power outlet properly wired and polarized Try another outlet to check for proper wiring and polarity Is this the first time the oven has been used Turn any one of the surface burner knobs on to release air from the gas lines Is the electronic oven ...

Page 14: ...plete model and serial number of your appliance This information will help us to better respond to your request If you need replacement parts If you need to order replacement parts we recommend that you use only FSP replacement parts FSP replacement parts will fit right and work right because they are made with the same precision used to build every new WHIRLPOOL appliance To locate FSP replacemen...

Page 15: ... appliance is used in a country other than the country in which it was purchased DISCLAIMER OF IMPLIED WARRANTIES LIMITATION OF REMEDIES CUSTOMER S SOLE AND EXCLUSIVE REMEDY UNDER THIS LIMITED WARRANTY SHALL BE PRODUCT REPAIR AS PROVIDED HEREIN IMPLIED WARRANTIES INCLUDING WARRANTIES OF MERCHANTABILITY OR FITNESS FOR A PARTICULAR PURPOSE ARE LIMITED TO ONE YEAR OR THE SHORTEST PERIOD ALLOWED BY LA...

Page 16: ...16 Notes ...
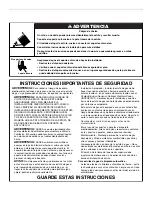
Page 17: ...ste u otro aparato electrodoméstico PASOS QUE USTED DEBE SEGUIR SI HUELE A GAS No trate encender ningún aparato electrodoméstico No toque ningún enchufe eléctrico No use ningún teléfono en su casa o edificio Llame inmediatamente a su proveedor de gas desde el teléfono de un vecino Siga las instrucciones de su proveedor de gas Si usted no puede comunicarse con su proveedor de gas llame al departame...

Page 18: ...s o pasajes en la parte inferior del horno ni cubra una rejilla entera con materiales tales como papel de aluminio El hacerlo bloquea el flujo de aire en el horno y puede causar la contaminación con monóxido de carbono Los forros de papel de aluminio también pueden atrapar el calor y provocar un riesgo de incendio AVISO No almacene artículos que interesen a los niños en los armarios que están enci...

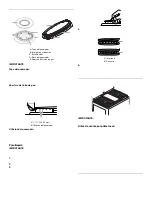
Page 19: ...ntrol esté en LITE producirá una llama 2 Gire la perilla hacia cualquier posición entre HI alto y LO bajo El chasquido parará Use el cuadro siguiente como guía para fijar los niveles de calor Cortes de corriente En el caso de un corte de corriente prolongado se pueden encender los quemadores exteriores manualmente Sostenga un cerillo encendido cerca del quemador y gire la perilla a la izquierda ha...

Page 20: ...mpie los orificios obstruidos del quemador con un alfiler recto tal como se ilustra No agrande ni distorsione el orificio No use palillos de dientes de madera Si el quemador necesita ser regulado llame a un técnico competente para darle servicio 4 Vuelva a colocar la tapa del quemador asegurándose de que las espigas de alineamiento estén debidamente alineadas con la tapa del quemador 5 Encienda el...

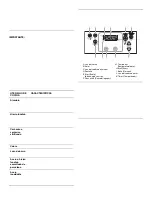
Page 21: ...a la hora destellando Presione CANCEL OFF Cancelar Apagar para despejar la hora que destella en la pantalla Si aparece la hora destellando ha ocurrido un corte de corriente Presione CANCEL OFF y vuelva a fijar el reloj si fuera necesario Cuando el horno no esté en uso la pantalla mostrará la hora del día Cuando esté utilizando una función de cocción o de temporizador la pantalla mostrará horas y m...

Page 22: ...mpo fijado en horas y minutos o en minutos y segundos El temporizador no pone en marcha ni detiene el horno Para fijar 1 Oprima TIMER Temporizador La luz indicadora del temporizador se encenderá Si no hay ninguna acción después de 1 minuto la pantalla volverá al modo de la hora del día de hornear o de asar 2 Presione los botones TEMP HOUR Temperatura Hora con las flechas hacia arriba o hacia abajo...

Page 23: ... no obstruya ni tape los ductos de escape inferiores del horno No cubra toda la parrilla con papel de aluminio ya que para lograr óptimos resultados de cocción el aire debe circular con libertad Para recoger los derrames coloque papel de aluminio en la parrilla que está debajo del recipiente de hornear Asegúrese de que el forro sea por lo menos 1 3 cm más grande que el recipiente de hornear y que ...

Page 24: ...camente el ciclo de acondicionamiento basándose en la temperatura del horno seleccionada El tiempo de acondicionamiento del ciclo no variará si vuelve a fijarse la temperatura antes de que termine la cuenta regresiva del ciclo El ciclo de acondicionamiento para el precalentamiento se ha terminado y el horno está listo para usarse cuando suene un tono de 1 segundo termine la cuenta regresiva del ci...

Page 25: ...puerta del asador y deslice hacia fuera la charola y la rejilla para asar 2 Coloque los alimentos en la parrilla de la charola para asar en la posición de asado deseada y cierre el cajón 3 Presione BROIL Asado La luz indicadora de BROIL Asado se encenderá 4 Presione START Se encenderá la luz indicadora Se puede modificar el ajuste de la temperatura en cualquier etapa del ciclo de asado Durante la ...

Page 26: ... de limpieza Producto para limpiar vidrios y un paño suave o esponja Aplique el producto para limpiar vidrios en una esponja o paño suave no lo haga directamente sobre el panel TAPAS Y PARRILLAS CON REVESTIMIENTO DE PORCELANA Los derrames que contienen ácidos tales como vinagre y tomate deben ser limpiados tan pronto como se enfríen la superficie de cocción las parrillas y las tapas Es posible que...

Page 27: ... perillas de control estén apagadas Para reemplazar 1 Desenchufe la estufa o desconecte el suministro de energía 2 Gire el foco a la izquierda para sacarlo del casquillo 3 Reemplace el foco 4 Enchufe la estufa o reconecte el suministro de energía Puertadelhorno Para un uso normal de la estufa no se aconseja quitar la puerta del horno Sin embargo si es necesario quitarla asegúrese de que el horno e...

Page 28: ...Los quemadores exteriores no funcionan Es ésta la primera vez que se usan los quemadores exteriores Encienda cualquiera de las perillas de los quemadores exteriores para liberar el aire proveniente de la tubería del gas Se ha fijado correctamente la perilla de control Oprima la perilla antes de girar a un ajuste Están obstruidos los orificios del quemador Vea la sección Quemadores exteriores Las l...

Page 29: ...ilio de cocina apropiado Vea la sección Utensilios de cocina Se ha fijado la perilla de control en el nivel apropiado de calor Vea la sección Controles de la superficie de cocción Los resultados del horneado no son los que se esperaba Está nivelado el estufa Nivele el estufa Vea las instrucciones de instalación Se ha precalentado el horno Espere que el horno se precaliente antes de colocar los ali...

Page 30: ...es de nuestra línea completa de electrodomésticos Información sobre instalación Procedimiento para el uso y mantenimiento Venta de accesorios y piezas para reparación Asistencia especializada para el cliente habla hispana problemas de audición visión limitada etc Recomendaciones con distribuidores locales compañías que dan servicio y distribuidores de partes para reparación Los técnicos de servici...

Page 31: ...n uso y mantenimiento de conformidad con las instrucciones adjuntas o provistas con el producto Whirlpool Corporation o Whirlpool Canada LP en lo sucesivo denominado Whirlpool se hará cargo del costo de las piezas especificadas de fábrica y del trabajo de reparación para corregir defectos en los materiales o en la mano de obra El servicio deberá ser suministrado por una compañía de servicio design...

Page 32: ...rlpool Corporation All rights reserved Todos los derechos reservados Registered Trademark TM Trademark of Whirlpool U S A Marca registrada TM Marca de comercio de Whirlpool U S A 8 06 Printed in Mexico Impreso en México ...

Reviews: