background image

12

WASHER USE

Starting Your Washer

WARNING: To reduce the risk of

re, electric shock, or injury to 

persons, read the IMPORTANT SAFETY INSTRUCTIONS before 

operating this appliance.

The following is a guide to using your washer. Please refer to 

speci

c sections of this manual for more detailed information.

Do not store laundry products on the top surface of this washer. 

Vibration is normal during operation.

Using the Proper Detergent

Use only High Ef

ciency detergents. The package for this type of 

detergent will be marked “HE” or “High Ef

ciency.” This wash 

system, along with less water, will create too much sudsing with a 

regular non-HE detergent. Using regular detergent will likely result 

in washer errors, longer cycle times, and reduced rinsing 

performance. It may also result in component failures and 

noticeable mold or mildew. HE detergents are made to produce 

the right amount of suds for the best performance. Follow the 

manufacturer's instructions to determine the amount of detergent 

to use. 

First Wash Cycle Without Laundry

Before washing clothes for the 

rst time, if not completed during 

the 

nal installation step, choose the Normal cycle and run it 

without clothes. Use only HE High Ef

ciency detergent. Use 1/2 

the manufacturer’s recommended amount for a medium-size 

load. This initial cycle serves to ensure the interior is clean before 

washing clothes.

For All Wash Cycles

1. To load washer

The washer can be fully loaded, but not tightly packed. 

Washer door should close easily.

Mix large and small items. Avoid washing a single item. 

Load evenly.

Wash small items such as infant socks in mesh garment 

bags. It is recommended that more than one garment bag 

be used and that each garment bag be

lled with equal 

amounts of material.

When unloading garments, occasionally check under the 

seal/bellow at the front of the tub for small items. 

2. Close the washer door by pushing it 

rmly until the lock

clicks. The washer door will remain locked during the wash

cycle.
NOTE: There is a routine at the beginning of each cycle to

avoid unintended use of the washer. This routine will take

approximately 1 minute to complete before the selected

wash cycle begins.

3. Open the dispenser drawer and add laundry products to the

detergent, bleach, or fabric softener compartments. Close

drawer slowly to avoid spills. See “Using the Dispenser.”

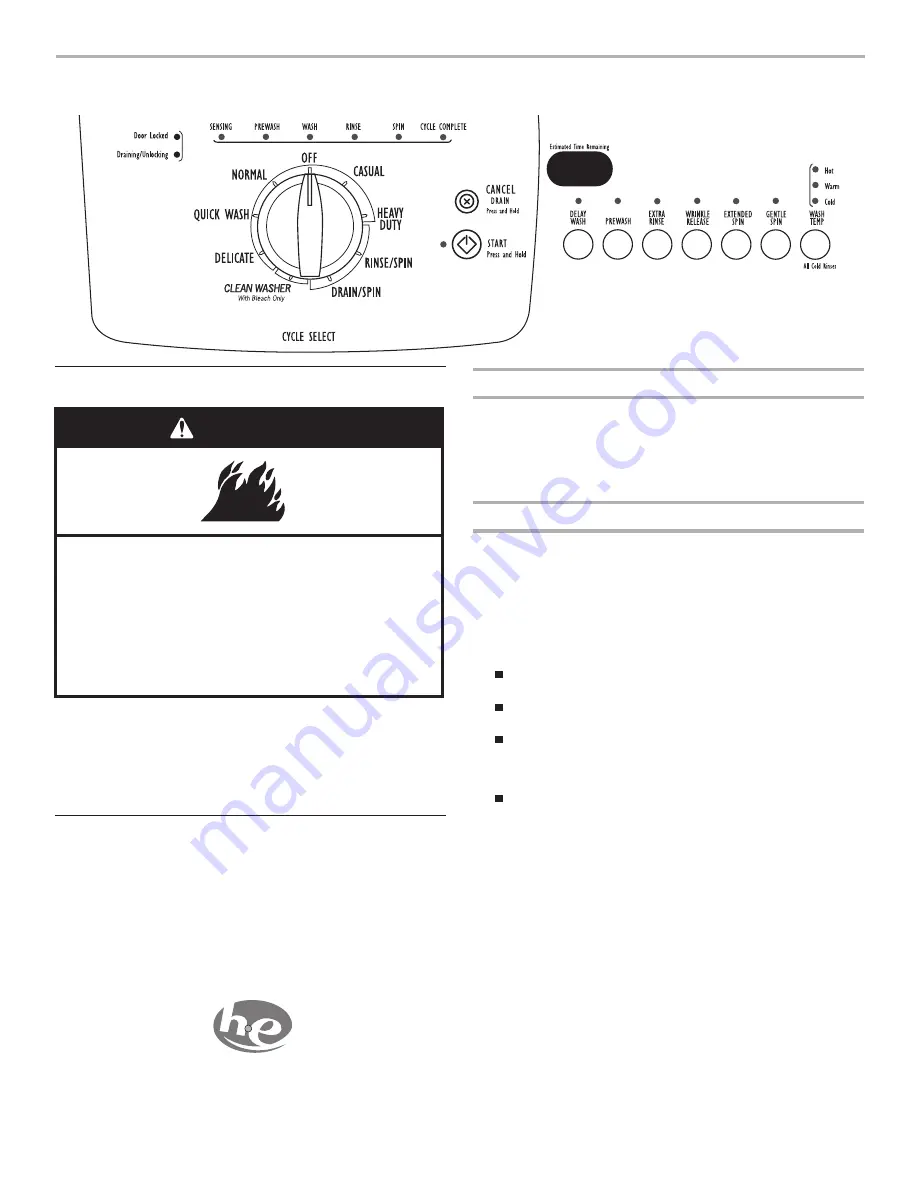
4. Turn on the washer by turning the cycle selector and

selecting one of the cycles. The indicator light for the

selected cycle will illuminate. When selecting a Wash Cycle,

the preset Modi

ers, Options and Water Temp for the

selected cycle will illuminate. The preset settings provide the

recommended fabric care for the selected cycle. See

“Cycles.”

Use only HE High Ef

ciency detergent.

Fire Hazard

Never place items in the washer that are dampened 

with gasoline or other flammable fluids.
No washer can completely remove oil.
Do not dry anything that has ever had any type of oil on 

it (including cooking oils).
Doing so can result in death, explosion, or fire.

WARNING

NOTE: Do not add clothes to washer drum prior to adding 

laundry products. Always follow manufacturer’s instructions.

Open the washer door by pulling on the handle. Add laundry

products, if desired. Single-dose laundry packet, Oxi-type

boosters, color-safe bleach, or fabric softener crystals can

be added to the drum prior to adding laundry. Sort laundry

according to color and type of fabric. Place a load of sorted

clothes in the washer. Do not overload washer. Overloading

can cause poor cleaning.

Summary of Contents for W10175588C

Page 1: ... AUTOMATIC WASHER Use CareGuide Table of Contents Table des matières 2 Designed to use only HE High Efficiency Detergent Conçue pour l utilisation d un détergent haute efficacité HE seulement W10175588C W10175907C SP ...

Page 2: ... BENEFITS 11 WASHER USE 12 Starting Your Washer 12 Using the Proper Detergent 12 Using the Dispenser 13 Restarting 14 Changing Cycles and Options 14 Status Lights 14 Cycles 14 Normal Sounds 15 Options and Modifiers 15 Laundry Guide 16 LAUNDRY TIPS 17 Loading 17 Stain Removal Guide 18 WASHER CARE 19 Cleaning Your Washer 19 Water Inlet Hoses 20 Vacation Storage and Moving Care 20 TROUBLESHOOTING 21 ...

Page 3: ...able or explosive substances to the wash water These substances give off vapors that could ignite or explode Under certain conditions hydrogen gas may be produced in a hot water system that has not been used for 2 weeks or more HYDROGEN GAS IS EXPLOSIVE If the hot water system has not been used for such a period before using the washing machine turn on all hot water faucets and let the water flow ...

Page 4: ...r responsibility You will need A water heater set to deliver 120 F 49 C water to the washer A grounded electrical outlet located within 5 4 ft 1 65 m of where the power cord is attached to the back of the washer See Electrical Requirements Hot and cold water faucets located within 4 ft 1 2 m of the hot and cold water fill valves and water pressure of 20 100 psi 137 9 689 6 kPa A level floor with a m...

Page 5: ...installation The dimensions shown are for the recommended spacing Custom undercounter installation Washer only Recommended installation spacing for recessed or closet installation with or without a pedestal The dimensions shown are for the recommended spacing Recessed area or closet installation Recessed or closet installation Washer on pedestal 36 2 92cm 23 4 59 5cm 32 9 83 5cm 20 1 51cm 1 2 5 cm...

Page 6: ...ipe drain system wall or floor views A B The standpipe drain requires a minimum diameter standpipe of 2 5 cm The minimum carry away capacity can be no less than 17 gal 64 L per minute The top of the standpipe must be at least 30 76 2 cm high and no higher than 55 1 4 m from the bottom of the washer Laundry tub drain system view C The laundry tub needs a minimum 20 gal 76 L capacity The top of the ...

Page 7: ...not use an adapter Do not use an extension cord Failure to follow these instructions can result in death fire or electrical shock WARNING GROUNDING INSTRUCTIONS For a grounded cord connected washer This washer must be grounded In the event of a malfunction or breakdown grounding will reduce the risk of electrical shock by providing a path of least resistance for electric current This washer is equ...

Page 8: ...shers supplied into each end of the inlet hoses Firmly seat the washers in the couplings Connect the inlet hoses to the water faucets Make sure the washer drum is empty 1 Attach a hose to the hot water faucet Screw on coupling by hand until it is seated on the washer 2 Attach a hose to the cold water faucet Screw on coupling by hand until it is seated on the washer 3 Using pliers tighten the coupl...

Page 9: ...hose from the shipping clips Laundry tub drain or standpipe drain Connect the drain hose form to the corrugated drain hose To keep drain water from going back into the washer Do not straighten the drain hose and do not force excess drain hose into standpipe Hose should be secure but loose enough to provide a gap for air Do not lay excess hose on the bottom of the laundry tub Floor drain You may ne...

Page 10: ...ide the washer to its final location 6 Confirm the levelness of the washer CompleteInstallation 1 Check the electrical requirements Be sure that you have the correct electrical supply and the recommended grounding method See Electrical Requirements 2 Check that all parts are now installed If there is an extra part go back through the steps to see which step was skipped 3 Check that you have all of...

Page 11: ...motor adapts to the load size and to the cycle selected to give the optimum cleaning rinsing and spinning conditions The motor can handle slow speeds needed for delicate items and is powerful enough to drive an average clothes load up to high speed spin Spin Speeds This washer automatically selects the spin speed based on the cycle selected Dynamic Balance A precision balancing system allows the w...

Page 12: ...than one garment bag be used and that each garment bag be filled with equal amounts of material When unloading garments occasionally check under the seal bellow at the front of the tub for small items 2 Close the washer door by pushing it firmly until the lock clicks The washer door will remain locked during the wash cycle NOTE There is a routine at the beginning of each cycle to avoid unintended us...

Page 13: ...uce the right amount of suds for the best performance Follow the manufacturer s instructions to determine the amount of detergent to use To fill dispenser compartments 1 Pull out the dispenser drawer 2 Add the desired laundry products to the proper compartment 3 Push in the dispenser drawer slowly and completely to avoid a spill Main Wash detergent compartment Letter B in Dispenser Illustration Add...

Page 14: ...outine removes extra suds and assures proper rinsing of your garments The options you select will also affect the cycle times that are shown in the Preset Cycle Settings table The Estimated Time Remaining can change to much longer times under extreme conditions Door Locked When the Door Locked LED light illuminates the door is locked The door is locked and unlocked automatically depending on the s...

Page 15: ...nds and synthetic fabrics This cycle has a load cooling process to reduce wrinkling NormalSounds As with any new product you will hear sounds that you are not accustomed to You may hear various sounds when the door is locked or unlocked and during the washing rinsing or spinning process Between changes in wash actions there will be momentary pauses You will hear water spraying and splashing during...

Page 16: ...ngs table in Cycles ATC works for the wash temperature with Warm and Cold settings The Cold rinse temperatures depend on the cold water at your faucet LaundryGuide Refer to this chart for suggested load types and their corresponding cycles Listed to the right are the options available to each of these washer cycles NOTE You cannot select Extra Rinse and Wrinkle Release for the same load Wash Water...

Page 17: ...ed load it is recommended that more than one garment bag be used and that each garment bag be filled with equal amounts of material NOTE If you are washing only small items it is recommended that more than one mesh garment bag be used and that each garment bag be filled with equal amounts of material Sorting Separate heavily soiled items from lightly soiled ones even if they would normally be wash...

Page 18: ...h Cycle Ink Whitest Whites Grass Whitest Whites Blood Cold or Warm Normal Casual Tomato Products Whitest Whites Coffee Chocolate Warm Whitest Whites Mud Warm Whitest Whites Cosmetics Heavy Duty Deodorants Heavy Duty Dirty Motor Oil Warm Heavy Duty Ring around the Collar Normal Casual Do not tumble dry soiled or stained items Heat may permanently set stains ...

Page 19: ...Recommended Add one affresh washer cleaner tablet to the washer drum If using liquid chlorine bleach Open the dispenser drawer and immediately add cup 120 mL of liquid chlorine bleach to the bleach compartment NOTE Do not add any detergent to this cycle Use of more than cup 120 mL of bleach will cause product damage over time 3 Close the washer door and the dispenser drawer 4 Select the CLEAN WASH...

Page 20: ...r 1 Put 1 qt 1 L of R V type antifreeze in the drum 2 Run washer on a Drain Spin cycle 3 Unplug washer or disconnect power 4 Shut off both water faucets 5 Disconnect water inlet hoses from faucets and drain To use washer again 1 Flush water pipes 2 Reconnect water inlet hoses to faucets 3 Turn on both water faucets 4 Plug in washer or reconnect power 5 Run the washer through the Normal cycle with ...

Page 21: ...omed to You may hear various sounds when the door is locked or unlocked and during the washing rinsing or spinning process Between changes in wash actions there will be momentary pauses You will hear water spraying and splashing during the wash and rinse cycles These new sounds and pauses are part of normal washer operation Is washer installed on a sturdy and solid floor Refer to the Installation ...

Page 22: ...e washer during the spin Select DRAIN SPIN to remove any water remaining in the washer The washer door will unlock at the end of the drain It will take 1 minute for the door to unlock Is the error code displayed Failure mode will lock the door Switch knob or press and hold START to exit then wait for the door to unlock Is the water temperature hotter than 104 F 40 C Wait for the water temperature ...

Page 23: ...s This routine will add time to the original cycle Did the load cause imbalance When too much imbalance occurs an imbalance routine will start to redistribute the load During the imbalance routine the time displayed may pause until this activity is complete then resume with the remainder of the cycle Are you washing a single item or bulky load Spin time is added if an unbalanced load is detected T...

Page 24: ...n as it stops Did you use a fabric softener dispensing ball Dispensing balls will not operate correctly with this washer Add liquid fabric softener to the fabric softener compartment Did you use powdered detergent in a low speed cycle Consider using liquid detergent Did you use Quick Wash on a large load For best results use Quick Wash for small lightly soiled loads Load is wrinkled twisted tangle...

Reviews: