background image

Summary of Contents for W10217688A

Page 1: ...o Wall 8 Prepare Upper Cabinet 9 Installthe Microwave Oven 9 Complete Installation 10 VENTING DESIGN SPECIFICATIONS 11 ASSISTANCE 12 Replacement Parts 12 Accessories 12 MICROWAVE HOODCOMBINATION SAFETY Your safety and the safety of others are very important We have provided many important safety messages in this manual and on your appliance Always read and obey all safety messages This is the safe...

Page 2: ... as a rear wall template 1 Cut along the perforation to separate the template from the rest of the cardboard packaging 2 Set the cardboard template to the side and refer to it during the Mark Rear Wall part of installation Check the opening where the microwave oven will be installed The location must provide Minimum installation dimensions See Installation Dimensions illustration Minimum one 2 x 4...

Page 3: ...time delay fuse or time delay circuit breaker A separate circuit serving only this microwave oven GROUNDING iNSTRUCTiONS For all cord connected appliances The microwave oven must be grounded In the event of an electrical short circuit grounding reduces the risk of electric shock by providing an escape wire for the electric current The microwave oven is equipped with a cord having a grounding wire ...

Page 4: ...em NOTE Skip this section if you are using recirculation installation Keep the damper assembly in case the venting method is changed or the microwave oven is reinstalled in another location where wall or roof venting may be used Wall Venting Installation Only 1 Remove screws attaching damper plate to top of microwave oven exterior then slide damper plate away from retaining tabs A B A Retaining ta...

Page 5: ...tallation Only 2 Repeat Step 2 from Wall Venting Installation Only 3 Repeat Step 3 from Wall Venting Installation Only 4 Rotate air deflector so that deflector feet face the bottom of the microwave oven and then slide air deflector into the back of the microwave oven as shown making sure its exhaust port open end aligns with the microwave oven exhaust port 5 A C A Microwave oven exhaust port B Air...

Page 6: ...examples of preferred installation configurations with the mounting plate No Wall Studs at End Holes Figure 1 No Wall Studs at End Holes Figure 2 S i i i i i i i i i i li i i C D I _1_ i Fi C i D i Wall Stud at One End Hole Figure 3 NOTE If wall stud is within 6 15 2 cm of the vertical centerline see Mark Rear Wall section only recirculation or roof venting installation can be done D Wall Studs at...

Page 7: ...horizontal line drawn in Step 3 and that the end holes are properly marked Make sure the mounting plate is level 6 Holding the mounting plate in place find the wall stud centerline s drawn in Step 2 of Locate Wall Stud s and mark at least 1 preferably 2 hole s through the mounting plate closest to the wall stud centerline s See figures 1 2 and or 3 in Possible Wall Stud Configurations in Locate Wa...

Page 8: ...nuts through the drywall and finger tighten the bolts to make sure toggle nuts have opened against drywall 5 i Trrm A 1 4 20 x 3 round head bolt B Mounting plate C Drywall D Spring toggle nut C D Insert lag screw s into the hole s drilled into wall stud s in Step 2 of Installation for No Wall Studs at End Holes in the Drill Holes in Rear Wall section 6 Check alignment of mounting plate making sure...

Page 9: ...njury IMPORTANT The control side of the microwave oven is the heavy side Handle the microwave oven gently 1 Place a washer on each 1 4 20 x 3 bolt and place inside upper cabinet near the 3 8 10 mm holes 2 Make sure the microwave oven door is closed and taped shut 3 Using 2 or more people lift microwave oven and hang it on support tabs at the bottom of mounting plate NOTE To avoid damage to the mic...

Page 10: ...damper plate Then secure with one of the remaining screws removed in Step 1 of Rotate Air Deflector NOTE The screw cannot be installed if the damper assembly is not positioned as shown A B C D E A Screw B Damper assembly C Long tab inside raised slot D Upper cabinet cutout E Damper plate A Vent B Damper assembly under vent 1 Install filters Referto the User Instructions for filter placement Electr...

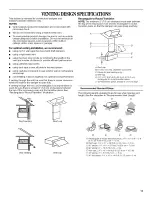
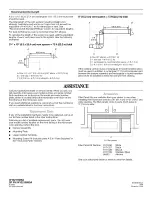
Page 11: ... compound to seal exterior wall or roof opening around cap not installing 2 elbows together for optimal hood performance If venting through the wall be sure that there is proper clearance within the wall for the damper to open fully If venting through the roof and rectangular to round transition is used be sure there is at least 3 7 6 cm of clearance between the top of the microwave oven and the t...

Page 12: ...ion piece must be installed to keep the damper from sticking ASSISTANCE Call your authorized dealer or service center When you call you will need the microwave oven model number and serial number Both numbers can be found on the model and serial number plate which is located behind the microwave oven door on the front frame of the microwave oven If you need additional assistance call us at our tol...

Reviews: