FOR SERVICE TECHNICIAN ONLY - DO NOT REMOVE OR DESTROY
PAGE 23
6.
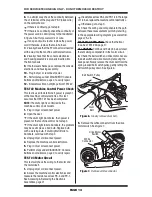
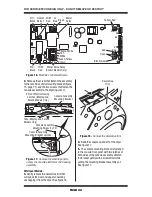
The console electronics is split into two
assemblies connected by two cables. Each
assembly is fastened to the decorative piece by
four plastic latches. To remove these assemblies,
gently compress the plastic latches while pulling
up on the assembly. For the cycle selector
assembly, the cycle selector knob must first
be removed by firmly pulling on it or gently
prying it straight upward. See figure 19.
Maytag Models:
3.
Slide the console up and off of the dryer, gently
unlatching the front three plastic housing latches
from the front door trim section. See figures 17
and 20.
4.
The console mounting bracket is fastened to
the console front panel with two latches at both
sides of the console assembly. Unlatch the bracket
gently with a screwdriver while pulling the mounting
bracket assembly out. See figure 17, page 22.
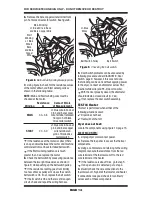
5.
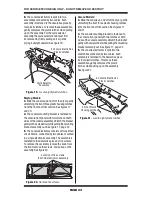
The console electronics consists of two printed
circuit boards, connected by two cables, mounted
in a single electronics assembly. The assembly is
fastened to the decorative piece by five screws.
To remove this assembly, remove the knob from
the front, remove the screws, and pull up on the
assembly. See figure 20.
Amana Models:
3.
Slide the console up and off of the dryer, gently
unlatching the front three plastic housing latches
from the front door trim section. See figures 17
and 21.
4.
The console mounting bracket is fastened to
the console front panel with two latches at both
sides of the console assembly. Unlatch the bracket
gently with a screwdriver while pulling the mounting
bracket assembly out. See figure 17, page 22.
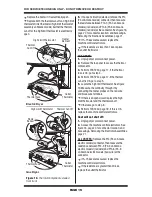
5.
The console electronics is split into two
assemblies connected by two cables. Each
assembly is fastened to the decorative piece
by four plastic latches. To remove these
assemblies, gently compress the plastic
latches while pulling up on the assembly.
See figure 21.
8 Console Electronics
Plastic Latches
Cycle Selector
Assembly
Figure 19.
Locate eight plastic latches.
Figure 20.
Remove five screws.
Location of five screws
that hold electronics assembly
8 Console Electronics
Plastic Latches
Figure 21.
Locate eight plastic latches.
3 Front Plastic
Housing Latches

