background image

7

INSTALLATION INSTRUCTIONS

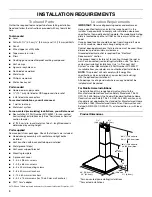
Prepare Location

It is recommended that the vent system be installed before 
hood is installed.

Before making cutouts, make sure there is proper clearance 
within the ceiling or wall for exhaust vent.

Check your ceiling height and the hood height maximum 
before you select your hood.

1.

Disconnect power.

2.

Determine which venting method to use: roof, wall, or non-
vented.

3.

Select a flat surface for assembling the range hood. Place 
covering over that surface.

4.

Using 2 or more people, lift range hood onto covered surface.

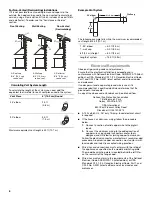
Range Hood Mounting Screws Installation

1.

Determine and mark the centerline on the wall where the 
canopy hood will be installed.

2.

Select a mounting height between a minimum of 24" 
(61.0 cm) for an electric cooking surface, a minimum of 
27" (68.6 cm) for a gas cooking surface, and a suggested 
maximum of 36" (91.4 cm) above the range to the bottom 
of the hood. Mark a reference line on the wall.

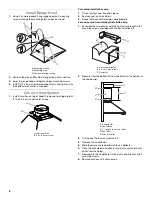
3.

Tape template in place, aligning the template centerline 
and bottom of template with hood bottom line and with 
the centerline marked on the wall.

4.

Mark centers of the fastener locations through the template 
to the wall.

IMPORTANT:

 All canopy mounting screws must be installed 

into wood where possible. If there is no wood to screw into, 
additional wall framing supports may be required, or use the 
(4) 10 x 60 mm wall anchors and 5.4 x 75 mm screws.

Remove the template.

5.

For wood, drill 

³⁄₁₆

" (4.8 mm) pilot holes at all locations where 

screws are being installed into wood.

For wall anchors, drill 

⁷⁄₁₆

" (10 mm) holes at all locations where 

wall anchors are being used.

6.

For wood, install (2) 5 x 45 mm mounting screws. Leave a 

¹⁄₄

" (6.4 mm) gap between the wall and the back of the screw 

head to slide range hood into place.

For wall anchors, install the 10 x 60 mm wall anchors and 
install the 5.4 x 75 mm screws into the wall anchors. Tighten 
until the wall anchors are secure. Back the screws out 

¹⁄₄

(6.4 mm).

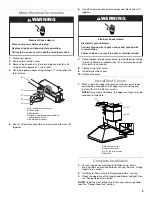
Vent Cover Support Bracket Installation

Installations using telescoping upper and lower vent cover 
assembly

1.

Position vent cover bracket on wall about 

¹⁄₈

" (3.0 mm) away 

from the ceiling.

2.

Mark the hole locations.

3.

Drill (2) 

³⁄₈

" (9.5 mm) holes for 8 x 40 mm wall anchors and 

insert anchors flush with the wall.

4.

Attach vent cover support bracket to wall.

Complete Preparation

1.

Determine and make all necessary cuts in the wall for the vent 
system. Install the vent system before installing the hood. See 
“Venting Requirements” section.

2.

Determine the required height for the home power supply 
cable and drill a 1¼" (3.2 cm) hole at this location.

3.

Run the home power supply cable according to the National 
Electrical Code or CSA Standards and local codes and 
ordinances. There must be enough ½" conduit and wires 
from the fused disconnect (or circuit breaker) box to make 
the connection in the hood’s electrical terminal box.

NOTE:

 Do not reconnect power until installation is complete.

4.

Use caulk to seal all openings.

A. Centerline
B. Fastener locations

C. Mounting height reference

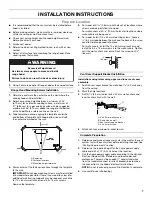
WARNING

Excessive Weight Hazard

Use two or more people to move and install 
range hood.

Failure to do so can result in back or other injury.

V

e

r

tical Center

line

C

L

L

L

A

W


R

A

E

R

E

T

A

L

P

M

E

T


G

N

I

T

N

U

O

M

E

G

D

E


M

O

T

T

O

B


N

G

I

L

A


E

N

I

L


L

I

C

N

E

P


H

T

I

W

M

O

T

T

O

B


G

N

I

T

A

C

I

D

N

I

D

O

O

H


E

H

T


F

O

t

h

g

i

e

H


n

o

i

t

a

l

l

a

t

s

n

I

T

R

O

P

P

U

S


L

L

A

W


R

A

E

R


R

O


S

D

U

T

S


H

G

U

O

R

H

T


S

E

L

O

H


T

O

L

I

P


"

6

1

/

3


)

O

W

T

(


2


L

L

I

R

D

e

n

i

L


l

a

t

n

o

z

i

r

o

H

A

C

B

A. 8 x 40 mm wall anchors
B. Centerline on wall

C. Vent cover support bracket
D. 5 x 45 mm screws

¹⁄₄

"

(6.4 mm)

A

B

C

D

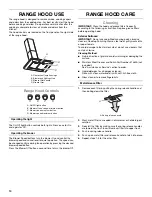
Summary of Contents for W10320580C

Page 1: ...ite at www whirlpool com or www whirlpool ca HOTTE DE CUISINIÈRE CONFIGURÉE EN ÎLOT À MONTAGE MURAL 30 76 2 CM ET 36 91 4 CM Instructions d installation et Guide d utilisation et d entretien Au Canada pour assistance installation ou service composez le 1 800 807 6777 ou visitez notre site web à www whirlpool ca Table of Contents Table des matières 2 IMPORTANT READ AND SAVE THESE INSTRUCTIONS FOR R...

Page 2: ...e 24 ENTRETIEN DE LA HOTTE 24 Nettoyage 24 SCHÉMA DE CÂBLAGE 26 ASSISTANCE OU SERVICE 27 Au Canada 27 Accessoires 27 GARANTIE 28 RANGE HOOD SAFETY You can be killed or seriously injured if you don t immediately You can be killed or seriously injured if you don t follow All safety messages will tell you what the potential hazard is tell you how to reduce the chance of injury and tell you what can h...

Page 3: ...3 IMPORTANT SAFETY INSTRUCTIONS READ AND SAVE THESE INSTRUCTIONS ...

Page 4: ...onsibility to comply with installation clearances specified on the model serial rating plate The model serial rating plate is located behind the left filter on the rear wall of the vent hood Canopy hood location should be away from strong draft areas such as windows doors and strong heating vents Cabinet opening dimensions that are shown must be used Given dimensions provide minimum clearance Grou...

Page 5: ...al exterior wall or roof opening around the cap The size of the vent should be uniform Cold Weather Installations An additional back draft damper should be installed to minimize backward cold air flow and a thermal break should be installed to minimize conduction of outside temperatures as part of the vent system The damper should be on the cold air side of the thermal break The break should be as...

Page 6: ...onal 8501 East Pleasant Valley Road Cleveland OH 44131 5575 A 120 volt 60 Hz AC only 15 amp fused electrical circuit is required If the house has aluminum wiring follow the procedure below 1 Connect a section of solid copper wire to the pigtail leads 2 Connect the aluminum wiring to the added section of copper wire using special connectors and or tools designed and UL listed for joining copper to ...

Page 7: ...screw head to slide range hood into place For wall anchors install the 10 x 60 mm wall anchors and install the 5 4 x 75 mm screws into the wall anchors Tighten until the wall anchors are secure Back the screws out 6 4 mm Vent Cover Support Bracket Installation Installations using telescoping upper and lower vent cover assembly 1 Position vent cover bracket on wall about 3 0 mm away from the ceilin...

Page 8: ... recirculating installation only 1 Assemble the air deflector with the duct cover bracket with 2 assembly screws provided with the Recirculation Kit 2 Measure from the bottom of the air deflector to the bottom of the hood outlet 3 Cut the duct to the measured size X 4 Remove the air deflector 5 Slide the duct onto the bottom of the air deflector 6 Place the assembled air deflector and duct over th...

Page 9: ... vent cover may be reversed to hide slots Complete Installation 1 For non vented recirculating installations only install charcoal filters over grille on blower housing See the Range Hood Care section 2 Install metal filters See the Range Hood Care section 3 Check the operation of the range hood blower and light See the Range Hood Use section NOTE To get the most efficient use from your new range ...

Page 10: ...s abrasive cleaners Cooktop Polishing Creme steel wool gritty washcloths or paper towels To avoid damage to the stainless steel do not use cleaners that contain chlorine Cleaning Method Rub in direction of grain to avoid scratching or damaging the surface Stainless Steel Cleaner and Polish Part Number 31462A not included See Assistance or Service section to order Liquid detergent or all purpose cl...

Page 11: ...o place to secure the charcoal filter to the metal filter 5 Replace metal grease filter See Metal Grease Filter in this section Replacing a Fluorescent Lamp Turn off the range hood and allow the fluorescent lamp to cool If new light does not operate make sure the lamp is inserted correctly before calling service 1 Disconnect power 2 Remove the screw from the lens cover and remove the cover 3 Remov...

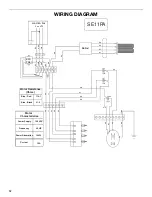
Page 12: ...or Characteristics Power Supply Frequency Power Absorption Current 120 VAC 60 HZ 144 W 1 2A Junction box L N GND EMI Filter BK YL GN WH WH BK WH BK WH YL GN BK WH YL GN BK BR YL BR YL GY RD BK WH GY RD BK WH BK BU RD BU BK YL GN YL GN 25uF 16uF 15uF Ballast SE11PA RD RD BU BU ...

Page 13: ...ance If you need further assistance you can write to Whirlpool Corporation with any questions or concerns at Whirlpool Brand Home Appliances Customer eXperience Center 553 Benson Road Benton Harbor MI 49022 2692 Please include a daytime phone number in your correspondence In Canada Call the Whirlpool Canada Customer eXperience Centre toll free 1 800 807 6777 or visit our website at www whirlpool c...

Page 14: ...onsumable parts i e light bulbs batteries air or water filters preservation solutions etc 5 Conversion of products from natural gas or L P gas 6 Damage from accident misuse abuse fire floods acts of God or use with products not approved by Whirlpool 7 Repairs to parts or systems to correct product damage or defects caused by unauthorized service alteration or modification of the appliance 8 Cosmet...

Page 15: ...areil ménager Assurez vous de toujours lire tous les messages de sécurité et de vous y conformer AVERTISSEMENT DANGER Voici le symbole d alerte de sécurité Ce symbole d alerte de sécurité vous signale les dangers potentiels de décès et de blessures graves à vous et à d autres Tous les messages de sécurité suivront le symbole d alerte de sécurité et le mot DANGER ou AVERTISSEMENT Ces mots signifien...

Page 16: ...e et évacuer adéquatement les gaz veiller à acheminer l air aspiré par un conduit jusqu à l extérieur ne pas décharger l air aspiré dans un espace vide du bâtiment comme une cavité murale un plafond un grenier un vide sanitaire ou un garage AVERTISSEMENT POUR RÉDUIRE LE RISQUE D INCENDIE UTILISER UNIQUEMENT DES CONDUITS MÉTALLIQUES AVERTISSEMENT POUR MINIMISER LE RISQUE D UN FEU DE GRAISSE SUR LA ...

Page 17: ...les dispositions de tous les codes et règlements en vigueur Confier l installation de la hotte à un technicien qualifié C est à l installateur qu incombe la responsabilité de respecter les distances de séparation spécifiées sur la plaque signalétique de l appareil La plaque signalétique de l appareil est située derrière le filtre de gauche sur la paroi arrière de la hotte On doit toujours installe...

Page 18: ...lliques rigides Ne pas utiliser de conduit de plastique ou en feuille métallique La longueur du circuit d évacuation et le nombre de coudes doivent être réduits au minimum pour fournir la meilleure performance Pour un fonctionnement efficace et silencieux Ne pas utiliser plus de trois coudes à 90 Veiller à ce qu il y ait une section droite de conduit de 24 61 0 cm ou plus entre deux coudes si on d...

Page 19: ...éduit considérablement la performance La sortie à l extérieur du circuit d évacuation peut se faire à travers le toit ou à travers un mur Pour la sortie à travers un mur on doit employer un raccord coudé 90 Décharge par l arrière Le raccord coudé à 90 peut être installé immédiatement au dessus de la hotte Installations sans décharge à l extérieur recyclage S il n est pas possible d évacuer les fum...

Page 20: ...é partie 1 et C22 2 n 0 M91 édition la plus récente et de tous les codes et règlements en vigueur INSTRUCTIONS D INSTALLATION Préparation de l emplacement Il est recommandé d installer le circuit d évacuation avant de procéder à l installation de la hotte Avant d exécuter les découpages vérifier la disponibilité d un dégagement suffisant dans le plafond ou le mur pour le conduit d évacuation Avant...

Page 21: ...s dernières en affleurement avec le mur 4 Fixer la bride de support du cache conduit au mur Achever la préparation 1 Déterminer et effectuer tous les découpages nécessaires dans le mur pour le passage du circuit d évacuation Installer le circuit d évacuation avant la hotte Voir la section Exigences concernant l évacuation 2 Déterminer la hauteur appropriée pour le cordon d alimentation du domicile...

Page 22: ...e bas du déflecteur d air 6 Placer le déflecteur d air et le conduit assemblés sur la sortie d évacuation de la hotte 7 Réassembler le déflecteur d air sur la bride du cache conduit à l aide des 2 vis de montage 8 Assurer l étanchéité des raccordements avec une bride de conduit Raccordement électrique 1 Déconnecter la source de courant électrique 2 Ôter le couvercle du boîtier de connexion 3 Ôter ...

Page 23: ...e à l extérieur le cache conduit supérieur peut être inversé pour dissimuler les fentes Achever l installation 1 Pour les installations sans décharge à l extérieur recyclage uniquement installer les filtres à charbon sur la grille du logement du ventilateur Voir la section Entretien de la hotte 2 Installer les filtres métalliques Voir la section Entretien de la hotte 3 Contrôler le fonctionnement ...

Page 24: ...as utiliser de tampons de récurage savonneux de nettoyants abrasifs de crème à polir pour table de cuisson de laine d acier de chiffons de lavage rugueux ou d essuie tout Pour éviter d endommager les surfaces en acier inoxydable ne pas utiliser de nettoyants contenant du chlore Méthode de nettoyage Frotter dans la direction du grain pour éviter d égratigner ou d endommager la surface Nettoyant et ...

Page 25: ...in de fixer le filtre à charbon au filtre métallique 5 Réinstaller le filtre à graisse métallique Voir Filtre à graisse métallique dans cette section Remplacement d une lampe fluorescente Interrompre l alimentation de la hotte attendre le refroidissement de la lampe fluorescente Si la nouvelle lampe ne fonctionne pas vérifier que chaque lampe est correctement insérée dans sa douille avant de deman...

Page 26: ...ristiques du moteur Alimentation Fréquence Absorption de courant Courant 120 VAC 60 HZ 144 W 1 2A Boîtier de connexion L Neu Terre Filtre EMI N JA VE BL BL N BL N BL JA VE N BL JA VE BL MAR JA MAR JA GRIS R N BL GRIS R N BL N BU R BU N JA VE JA VE 25uF 16uF 15uF Ballast SE11PA R R BU BU ...

Page 27: ...service désignés par Whirlpool sont formés pour remplir la garantie des produits et fournir un service après garantie partout au Canada Caractéristiques et spécifications sur toute notre gamme d appareils électroménagers Références aux marchands locaux Consignes d utilisation et d entretien Vente d accessoires et de pièces de rechange Pour plus d assistance Si vous avez besoin de plus d assistance...

Page 28: ...ion de votre produit du gaz naturel ou du gaz de pétrole liquéfié 6 Dommages causés par accident mésusage abus incendie inondations catastrophe naturelle ou l utilisation de produits non approuvés par Whirlpool 7 Réparations aux pièces ou systèmes dans le but de rectifier un dommage ou des défauts résultant d une réparation altération ou modification non autorisée faite à l appareil 8 Défauts d ap...

Reviews: