


20
3. Make sure the funnel (A21) is not blocked, then add one
level measure of pre-ground coffee (fig. 14).
4. Place a cup under the coffee spouts (A13).
5. Then select your required coffee (ESPRESSO, COFFEE, LONG)
from the homepage;
6. Preparation begins. An image of the selected beverage ap-
pears on the display, together with a progress bar which
gradually fills as preparation progresses.
• While the machine is making coffee, delivery can be inter-
rupted at any moment by pressing
.
• As soon as delivery has ended, to increase the quantity of
coffee in the cup, just press
. When the required
quantity is reached, press
.
Once the coffee has been made, the appliance is ready to make
the next beverage.
Making
LONG coffee:
Halfway through preparation, the message ADD PRE-GROUND
COFFEE, MAXIMUM ONE MEASURE is displayed. Add one level
measure of pre-ground coffee and press
.
Adjusting the coffee mill
The coffee mill is set by default to prepare coffee correctly and
should not require regulating initially.
However, if after making the first few coffees you find that the
coffee is either too weak and not creamy enough or delivery is
too slow (a drop at a time), this can be corrected by adjusting the
grinding adjustment dial A17 (fig. 11).
The grinding adjustment dial must only be turned when the
coffee mill is in operation during the initial phase of coffee
preparation.
If the coffee is delivered too slowly or not
at all, turn one click clockwise towards 7.
For fuller bodied creamier coffee, turn
one click anticlockwise towards 1 (do
not turn more than one click at a time
otherwise the coffee could be delivered
a drop at a time).
These adjustments will only be evident after at least 2 cups of
coffee have been delivered. If this adjustment does not obtain
the desired result, turn the dial another click.
Tips for a hotter coffee
For hotter coffee, you should:
• perform a rinse cycle by selecting the "Rinsing" function in
the settings menu (section “Rinsing
”);
• warm the cups with hot water using the hot water function
(see section “Delivering hot water”;
• increase the coffee temperature in the settings menu (see
section “Coffee temperature
”).
MAKING CAPPUCCINOS AND MILK-BASED COFFEES
To avoid milk with poor froth or large bubbles, always clean the
milk container lid (D2) and hot water connection nozzle (A10)
as described in sections “Cleaning the milk container after use”,
“Cleaning the milk container” and “Cleaning the hot water/
steam connection nozzle”.
Filling and attaching the milk container
1. Remove the lid (D2) (fig. 15);
2. Fill the milk container (D3) with a sufficient quantity of
milk, not exceeding the MAX level marked on the contain-
er (fig. 16). Each mark on the side of the container corre-
sponds to about 100 ml of milk;
• For a denser more even froth, you must use skimmed or par-
tially skimmed milk at refrigerator temperature (about 5°C).
• If "Energy Saving" mode is enabled, you may have to wait a
few seconds before the beverage is delivered.
1. Make sure the milk intake tube (D4) is correctly inserted in
the bottom of the milk container lid (fig. 17);
2. Place the lid back on the milk container;
3. Remove the hot water/steam spout (C4) (fig. 18);
4. Attach the milk container (D) to the connection nozzle
(A10) and push as far as it will go (fig. 19). The machine
emits a beep (if the beep function is enabled);
5. Place a sufficiently large cup under the coffee spouts (A13)
and frothed milk spout (D5). Adjust the length of the milk
spout. To move it nearer the cup, simply pull it downwards
(fig. 20).
5. Follow the instructions below for each function.
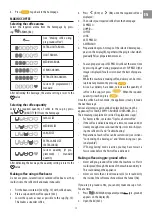
Adjusting the amount of froth
Turn the froth adjustment dial (D1) on the milk container lid to
adjust the amount of froth on the milk delivered while making
milk-based coffees. Follow the tips in the table below:
Dial
position
Description
Recommended for
No froth
CAFFELATTE /
HOT MILK
Min. froth
LATTE MACCHIATO
Max. froth
CAPPUCCINO /
MILK (frothed milk)
Summary of Contents for W11 CM145
Page 1: ...Instruction for Use ...
Page 2: ...2 ...
Page 4: ...4 x 1 x 1 approx 350mm x 2 560 1 mm x 4 x 4 FIG 3 FIG 5 FIG 4 FIG 6 FIG 7 ...
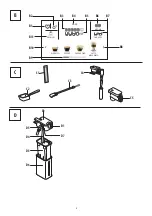
Page 5: ...5 A4 A1 A14 A13 A18 A3 A2 A5 A6 A8 A10 A7 A9 A16 A21 A15 A12 A A19 A17 A22 A20 A23 ...
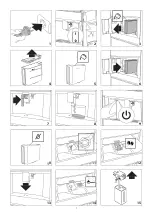
Page 7: ...7 1 4 5 7 13 15 2 3 6 8 9 10 12 14 11 ...
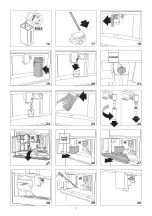
Page 8: ...8 16 30 17 18 23 24 25 20 22 28 27 26 21 19 29 ...
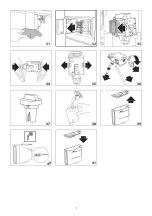
Page 9: ...9 34 33 36 38 39 40 35 37 41 31 32 ...
Page 36: ...400011239758 ...


