26
4.
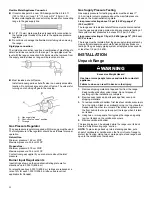
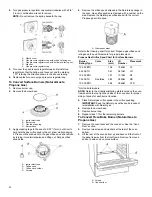
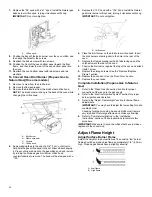
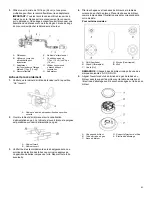
If the oven bake flame needs to be adjusted, locate the air
shutter near the center rear of the drawer cavity behind the
access panel. Loosen the locking screw and rotate the air
shutter until the proper flame appears. Tighten locking screw.
A. Locking screw
B. Air shutter
5.
Push the Off pad when finished.
6.
Reinstall the oven bottom and the premium storage drawer,
warming drawer or baking drawer or the storage drawer (see
the “Remove/Replace Drawer” section).
Adjust Oven Broil Burner Flame (If Needed)
Press BROIL, and then press the start pad. Look through the oven
window to check broil burner for proper flame. This flame should
have a 1/2" (1.3 cm) long inner cone of bluish-green with an outer
mantle of dark blue and should be clean and soft in character. No
yellow tips, blowing, or lifting of flame should be present.
If Flame Needs to be Adjusted:
1.
Press the Off pad. Let the oven cool.
2.
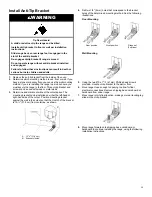
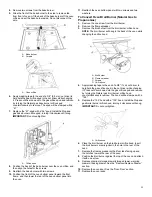
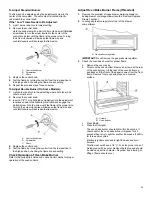
Loosen the lock screw on the air shutter located at the rear of
the broil burner.
3.
Adjust the air shutter as needed.
4.
Tighten lock screw.
A. Lock screw
B. Air shutter
5.
Close the oven door. Press BROIL, and then press the Start
pad. Look through the oven window to check broil burner for
proper flame. If flame needs to be adjusted, repeat steps 1 to
5.
Moving the Range
WARNING
Tip Over Hazard
A child or adult can tip the range and be killed.
Install anti-tip bracket to floor or wall per installation
instructions.
Slide range back so rear range foot is engaged in the
slot of the anti-tip bracket.
Re-engage anti-tip bracket if range is moved.
Do not operate range without anti-tip bracket installed
and engaged.
Failure to follow these instructions can result in death or
serious burns to children and adults.
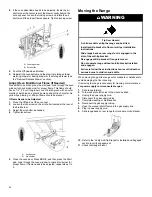
When moving range, slide range onto cardboard or hardboard to
avoid damaging the floor covering.
If removing the range is necessary for cleaning or maintenance:
For power supply cord-connected ranges:
1.
Slide range forward.
2.
Turn manual shutoff valve to the closed position.
3.
Unplug the power supply cord.
4.
Disconnect the gas supply tubing.
5.
Complete cleaning or maintenance.
6.
Reconnect the gas supply tubing.
7.
Open the manual shutoff valve in the gas supply line.
8.
Plug in power supply cord.
9.
Slide range back so rear range foot is under anti-tip bracket.
10.
Refer to the “Verify Anti-Tip Bracket Is Installed and Engaged”
section to verify engagement.
11.
Check that range is level.

