background image

If range does not
operate:

Check that the circuit breaker is
not tripped or the house fuse
blown.

Check that the power supply cord
is plugged into the outlet.

See Use and Care Guide for
troubleshooting list.

If you need
assistance:

If you have questions about operating,
cleaning or maintaining your range:

Refer to Use and Care Guide.

Call the Consumer Assistance

Center. Check your Use and Care
Guide for a toll-free number to call
or call the dealer from whom you
purchased this appliance. The dealer
is listed in the Yellow Pages of your
phone directory under “Appliances
— Household — 
Major — Service and Repair.”

If you need
service:

Maintain the quality built into your range
by calling an authorized service
company.

To obtain the name and number of the
authorized service company:

Contact the dealer from whom

you purchased your range; or

Look in the Yellow Pages of your

telephone directory under
“Appliances — Household —
Major — Service and Repair;” or

Call the Consumer Assistance

Center. The toll-free number is
listed in your Use and Care
Guide.

When you call, you will need:

The range model number.

The range serial number.

Both numbers are listed on the
model/serial rating plate located on
the oven frame behind the storage
drawer panel.

Moving the range:

When moving range, slide range onto
cardboard to prevent damaging the floor
covering.

If removing the range is necessary for
cleaning or maintenance:

1. Unplug range or disconnect power.

2. Slide range forward to complete

cleaning or maintenance.

3. Make sure the anti-tip bracket is

installed:

• Look for the anti-tip bracket 

securely attached to floor.

•  Slide range back so rear range 

foot is under anti-tip bracket.

4. Check that range is level.

5. Plug in range or reconnect power.

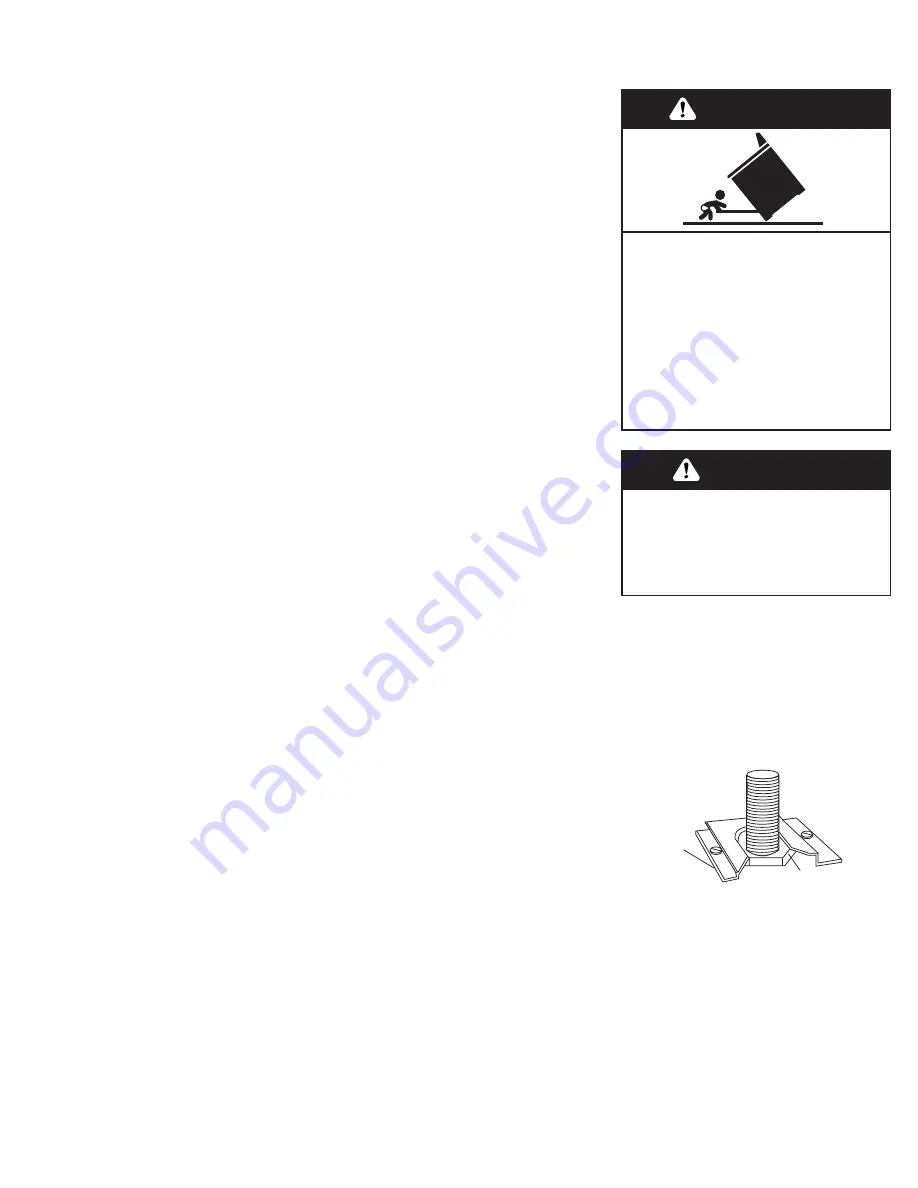
Tip Over Hazard

A child or adult can tip the range
and be killed.

Connect anti-tip bracket to rear
range foot.

Reconnect the anti-tip bracket, if
the range is moved.

Failure to follow these instructions
can result in death or serious
burns to children and adults.

WARNING

Benton Harbor, Michigan 49022

Printed in U.S.A.

Part No. 9756848
© 2003 Whirlpool Corporation

anti-tip
bracket

range foot

Excessive Weight Hazard

Use two or more people to move and
install range.

Failure to do so can result in back or
other injury.

WARNING

Summary of Contents for werp4120pq0

Page 1: ... listed on the model serial rating plate located on the oven frame behind the storage drawer panel Before you start Product dimensions Cabinet dimensions requirements Installation steps Check operation If range does not operate If you need assistance service Moving the range IMPORTANT Installer Leave Installation Instructions with the homeowner Homeowner Keep Installation Instructions for future r...

Page 2: ... must install this range Make sure you have everything necessary for correct installation It is the installer s responsibility to comply with installation clearances specified on the model serial rating plate The model serial rating plate is located on the oven frame behind the storage drawer panel Check location where range will be installed The range should be located for convenient use in kitch...

Page 3: ...terial Product dimensions Cabinet dimensions requirements 3 NOTE 24 61 cm min when bottom of wood or metal cabinet is protected by not less than 1 4 0 64 cm flame retardant millboard covered with not less than No 28 MSG sheet steel 0 015 0 4 mm stainless steel 0 024 0 6 mm aluminum or 0 020 0 5 mm copper 30 min 76 2 cm clearance between the top of the cooking platform and the bottom of an unprotec...

Page 4: ...ople to move and install range Failure to do so can result in back or other injury WARNING 1 Put on safety glasses and gloves Remove shipping materials tape and protective film from range Keep cardboard bottom and shipping base under range Remove oven racks and parts package from inside oven 2 Do not remove the cardboard shipping base at this time 3 Remove storage drawer Use a 3 8 drive ratchet to...

Page 5: ...ur range has oven selector and temperature control knobs If your oven has an electronic console 1 Press the BAKE pad The BAKE indicator will light 350 will appear in the display The START indicator will begin to flash after 5 seconds 2 Press the START ENTER pad The HEAT and ON indicators will light The display will show the automatic countdown time 6 minutes needed to preheat the oven for selected...

Page 6: ...se and Care Guide When you call you will need The range model number The range serial number Both numbers are listed on the model serial rating plate located on the oven frame behind the storage drawer panel Moving the range When moving range slide range onto cardboard to prevent damaging the floor covering If removing the range is necessary for cleaning or maintenance 1 Unplug range or disconnect...

Page 7: ...ère le panneau de façade du tiroir de rangement Avant de commencer Dimensions du produit Dimensions des placards et dégagements Processus d installation Contrôle du fonctionnement Si la cuisinière ne fonctionne pas Besoin d assistance ou de service après vente Déplacement de la cuisinière IMPORTANT Installateur Remettre les instructions d installation au propriétaire Propriétaire Conserver les ins...

Page 8: ...e plan de travail a été convenablement préparé Vérifier que tout le matériel nécessaire pour une installation correcte est disponible C est à l installateur qu incombe la responsabilité de respecter les dégagements de séparation spécifiés sur la plaque signalétique On trouve la plaque signalétique sur le châssis du four derrière le tiroir de remisage Examiner l emplacement où la cuisinière sera in...

Page 9: ...combustible Dimensions du produit Dimensions des placards et dégagements 3 NOTE Distance minimale de 61 cm 24 po min lorsque le fond de bois ou de métal du placard est protégé par un matériau ignifugé d au moins 0 64 cm 1 4 po recouvert d une tôle d acier au moins 28 MSG d acier inoxydable 0 4 mm 0 015 po d aluminium 0 6 mm 0 024 po ou de cuivre 0 5 mm 0 020 po Distance minimale de 76 2 cm 30 po m...

Page 10: ...fs et film de protection Laisser palette matériaux d emballage sous la cuisinière Enlever les grilles du four les grilles de brûleur et les sachets de pièces placés à l intérieur du four 2 Ne pas déjà enlever la base de l emballage de carton 3 Retirer du tiroir de rangement Avec une clé à cliquet à prise de 3 8 po déployer de un demi tour les pieds arrière de réglage de l aplomb Utiliser la pince ...

Page 11: ...he START ENTER Les témoins HEAT et ON chauffage et fonctionnement s allument L afficheur présente le décompte automatique 6 minutes du préchauffage du four pour la température sélectionnée L élément inférieur doit rougeoyer L élément supérieur devrait s échauffer mais sans rougeoyer Le four a atteint la température de préchauffage lorsque le témoin HEAT s éteint l appareil émet un signal sonore 1 ...

Page 12: ...e sol S il est nécessaire de retirer la cuisinière pour une opération de nettoyage ou entretien 1 Débrancher la cuisinière ou déconnecter la source de courant électrique 2 Faire glisser l appareil vers l avant pour pouvoir exécuter les opérations de nettoyage ou entretien 3 Vérifier que la bride anti basculement est correctement installée La bride anti basculement doit être solidement fixée au pla...

Reviews: