background image

W10841336B

ELECTRIC RANGE 

USER INSTRUCTIONS

THANK YOU for purchasing this high-quality product. Register your new range at 

www.whirlpool.com. 

In Canada, register your range 

at 

www.whirlpool.ca.

For future reference, please make a note of your product model and serial numbers. These can be located on the oven frame behind  

the top right side of the oven door.

Model Number__________________________________________        Serial Number__________________________________________

Para una versión de estas instrucciones en español, visite 

www.whirlpool.com.

Deberá tener a mano el número de modelo y de serie, que están ubicados en el marco del horno, detrás del lado derecho 

superior de la puerta del horno.

Table of Contents

RANGE SAFETY .............................................................................2

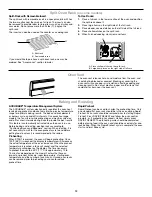
The Anti-Tip Bracket ....................................................................2

FEATURE GUIDE ............................................................................4
COOKTOP USE ..............................................................................
6

Cookware .....................................................................................8
Home Canning .............................................................................9

OVEN USE .......................................................................................9

Electronic Oven Controls .............................................................9
Sabbath Mode............................................................................10
Aluminum Foil .............................................................................11
Positioning Racks and Bakeware ..............................................11
Split Oven Rack ..........................................................................12
Oven Vent ...................................................................................12
Baking and Roasting ..................................................................12
Broiling........................................................................................13
Convection Cooking ..................................................................13
Cook Time ..................................................................................13

RANGE CARE ...............................................................................14

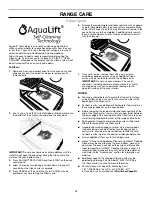
Clean Cycle ................................................................................14
General Cleaning ........................................................................15
Oven Light ..................................................................................16

TROUBLESHOOTING ..................................................................16
ACCESSORIES .............................................................................18
WARRANTY ..................................................................................19

Summary of Contents for WFE745H0FE

Page 1: ...______ Para una versión de estas instrucciones en español visite www whirlpool com Deberá tener a mano el número de modelo y de serie que están ubicados en el marco del horno detrás del lado derecho superior de la puerta del horno Table of Contents RANGE SAFETY 2 The Anti Tip Bracket 2 FEATURE GUIDE 4 COOKTOP USE 6 Cookware 8 Home Canning 9 OVEN USE 9 Electronic Oven Controls 9 Sabbath Mode 10 Alu...

Page 2: ...y alert symbol and either the word DANGER or WARNING These words mean follow instructions instructions DANGER WARNING Tip Over Hazard A child or adult can tip the range and be killed Verify the anti tip bracket has been properly installed and engaged per installation instructions Re engage anti tip bracket if range is moved Do not operate range without anti tip bracket installed and engaged Failur...

Page 3: ...f these pans or bowls during cooking may subject wiring or components underneath to damage Protective Liners Do not use aluminum foil to line surface unit drip bowls or oven bottoms except as suggested in the manual Improper installation of these liners may result in a risk of electric shock or fire Glazed Cooking Utensils Only certain types of glass glass ceramic ceramic earthenware or other glaz...

Page 4: ...t have to be entered For example for 2 minutes enter 2 3 Press TIMER or START to begin the countdown If enabled end of cycle tones will sound at end of countdown 4 Press TIMER twice to cancel the Timer and return to the Time of Day Do not press the Cancel keypad because the oven will turn off 5 If the Timer is running but not in the display press TIMER to display the countdown for 5 seconds START ...

Page 5: ...r 3 times for convection broiling 2 Press the number keypads to set a temperature other than 350 F 177 C in 5 increments between 170 F and 500 F 77 C and 260 C 3 Press START Auto conversion will reduce the temperature by 25 F 15 C 4 To change the temperature repeat steps 1 and 2 Press START or wait 5 seconds for the change to take effect 5 Press CANCEL when finished KEEP WARM Hold warm Food must b...

Page 6: ... IMPORTANT To avoid permanent damage to the cooktop surface and to make soils easier to remove clean the cooktop after each use to remove all soils Avoid storing jars or cans above the cooktop Dropping a heavy or hard object onto the cooktop could crack the cooktop To avoid damage to the cooktop do not leave a hot lid on the cooktop As the cooktop cools air can become trapped between the lid and t...

Page 7: ...d for larger cookware larger quantities of food and home canning A Triple B Dual C Single NOTE Settings are marked on the control knob Dual Zone Cooking Element on some models The Dual Zone Cooking Element offers flexibility depending on the size of the cookware Single size can be used in the same way as a regular element The dual size combines both the single and outer element and is recommended ...

Page 8: ...tructions Heats slowly but unevenly Ideal results on low to medium heat settings May scratch the cooktop Copper Heats very quickly and evenly May leave copper residues which may be diminished if cleaned immediately after cooking Can leave a permanent stain or bond to the cooktop if overheated Earthenware Follow manufacturer s instructions Use on low heat settings May scratch the cooktop Porcelain ...

Page 9: ...SH START TO CHANGE will be displayed 2 Press START to display the current setting 3 Press 3 for AM or 6 for PM 4 Press the number keypads to set the time of day 5 Press START 6 Press CANCEL to exit Oven Temperature Offset Control IMPORTANT Do not use a thermometer to measure oven temperature Elements will cycle on and off as needed to provide consistent temperature but may run slightly hot or cool...

Page 10: ...floor with 120 V power connection and permits the control features to be demonstrated without heating elements turning on If this feature is activated the oven will not work 1 Press SETTINGS until DEMO MODE is displayed 2 Press START to display the current setting 3 Press the 3 keypad to adjust the setting 4 Press START to save the setting 5 Press CANCEL to exit 12 Hour Shutoff The oven control is...

Page 11: ...x Capacity Rack is used the rack position must be adjusted as shown in the previous figure Multiple Rack Cooking 2 rack Use rack positions 2 and 5 for regular baking 2 rack convection only Use rack positions 2 and 5 or 3 and 6 3 rack true convection only Use rack positions 1 4 and 7 or 2 4 and 6 Baking Cookies and Layer Cakes on 2 Racks Baking Layer Cakes For best results when baking cakes on 2 ra...

Page 12: ...that have an impact on preheat times are room temperature starting oven temperature and the number of oven racks Unused oven racks can be removed prior to preheating your oven to reduce preheat time Rapid Preheat Rapid Preheat can be used to shorten the preheating time Only one standard flat oven rack should be in the oven during Rapid Preheat Extra racks should be removed prior to starting Rapid ...

Page 13: ...the display To Set a Delayed Timed Cook 1 Press BAKE or press CONVECT once for Convection Baking or twice for Convection Roasting 2 Press the number keypads to enter a temperature other than the one displayed 3 Press COOK TIME The cook time oven indicator light will light up 4 Press number keypads to enter the length of time to cook 5 Press START TIME The start time delay oven indicator light will...

Page 14: ...Additional Clean cycles may be run to help remove the stubborn soils IMPORTANT Do not use oven cleaners The use of chemicals including commercial oven cleaners or metal scouring pads may cause permanent damage to the porcelain surface of the oven interior NOTES The range should be level to ensure that the entire surface of the bottom of the oven cavity is covered by water at the beginning of the C...

Page 15: ...teel wool abrasive powder cleansers chlorine bleach rust remover or ammonia 1 Remove food residue with the Cooktop Scraper Repeat steps 1 through 3 as necessary for stubborn or burned on stains The Complete Cooktop Cleaner Kit is available for order and includes the following Cooktop Scraper affresh Cooktop Cleaner Blue Cooktop Cleaning Pads See the Accessories section for part numbers and informa...

Page 16: ...hould be cleaned when oven cools At high temperatures foods react with porcelain and staining etching pitting or faint white spots can result Cleaning Method Clean cycle See Clean Cycle first Operation PROBLEM POSSIBLE CAUSES SOLUTIONS Nothing will operate Power supply cord is unplugged Plug into a grounded outlet Household fuse is blown or a circuit breaker is tripped Replace the fuse or reset th...

Page 17: ...stallation Instructions To remove deposits use a cloth soaked with vinegar Then use a cloth dampened with water to thoroughly remove any vinegar residue Oven cooking results not what expected Range is not level Level the range See the Installation Instructions The temperature set was incorrect Double check the recipe in a reliable cookbook Oven temperature is calibrated incorrectly See Oven Temper...

Page 18: ...mber W10355051 Cooktop Cleaning Pads ceramic glass models Order Part Number W10391473 affresh Stainless Steel Cleaner stainless steel models Order Part Number W10355016 affresh Kitchen and Appliance Cleaner Order Part Number W10355010 AquaLift Oven Cleaning Kit Order Part Number W10423113RP Cooktop Scraper ceramic glass models Order Part Number WA906B Granite Cleaner and Polish Order Part Number W...

Page 19: ...utions etc 5 Defects or damage caused by the use of non genuine Whirlpool parts or accessories 6 Conversion of products from natural gas or L P gas 7 Damage from accident misuse abuse fire floods acts of God or use with products not approved by Whirlpool 8 Repairs to parts or systems to correct product damage or defects caused by unauthorized service alteration or modification of the appliance 9 C...

Page 20: ...W10841336B SP PN W10856229 FR PN W10841337 2016 Whirlpool Used under license in Canada All rights reserved 1 16 ...

Reviews: