background image

11

Display shows messages

Is the display showing a flashing time?
There has been a power failure. Clear the display. On some 
models, reset the clock, if needed. See “Clock” keypad feature 
in the “Feature Guide” section.

Is the display showing a letter followed by a number?
Depending on your model, press OFF/CANCEL or CANCEL/
OFF to clear the display. See “Control Display” in the 
“Electronic Oven Controls” section. If it reappears, call for 
service. See cover for contact information.

Is the display showing a flashing “PUSH?” or “PSH”?
See the “Start” keypad feature in the “Feature Guide” section.

Self-Cleaning cycle will not operate

Is the oven door open?
Close the oven door all the way.

Has the function been entered?
See “Self-Cleaning Cycle” section.

Has a delay start been set? (on some models)
See “Timed Cooking” section.

Has a self-clean cycle been run in the past 12 hours?
If a self-clean cycle has been run, or canceled after the oven 
has reached temperature, you will have to wait 12 hours to 
restart.

Oven cooking results not what expected

Is the range level?
Level the range. See the Installation Instructions.

Is the proper temperature set?
Double-check the recipe in a reliable cookbook.

Is the proper oven temperature calibration set?
See “Oven Temperature Control” section of the “Electronic 
Oven Controls” section.

Was the oven preheated?
See “Baking and Roasting” section.
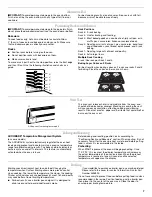
Are the racks positioned properly?
See “Positioning Racks and Bakeware” section.

Is there proper air circulation around bakeware?
See “Positioning Racks and Bakeware” section.

Is the batter evenly distributed in the pan?
Check that batter is level in the pan.

Is the proper length of time being used?
Adjust cooking time.

Has the oven door been opened while cooking?
Oven peeking releases oven heat and can result in longer 
cooking times.

Are baked items too brown on the bottom?
Move rack to higher position in the oven.

Are pie crust edges browning early?
Use aluminum foil to cover the edge of the crust and/or reduce 
baking temperature.

ACCESSORIES

Stainless Steel Cleaner and Polish

(stainless steel models)
Order Part Number 31462

All-Purpose Appliance Cleaner

Order Part Number 31682

Gas Grate and Drip Pan Cleaner

Order Part Number 31617

Split-Rack with Removable Insert

Order Part Number 4396927

Broiler Pan

Order Part Number 4396923

Summary of Contents for WFG361LV

Page 1: ...ional acerca de su producto visite www whirlpool com Tenga listo su número de modelo completo Puede encontrar su número de modelo y de serie en la etqueta en el marco del horno detrás del panel del cajón de almacenamiento GASRANGE USERINSTRUCTIONS Table of Contents RANGE SAFETY 2 The Anti Tip Bracket 3 FEATURE GUIDE 4 COOKTOP USE 5 Sealed Surface Burners 5 OVEN USE 6 Electronic Oven Controls 6 Alu...

Page 2: ...iance WHAT TO DO IF YOU SMELL GAS Do not try to light any appliance Do not touch any electrical switch Do not use any phone in your building Immediately call your gas supplier from a neighbor s phone Follow the gas supplier s instructions If you cannot reach your gas supplier call the fire department Installation and service must be performed by a qualified installer service agency or the gas supp...

Page 3: ...WARNING NEVER cover any slots holes or passages in the oven bottom or cover an entire rack with materials such as aluminum foil Doing so blocks air flow through the oven and may cause carbon monoxide poisoning Aluminum foil linings may also trap heat causing a fire hazard CAUTION Do not store items of interest to children in cabinets above a range or on the backguard of a range children climbing o...

Page 4: ... time of day including a m or p m 4 Press SET CLOCK or START TIMER SET OFF Oven timer The Timer can be set in hours or minutes up to 12 hours and 59 minutes 1 Press TIMER 2 Press TEMP TIME or arrow pads to set the length of time 3 Press START to begin the countdown If enabled end of cycle tones will sound at end of countdown 4 Press TIMER twice to cancel the Timer Do not press the CANCEL OFF keypa...

Page 5: ...ionally for proper size and shape as shown above A good flame is blue in color not yellow Keep this area free of soil and do not allow spills food cleaning agents or any other material to enter the burner ports COOK TIME Timed cooking Timed Cooking allows the oven to be set to turn on at a certain time of day cook for a set length of time and or shut off automatically Delay start should not be use...

Page 6: ...ach minute after the end of cycle tones Three tones Invalid pad press Four tones End of cycle Fahrenheit and Celsius The temperature is preset at Fahrenheit but can be changed to Celsius To change Press and hold BROIL for 5 seconds A tone will sound and C or F will appear on the display Repeat to change back To exit mode press CANCEL OFF Oven Temperature Control IMPORTANT Do not use a thermometer ...

Page 7: ... results Do not set plastics paper or other items that could melt or burn near the oven vent BakingandRoasting ACCUBAKE Temperature Management System on some models The ACCUBAKE system electronically regulates the oven heat levels during preheat and bake to maintain a precise temperature range for optimal cooking results The bake and broil elements or burners cycle on and off in intervals This fea...

Page 8: ...damp cloth to clean inside door edge and the 1 3 8 cm area around the inside oven cavity frame being certain not to move or bend the gasket Remove plastic items from the cooktop because they may melt Remove all items from the storage drawer How the Cycle Works IMPORTANT The heating and cooling of porcelain on steel in the oven may result in discoloring loss of gloss hairline cracks and popping sou...

Page 9: ...s against each other or hard surfaces such as cast iron cookware Do not reassemble caps on burners while wet Do not clean in the Self Cleaning cycle Cleaning Method Nonabrasive plastic scrubbing pad and mildly abrasive cleanser Clean as soon as cooktop grates and caps are cool Dishwasher grates only not caps Use the most aggressive cycle Cooked on soils should be soaked or scrubbed before going in...

Page 10: ...e cycle A pop can be heard when the gas valve is opening or cycling on and will make a single pop when it snaps open from the solenoid It sounds similar to a suction cup being pulled off of a piece of glass The igniters will click several times until the flame is detected These are short clicking sounds like tapping a nail onto a piece of glass A whooshing or poof sound is heard when the Bake or B...

Page 11: ... Level the range See the Installation Instructions Is the proper temperature set Double check the recipe in a reliable cookbook Is the proper oven temperature calibration set See Oven Temperature Control section of the Electronic Oven Controls section Was the oven preheated See Baking and Roasting section Are the racks positioned properly See Positioning Racks and Bakeware section Is there proper ...

Page 12: ...if your major appliance is located in a remote area where service by an authorized Whirlpool servicer is not available 10 The removal and reinstallation of your major appliance if it is installed in an inaccessible location or is not installed in accordance with published installation instructions 11 Major appliances with original model serial numbers that have been removed altered or cannot be ea...

Reviews: