background image

12

Positioning Racks and Bakeware

IMPORTANT: To avoid permanent damage to the porcelain finish, 
do not place food or bakeware directly on the oven door or bottom.

Bakeware

To cook food evenly, hot air must be able to circulate. Allow 
2" (5 cm) of space around bakeware and oven walls. Make sure 
that no bakeware piece is directly over another.

Racks

Position racks before turning on the oven. 

Do not move racks with bakeware on them. 

Make sure racks are level. 

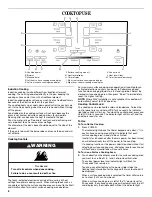
To move a rack, pull it out to the stop position, raise the front edge, 
and then lift out. Use the following illustration and charts as a 
guide.

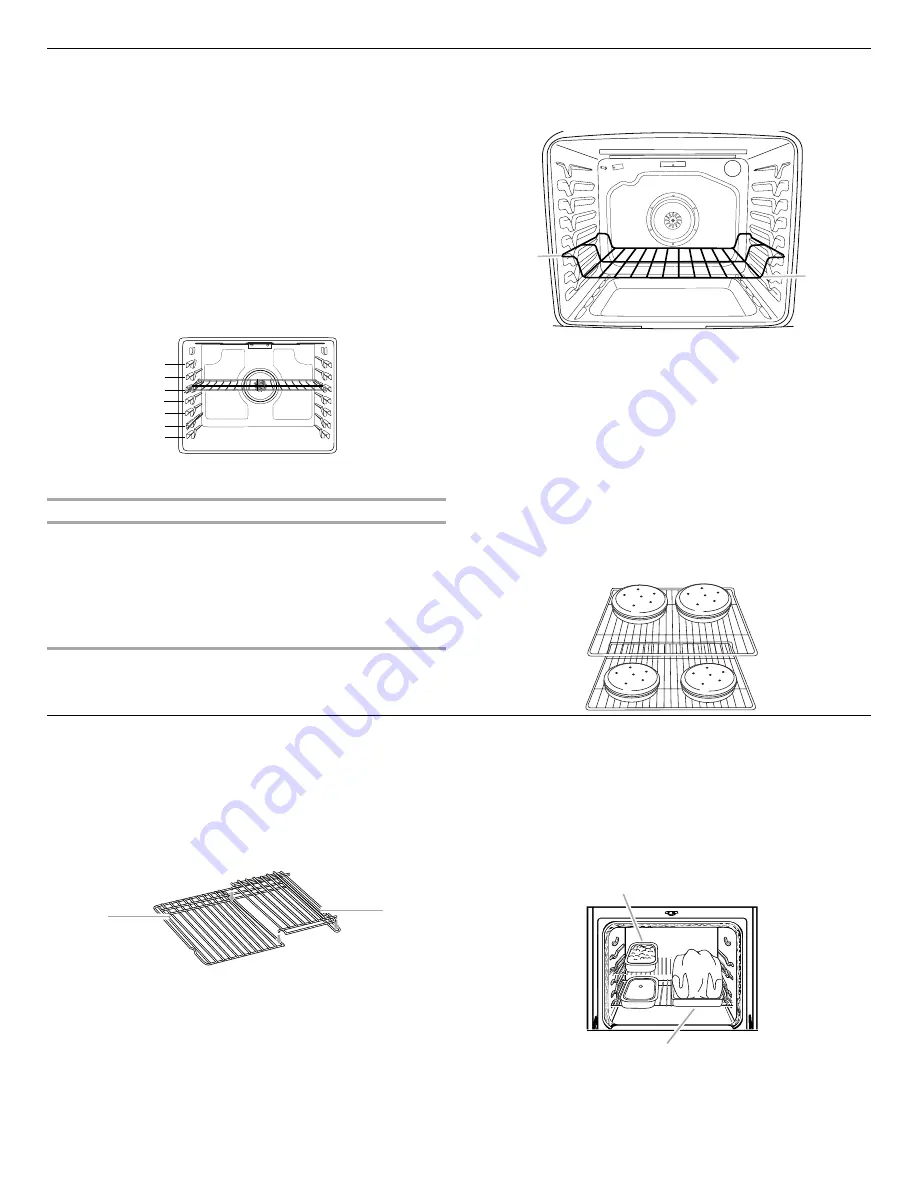
The oven has 7 positions for a flat rack, as shown in the previous 
illustration and the following table. 

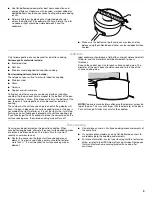
*If your model has a Max Capacity Oven Rack, the recessed ends 

must be placed in the rack position above the desired position of 
the food. See the following illustration.

IMPORTANT: These rack positions are for flat racks. If a Max 
Capacity Oven Rack is used, the rack position must be adjusted as 
shown in the previous figure.
Multiple Rack Cooking

2-rack: Use rack positions 2 and 5 for regular baking.
2-rack (convection only): Use rack positions 2 and 5; or 3 and 6.
3-rack (convection only): Use rack positions 1, 4 and 7; or 2, 4 
and 6.
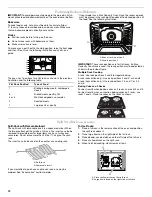
Baking Cakes on 2 Racks

For best results when baking cakes on 2 racks, use racks 2 and 5. 
For best results when convection baking cakes on 2 racks, use 
racks 1 and 4. Place the cakes on the racks as shown.

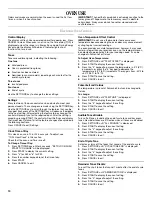
Split Oven Rack 

(on some models)

Split-Rack with Removable Insert

The split-rack with removable insert is a space maximizer. When 
the two are attached, they make a full rack. The insert can also be 
removed to provide room for large items such as a turkey and 
casseroles. Do not place more than 25 lbs (11.3 kg) on the split-
rack.
The insert can also be used on the counter as a cooling rack.

If you would like to purchase a split-oven rack, one may be 
ordered. See “Accessories” section to order. 

To Use Racks:

1. Place a full rack in the lower section of the oven and position 

the split-rack above it.

2. Place large items on the right side of the full rack.
3. Place deeper, covered dishes on the left side of the full rack. 
4. Place shallow dishes on the split-rack.
5. When finished cooking, slowly remove items.

Flat Rack Position*

Type of Food

7

Broiling/searing meats, hamburgers, 
steaks

6

Broiled meats, poultry, fish

3 or 4

Most baked goods, casseroles

2

Roasted  meats

1

Large  roasts  or  poultry

7
6
5

4
3
2
1

A. Ends of rack in position 3
B. Food in position 2

A

B

A. Split-rack
B. Removable insert

A

B

A. Place shallow dishes on the split-rack
B. Large item placed on the right side of full-rack

A

B

Summary of Contents for  WFI910H0AS

Page 1: ... su producto visite www whirlpool com Deberá tener a mano el número de modelo y de serie que están ubicados en el marco del horno detrás del lado derecho superior de la puerta del horno Table of Contents RANGE SAFETY 2 The Anti Tip Bracket 2 FEATURE GUIDE 4 COOKTOP USE 6 Cookware 9 Home Canning 9 OVEN USE 10 Electronic Oven Controls 10 Sabbath Mode 11 Aluminum Foil 11 Positioning Racks and Bakewar...

Page 2: ... alert symbol and either the word DANGER or WARNING These words mean follow instructions instructions DANGER WARNING Tip Over Hazard A child or adult can tip the range and be killed Verify the anti tip bracket has been properly installed and engaged per installation instructions Re engage anti tip bracket if range is moved Do not operate range without anti tip bracket installed and engaged Failure...

Page 3: ...f these pans or bowls during cooking may subject wiring or components underneath to damage Protective Liners Do not use aluminum foil to line surface unit drip bowls or oven bottoms except as suggested in the manual Improper installation of these liners may result in a risk of electric shock or fire Glazed Cooking Utensils Only certain types of glass glass ceramic ceramic earthenware or other glaz...

Page 4: ...ed instructions KEYPAD FEATURE INSTRUCTIONS CLOCK Clock This clock can use a 12 or 24 hour cycle See Electronic Oven Controls section 1 Press SETTINGS once 2 Press START to change the time 3 Press 3 for AM or 6 for PM 4 Press the number keypads to set the time of day 5 Press START OVEN LIGHT Oven cavity light While the oven door is closed press the OVEN LIGHT keypad to turn the light on and off Th...

Page 5: ... time for the BAKE function 1 Press RAPID PREHEAT 2 Press the number keypads in response to the scrolling text to enter the Bake temperature 3 Press START 4 A reminder tone will sound when the preheat temperature is reached Place food inside the oven NOTE This feature should only be used for one rack baking Unused racks should be removed prior to Rapid Preheat A standard rack should be used for Ra...

Page 6: ...control panel press and hold LOCK for 3 seconds An indicator light above Lock will turn on To unlock the control panel press and hold LOCK for 3 seconds The indicator light will turn off and the cooktop is ready for use To Use To Turn On the Cooktop 1 Press POWER The indicator light above the Power keypad and a dash in each surface cooking area will light to indicate that each surface cooking area...

Page 7: ...unction can be used with all surface cooking areas To Use To Turn On 1 Check that a surface cooking area has been selected 2 Touch MELT HOLD A will appear in the display and the indicator light next to Melt Hold will light The timer remains visible and can be set if desired To Turn Off Melt and Hold can be turned off in 3 different ways 1 Use the power slider to set to a heat level OR 2 Touch the ...

Page 8: ...wer level Slider is moved to Boost power level Two tones Invalid pad press Three tones End of Timer cycle Ceramic Glass Clean the cooktop after each use to help avoid scratches pitting abrasions and to condition the glass surface Ceramic glass cooktop cleaner and a cooktop scraper are also recommended for stubborn soils Do not use abrasive cleaners cleaning pads or harsh chemicals for cleaning The...

Page 9: ...ing once a suitable pan is placed on the surface cooking area If you take longer than 90 seconds to place the correct pan on the surface cooking area the surface cooking area will turn off Ideal cookware should have a flat bottom straight sides and a well fitting lid and the material should be of medium to heavy thickness Choose the correct pan size for each surface cooking area The diameter of th...

Page 10: ...Press the number keypads to set the time of day 5 Press START 6 Press CANCEL to exit Oven Temperature Offset Control IMPORTANT Do not use a thermometer to measure oven temperature because opening the oven door may cause element cycling to give incorrect readings The oven provides accurate temperatures however it may cook faster or slower than your previous oven so the temperature can be adjusted t...

Page 11: ... START to display the current setting 3 Press the 3 keypad to adjust the setting 4 Press START to save the setting 5 Press CANCEL to exit SabbathMode The Sabbath Mode sets the oven to remain on in a bake setting until turned off When the Sabbath Mode is set all cooking and cleaning cycles are disabled Only the Bake cycle will operate in the Sabbath Mode No tones will sound and the displays will no...

Page 12: ... 4 and 7 or 2 4 and 6 Baking Cakes on 2 Racks For best results when baking cakes on 2 racks use racks 2 and 5 For best results when convection baking cakes on 2 racks use racks 1 and 4 Place the cakes on the racks as shown SplitOvenRack onsomemodels Split Rack with Removable Insert The split rack with removable insert is a space maximizer When the two are attached they make a full rack The insert ...

Page 13: ...he door open 6 15 cm at the broil stop position to ensure proper broiling temperature Preheat the oven for 5 minutes before putting food in unless recommended otherwise in the recipe Position food on grid in a broiler pan then place it in the center of the oven rack NOTE Odors and smoke are normal the first few times the oven is used or if the oven is heavily soiled Changing the temperature when b...

Page 14: ...pes of food may be placed in the warming drawer at the same time For best results do not hold foods longer than 1 hour For smaller quantities pizza or heat sensitive foods such as eggs do not hold longer than 30 minutes Food must be at serving temperature before being placed in the warming drawer Breads pastries and fruit pies may be heated from room temperature Remove food from plastic bags and p...

Page 15: ...remove them with a non scratch scrubbing sponge or plastic scraper Additional Clean cycles may be run to help remove the stubborn soils IMPORTANT Do not use oven cleaners The use of chemicals including commercial oven cleaners or metal scouring pads may cause permanent damage to the porcelain surface of the oven interior NOTES The range should be level to ensure that the entire surface of the bott...

Page 16: ...soil Can be cleaned with damp paper towels or sponge Light stains should be addressed with cleaner and cleaning pad Sugary spills jellies candy syrup Clean with cooktop scraper and cooktop cleaner Scrape off sugary spills while the cooktop is still warm You may want to wear oven mitts while cleaning the cooktop Heavy soil dark streaks specks and discoloration Clean with Cooktop Cleaner or nonabras...

Page 17: ...lash Needs service oven indicator lights are flashing See Control Display in the Electronic Oven Controls section If the indicator light s keeps flashing call for service See cover for contact information Oven control displays messages Power failure display shows flashing time Clear the display On some models reset the clock if needed See Clock keypad feature in the Feature Guide section Error cod...

Page 18: ...e Oven cooking results not what expected Range is not level Level the range See the Installation Instructions The temperature set was incorrect Double check the recipe in a reliable cookbook Oven temperature is calibrated incorrectly See Oven Temperature Control in the Electronic Oven Controls section Oven was not preheated See Baking and Roasting section Racks were positioned improperly See Posit...

Page 19: ... even after the cooktop has been switched off if the temperature it detects is too high Cooktop Care Kit ceramic glass models includes cleaner protectant scraper and applicator pads Order Part Number 31605 Cooktop Protectant ceramic glass models Order Part Number 31463A affresh Stainless Steel Cleaning Wipes stainless steel models Order Part Number W10355049 affresh Cooktop Cleaner ceramic glass m...

Page 20: ...r major appliance is located in a remote area where service by an authorized Whirlpool servicer is not available 10 The removal and reinstallation of your major appliance if it is installed in an inaccessible location or is not installed in accordance with published installation instructions 11 Major appliances with original model serial numbers that have been removed altered or cannot be easily d...

Reviews: