background image

13

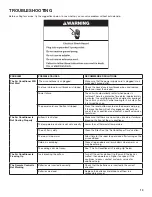
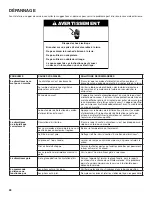
TROUBLESHOOTING

Before calling for service, try the suggestions below to see whether you can solve problem without outside help.

PROBLEM

POSSIBLE CAUSES

RECOMMENDED SOLUTIONS

The Air Conditioner Will 

Not Start

 The air conditioner is unplugged.

Make sure that the power supply cord is plugged into a 

grounded 3 prong outlet.

The fuse is blown/circuit breaker is tripped.

Check the house fuse/circuit breaker box and replace 

the fuse or reset the breaker.

Power failure.

The unit will automatically restart when power is 

restored. There is a protective time delay (approximately 

3 minutes) to avoid tripping of the compressor overload. 

The unit may not start normal cooling for 3 minutes after 

it is turned back on.

The power cord reset button is tripped.

Press the reset button located on the power cord plug. 

If the reset button will not stay engaged, discontinue 

use of the air conditioner and contact a qualified service 

technician.

The Air Conditioner Is 

Not Cooling Properly

Airflow is restricted.

Make sure that there are no curtains, blinds, or furniture 

blocking the front of the air conditioner.

The temperature control is not set correctly.

Lower the set thermostat temperature.

The air filter is dirty.

Clean the filter. See the “Air Conditioner Care” section.

The room is too warm.

Allow time for the room to cool down after turning on the 

air conditioner.

Cold air is escaping.

Close all open doors and/or windows where warm air 

may be entering.

The cooling coils are frozen.

See “The Air Conditioner Is Freezing Up” below.

The Air Conditioner Is 

Freezing Up

Ice is blocking the airflow.

Turn off the unit and allow it to thaw until the ice has 

melted, then operate on a higher fan speed. If this 

continues to occur, contact customer service for 

additional help.

The Remote Control Is 

Not Working

Batteries are inserted incorrectly.

Check that the batteries are inserted in the correct 

direction.

Batteries are dead.

Replace the batteries and dispose of them in a 

responsible manner.

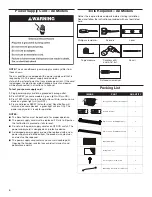
Summary of Contents for WHAT081-1AW

Page 1: ...ools Required All Models 4 Packing List 4 Universal Wall Sleeve Dimensions 5 INSTALLATION INSTRUCTIONS 6 Prepare Air Conditioner for Installation 6 Dual Intake Grille 7 Trim Kit Installation Instructions 8 USING AIR CONDITIONER 9 Turning on the Air Conditioner 9 Selecting the Mode 9 Features 9 Selecting the Fan Speed 9 Adjusting the Temperature 9 Using the Timer 10 Changing Air Direction 10 Use of...

Page 2: ...uding children whose physical sensory or mental capacities are different or impaired or who lack the necessary experience or knowledge expertise to do so unless such persons are supervised or are trained to operate the appliance by a person who accepts responsibility for their safety Do not use an extension cord Unplug air conditioner before servicing Use two or more people to move and install air...

Page 3: ...min 240 max 0 8 A 10 A time delay fuse or circuit breaker 8 000 BTU 115 V and 10 000 14 000 BTU 230 V Cooling Heating models 4 15 A 20 A time delay fuse or circuit breaker If there is a Single Circuit Only label on the unit use on a dedicated single outlet circuit only If a dedicated single outlet circuit is not available then it is the customer s responsibility to have a single outlet circuit ins...

Page 4: ... is pressed or fails to reset Do not use the power supply cord as an OFF ON switch The power supply cord is designed as a protective device A damaged power supply cord must be replaced with a new power supply cord obtained from the product manufacturer and must not be repaired The power supply cord contains no user serviceable parts Opening the tamper resistant case voids all warranty and performa...

Page 5: ...e 2 Remove the old air conditioner from wall sleeve and prepare as follows Clean interior Do not disturb seals Check the wall sleeve to make sure that it is securely attached to the wall before installing Repair painted surface if needed 3 If the ground wire hole does not exist drill a 3 16 pilot hole for the ground screw through the left hand side of the sleeve in a clear area about 3 inches max ...

Page 6: ...unit can operate at maximum efficiency If there is an existing sleeve and rear grille check whether the dimension is suitable or not otherwise replace them Existing Sleeves may have older single sided intake grilles Single sided intake grilles must be replaced with the dual intake grille type as shown in the above figure Remove the existing grille and save the mounting screws Place the grille incl...

Page 7: ...it apply two 1 x 3 4 x 14 seals along the flat metal flange of the condenser as shown in below figure Seal Seal In cases where the dual intake grille cannot be mounted directly to the sleeve it is desirable to attach the grille to the back of the TTW unit to the hole predrilled in the unit 1 Attach the 2 seals 1 x 3 8 x 14 as shown in above figure 2 Position the grille over the rear of the unit to...

Page 8: ...Pull the cord through the trim frame and slide the trim over the unit until flush with the wall Energy saving suggestion In order to reach the maximum energy saving and comfortability it is necessary to use an appropriately sized cover to provide additional insulation and air sealing when the unit is not in use during the off using season HIGH COOL DRY FAN AUTO NEXT MED LOW AUTO SPEED FAN SPEED SP...

Page 9: ... show the current room temperature Selecting the Fan Speed 1 Press FAN SPEED button until the LED indicator for the desired setting is lit 2 Choose Low Med or High Low Low fan speed Med Normal fan speed High Maximum fan speed NOTES Auto fan speed and temperature cannot be selected in Fan Only mode In ECO and SLEEP modes Auto fan speed is selected automatically After 5 seconds the display will show...

Page 10: ...emaining is shown on the display To Cancel Timer After the timer has been set press TIMER button Changing Air Direction Air Deflector Air Deflector Horizontal Wheel Use of the Directional Louvers Normal Operating Sounds When the air conditioner is operating normally you may hear sounds such as Droplets of water hitting the condenser causing a pinging or clicking sound The water droplets help cool ...

Page 11: ...erves energy by turning OFF compressor when room reaches desired temperature The fan motor will run for 20 to 40 seconds and then it will stop this will repeat to provide more comfortable feeling and save energy The compressor will turn back ON when the room temperature rises above the set temperature Press ECO to turn Eco feature ON and OFF When the unit is in Eco mode the light will turn ON Slee...

Page 12: ...rate the air conditioner without the filter in place Doing so will degrade the unit performance over time 1 Use a vacuum cleaner to clean air filter 2 If the air filter is very dirty use the liquid dish soap and warm water to wash the filter 3 Rinse the filter properly and shake the filter gently to remove the excess water 4 Let the filter dry completely before placing it into the air conditioner ...

Page 13: ...er and contact a qualified service technician The Air Conditioner Is Not Cooling Properly Airflow is restricted Make sure that there are no curtains blinds or furniture blocking the front of the air conditioner The temperature control is not set correctly Lower the set thermostat temperature The air filter is dirty Clean the filter See the Air Conditioner Care section The room is too warm Allow ti...

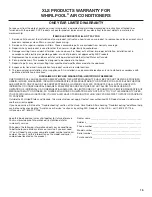
Page 14: ...air parts distributors and service companies XLS Products designated service technicians are trained to fulfill the product warranty and provide after warranty service anywhere in Canada For further assistance If you need further assistance you can write to XLS Products with any questions or concerns at XLS Products Inc Customer Service P O Box 16262 Philadelphia PA 19114 0262 Please include a day...

Page 15: ...PAIR AS PROVIDED HEREIN IMPLIED WARRANTIES INCLUDING WARRANTIES OF MERCHANTABILITY OR FITNESS FOR A PARTICULAR PURPOSE ARE LIMITED TO ONE YEAR OR THE SHORTEST PERIOD ALLOWED BY LAW XLS PRODUCTS SHALL NOT BE LIABLE FOR INCIDENTAL OR CONSEQUENTIAL DAMAGES SOME STATES AND PROVINCES DO NOT ALLOW THE EXCLUSION OR LIMITATION OF INCIDENTAL OR CONSEQUENTIAL DAMAGES OR LIMITATIONS ON THE DURATION OF IMPLIE...

Page 16: ...ode recommandée de liaison à la terre 18 Cordon d alimentation tous les modèles 19 Outils nécessaires Tous les modèles 19 Liste d articles 19 Dimensions de la gaine murale universelle 20 INSTRUCTIONS D INSTALLATION 21 Préparer le climatiseur pour l installation 21 Grille à entrée double 22 Instructions d installation de la trousse de garniture 23 UTILISATION DU CLIMATISEUR 24 Mettre en marche le c...

Page 17: ... mot DANGER ou AVERTISSEMENT Ces mots signifient Pour réduire les risques d incendie de choc électrique ou des blessures lors de l utilisation du climatiseur prendre quelques précautions fondamentales y compris les suivantes CONSERVEZ CES INSTRUCTIONS ranc er sur une prise alvéoles reliée la terre Ne pas enlever la broc e de liaison la terre Ne pas utiliser un adaptateur et appareil ne convient pa...

Page 18: ... chauffage de 230 V à 10 000 12 000 14 000 BTU avec refroidissement seulement Modèle de 230 V à 10 000 14 000 BTU avec refroidissement seulement 230 V 208 min à 240 max 0 8 A Fusible ou disjoncteur temporisé de 10 A Modèles de 115 V à 8 000 BTU et 230 V à 10 000 14 000 BTU avec refroidissement et chauffage 4 15 A Fusible ou disjoncteur temporisé de 20 A Si une étiquette Circuit indépendant seuleme...

Page 19: ...QUES Le bouton Reset réinitialisation doit être enfoncé pour une utilisation correcte Le cordon d alimentation doit être remplacé s il ne se déclenche pas lorsqu on appuie sur le bouton de test ou si l appareil n est pas réinitialisé Ne pas utiliser le cordon d alimentation comme interrupteur Le cordon d alimentation est conçu pour remplir les fonctions de dispositif de protection Un cordon d alim...

Page 20: ...ur ne pas déplacer les joints Vérifier la gaine murale pour s assurer qu elle est bien fixée au mur avant de procéder à l installation Réparer les surfaces peintes au besoin 3 S il n y a pas de trou pour le conducteur de liaison à la terre percer un avant trou de 3 16 po pour la vis du conducteur de liaison à la terre sur le côté gauche de la gaine dans la zone claire a environ 3 po max de distanc...

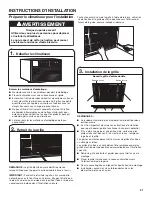
Page 21: ...n plein potentiel S il y a déjà une gaine et une grille arrière vérifier que les dimensions sont bonnes Si ce n est pas le cas remplacer la gaine et la grille Les gaines existantes peuvent être munies de grilles d entrée à un côté plus vieilles Les grilles d entrée à un côté doivent être remplacées par des grilles d entrée de type double comme indiqué dans l illustration suivante Retirer la grille...

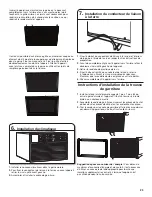
Page 22: ...1 po x 3 4 po x 14 po incluent dans la trousse d installation le long des rebords métalliques plats du condensateur comme indiqué dans l illustration suivante Joint Joint Dans une situation où la grille double ne peut être installée directement sur la gaine il est recommandé de fixer la grille au dos de l appareil à entrée à travers le mur aux trous déjà percés sur l appareil 1 Fixer les 2 joints ...

Page 23: ...clenchant en place 3 Tirer le cordon par le cadre de garniture et faire glisser ce dernier par dessus l appareil jusqu à ce qu il soit collé sur le mur Suggestions pour économiser de l énergie Pour obtenir le maximum d économie d énergie et de confort il est nécessaire d utiliser un couvercle de taille approprié pour fournir une isolation supplémentaire contre l air lorsque l appareil n est pas ut...

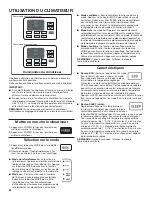
Page 24: ...utes Au plus la température changera 6 fois jusqu à ce qu elle atteigne 28 C 82 F Le temps de fonctionnement dépend de la température réglée REMARQUE Après 5 secondes l afficheur indique la température ambiante Commandes du climatiseur Pour modèle avec chauffage Pour modèle avec refroidissement COOL MODE TIMER SLEEP FILTER ECO AUTO SPEED LOW MED HIGH DRY FAN AUTO MODE FAN SPEED POWER COOL MODE TIM...

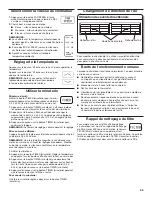
Page 25: ...ou un cliquettement Les gouttelettes d eau contribuent au refroidissement du condenseur Mouvement de l air sous l effet du ventilateur Déclics émis par le thermostat Vibrations ou bruits imputables à une construction médiocre du mur ou de la fenêtre Bourdonnement à fréquence élevée ou pulsations à cause du compresseur moderne à haute efficacité qui se met en marche et s arrête de façon intermitten...

Page 26: ...uveau sur TIMER minuterie 4 Appuyer une fois de plus sur TIMER minuterie pendant que le temps est affiché Pour annuler la minuterie Une fois la minuterie réglée appuyer sur TIMER minuterie POWER COOL SLEEP TIMER ECO DISPLA AUTO MODE FAN ONLY FAN SPEED Éco Conserve l énergie en fermant le compresseur lorsque la pièce atteint la température désirée Le moteur du ventilateur fonctionnera pendant 20 à ...

Page 27: ...un salon liquide pour la vaisselle et de l eau tiède pour laver le filtre 3 Bien rincer le filtre et secouer doucement le filtre pour éliminer l eau en trop 4 Laisser le filtre sécher complètement avant de le replacer dans le climatiseur pour assurer une efficacité maximale REMARQUE Ne pas laver le filtre à air au lave vaisselle ni utiliser de produits nettoyants chimiques pour ne pas l endommager...

Page 28: ...che Le bouton de réinitialisation du cordon d alimentation est ouvert Appuyer sur le bouton de réinitialisation situé sur le cordon d alimentation Si le bouton de réinitialisation ne reste pas enfoncé arrêter d utiliser le climatiseur et contacter un technicien d entretien qualifié Le climatiseur ne refroidit pas correctement Circulation d air limitée S assurer que l avant du climatiseur n est pas...

Page 29: ... des revendeurs distributeurs de pièces de rechange et services de réparation locaux Les techniciens de service désignés de XLS Products sont formés pour remplir la garantie des produits et fournir un service après la garantie partout au Canada Pour plus d assistance Si vous avez besoin de plus d assistance vous pouvez écrire à XLS Products en soumettant toute question ou tout problème à XLS Produ...

Page 30: ...CI DESSUS LES GARANTIES IMPLICITES Y COMPRIS LES GARANTIES APPLICABLES DE QUALITÉ MARCHANDE OU D APTITUDE À UN USAGE PARTICULIER SONT LIMITÉES À UN AN OU À LA PLUS COURTE PÉRIODE AUTORISÉE PAR LA LOI XLS PRODUCTS N ASSUME AUCUNE RESPONSABILITÉ POUR LES DOMMAGES FORTUITS OU INDIRECTS CERTAINES JURIDICTIONS NE PERMETTENT PAS L EXCLUSION OU LA LIMITATION DES DOMMAGES FORTUITS OU INDIRECTS OU LES LIMI...

Page 31: ...Herramientas necesarias Todos los modelos 34 Lista de contenido 34 Pared universal Dimensiones del manguito 35 INSTRUCCIONES DE INSTALACIÓN 36 Prepare el acondicionador de aire para la instalación 36 Rejilla de alimentación dual 37 Instrucciones de instalación del paquete de terminaciones 38 USO DEL ACONDICIONADOR DE AIRE 39 Encendido del acondicionador de aire 39 Selección del modo 39 Característ...

Page 32: ...ad y de la palabra PELIGRO o ADVERTENCIA Estas palabras significan Conecte a un contacto de pared de conexión a tierra de 3 terminales No quite el terminal de conexión a tierra No use un adaptador Este electrodoméstico no ha sido diseñado para ser usado por personas incluidos niños con capacidad física sensorial o mental diferente o reducida o con falta de experiencia y conocimiento a menos que lo...

Page 33: ...V 10000 12000 14000 Solo refrigeración 230V 10000 12000 14000 10 000 14 000 BTU 230 V Modelos solo de refrigeración 230 V 208 mín 240 máx 0 8 A 10 Un fusible retardador o un disyuntor 8 000 BTU 115 V y 10 000 14 000 BTU 230 V Modelos de refrigeración y calefacción 4 15 A 20 Un fusible retardador o un disyuntor Si la unidad tiene una etiqueta que indica Circuito simple solamente úsela solo con un c...

Page 34: ...er debe estar presionado para el funcionamiento adecuado El cable de suministro eléctrico se debe reemplazar si no se desconecta cuando se presiona el botón de prueba o si no se restablece No usar el cable de suministro eléctrico como interruptor para APAGAR ENCENDER El cable de suministro eléctrico ha sido diseñado como un dispositivo de protección un cable de suministro eléctrico se debe reempla...

Page 35: ...de aire viejo del manguito de pared y proceda del siguiente modo Limpiar el interior No alterar las juntas Verificar el manguito de pared para asegurar que se encuentra ajustado de manera segura a la pared antes de la instalación Reparar la superficie pintada en caso de que sea necesario 3 Si no hay un orificio para el cable a tierra realizar un orificio guía de 3 16 para el tornillo de tierra a t...

Page 36: ...ueden tener rejillas de entrada única antiguas Las rejillas de entrada única se deben reemplazar con rejillas de entrada dual como se muestra en la figura anterior Quitar la rejilla existente y guardar los tornillos de montaje Colocar la rejilla incluida con el nuevo acondicionador de aire hacia la parte trasera interior del manguito Acoplar la rejilla nueva al alinear los cuatro orificios de mont...

Page 37: ... 1 x 3 4 x 14 a lo largo de la brida de metal plana del condensador como se muestra en la figura debajo sello sello En los casos en los que la rejilla de entrada dual no se puede montar directamente al manguito es conveniente acoplar la rejilla a la parte de atrás de la unidad TTW al orificio realizado de manera previa en la unidad 1 Acoplar las 2 juntas 1 x 3 8 x 14 como se muestra en la figura a...

Page 38: ...as en su posición 3 Tirar del cable a través del marco de terminación y deslizar el marco sobre la unidad hasta que quede al ras de la pared Sugerencia para el ahorro de energía Para alcanzar el ahorro de energía y comodidad máxima es necesario utilizar una cubierta del tamaño apropiado para proporcionar aislamiento adicional y sellado de aire cuando la unidad no se está utilizando fuera de tempor...

Page 39: ...ón COOL MODE TIMER SLEEP FILTER ECO AUTO SPEED LOW MED HIGH DRY FAN AUTO MODE FAN SPEED POWER COOL MODE TIMER SLEEP FILTER ECO AUTO SPEED LOW MED HIGH DRY FAN AUTO MODE FAN SPEED POWER HEAT MODE SPEED MODE SPEED MODE SPEED MODE SPEED HEAT MODE AUTO Operar debidamente el acondicionador de aire le permite obtener los mejores resultados posibles Esta sección le explica cómo operar su acondicionador d...

Page 40: ...a construcción deficiente de la pared o de la ventana Un zumbido agudo o un ruido pulsante producido por el ciclo de encendido y apagado del moderno compresor de alta eficiencia El agua se recogerá en el recipiente de base durante los días de lluvia o humedad alta El agua puede desbordarse y gotear desde la parte exterior de la unidad Para dirigir el flujo de aire utilizar la rueda horizontal para...

Page 41: ...escanso Presionar el botón con la flecha hacia arriba o hacia abajo para cambiar el tiempo de retraso de 0 5 a 24 horas luego presionar TIMER nuevamente 4 Presionar TIMER nuevamente mientras se muestra el tiempo restante en la pantalla Para anular el temporizador Después de ajustar el temporizador presione TIMER Temporizador POWER COOL SLEEP TIMER ECO DISPLA AUTO MODE FAN ONLY FAN SPEED Eco Ecológ...

Page 42: ...y sucio utilizar detergente líquido para vajillas y agua tibia para lavar el filtro 3 Enjuagar el filtro de manera apropiada y sacudir el filtro cuidadosamente para eliminar el exceso de agua 4 Dejar que el filtro se seque completamente antes de colocarlo en el acondicionador de aire para asegurar la eficiencia máxima NOTA no lave el filtro de aire en la lavavajillas ni use limpiadores químicos es...

Page 43: ...set Restablecer ubicado en el enchufe del cable de suministro eléctrico Si el botón Reset Restablecer no se mantiene activado deje de usar el acondicionador de aire y comuníquese con un técnico de servicio calificado El acondicionador de aire no enfría de la manera apropiada El flujo de aire está restringido Verificar que no haya cortinas visillos ni muebles obstruyendo la parte frontal del acondi...

Page 44: ...ciones de distribuidores locales distribuidores de repuestos y empresas de servicio Los técnicos designados por XLS Products están capacitados para cumplir con la garantía del producto y ofrecer servicio después de la garantía en cualquier lugar de Canadá Para obtener más asistencia Si necesita asistencia adicional puede escribir a XLS Products con sus preguntas o dudas a XLS Products Inc Customer...

Page 45: ... PROPÓSITO PARTICULAR SE LIMITARÁN A UN AÑO O AL PERÍODO MÁS CORTO PERMITIDO POR LEY XLS PRODUCTS NO SE RESPONSABILIZARÁ POR DAÑOS INCIDENTALES O CONSECUENTES ALGUNOS ESTADOS Y PROVINCIAS NO PERMITEN LA EXCLUSIÓN O LIMITACIÓN DE DAÑOS INCIDENTALES O CONSECUENTES O LIMITACIONES DE LA DURACIÓN DE GARANTÍAS IMPLÍCITAS DE COMERCIABILIDAD O IDONEIDAD DE MODO QUE ESTAS LIMITACIONES O EXCLUSIONES PUEDEN ...

Reviews: