8
1.
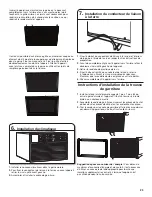
Install new unit into wall sleeve.
2.
To attach ground wire to the new unit, remove the screw from
the front, left side.
3.
Assemble and install the trim frame.
6.
Install the Air Conditioner
1.
Attach the one end of the ground wire inside the sleeve with
screw according to preparation instruction.
2.
Before sliding unit all the way back remove second screw from
left side of unit.
3.
Remove plastic washer from screw.
4.
Attach the other end of the ground wire to the unit with screw
as shown above. Make sure that the toothed washer is against
the cabinet.
5. Slide unit completely to the rear.
Trim Kit Installation Instructions
1.
Install the 1" x 1" x 84" long stuffer seal between the wall
sleeve and the unit. A flat-bladed screwdriver or putty knife is
needed.
2.
Assemble the trim frame by inserting the top and bottom
pieces into side pieces and snapping into place.
3.
Pull the cord through the trim frame and slide the trim over the
unit until flush with the wall.
Energy saving suggestion:
In order to reach the maximum
energy saving and comfortability, it is necessary to use an
appropriately sized cover to provide additional insulation and air
sealing when the unit is not in use during the off-using-season.
HIGH
COOL
DRY
FAN
AUTO
NEXT
MED
LOW
AUTO
SPEED
FAN
SPEED
SPLEEP
FILTER
TIMER
ECO
MODE
POWER
7.
Install Ground Wire
Insert the unit with the seal into the sleeve pushing it all the way
to the rear, making sure the seals are against the rear grille. The
seals are necessary to reduce recirculation of hot air into the
intakes which would reduce system performance.
An option is to purchase 3/4" diamond cut aluminum grille and
cut it to fit inside the sleeve. Secure it with screws. Attach the
dual intake grill directly to the back of the unit. Slide the entire
unit into the sleeve and seal with the stuffing seal supplied with
the kit.
HIGH
COOL
DRY
FAN
AUTO
NEXT
MED
LOW
AUTO
SPEED
FAN
SPEED
SPLEEP
FILTER
TIMER
ECO
MODE
POWER


