background image

7

Start

The Start keypad begins any function. If non-sensor cooking 

is interrupted by opening the door, touching START will resume 

the cycle.

NOTE:

 To avoid unintentional operation of the microwave oven, 

a cooking function cannot be started if the microwave oven 

door has been closed for about 5 minutes. The word “door” 

will appear in the display until the door is opened and closed.

Add 30 Seconds

The Start Add 30 Sec keypad automatically starts the  

microwave oven at 100% power for 30 seconds and adds 

30 seconds of cook time, up to 10 minutes, with each additional 

touch of the control.
Time may be added to any manual cooking cycle in 30-second 

increments, up to 10 minutes, at the current power level, by 

touching ADD 30 SEC during cooking.

NOTE:

 To avoid unintentional operation of the microwave oven, 

a cooking function cannot be started if the microwave oven 

door has been closed for about 5 minutes. The word “door” 

will appear in the display until the door is opened and closed.

Pause/Cancel

The Pause/Cancel keypad clears any incorrect command and 

pauses and/or cancels any program during cooking. The first 

touch pauses a cooking cycle and the second touch cancels 

the cycle. It will not erase the time of day.
The microwave oven will also turn off when the door is opened. 

Close the door and touch START to resume the cycle.
The Pause/Cancel keypad is also used to lock and unlock the 

control panel. See the “Control Lock” section.

Clock

This is a 12- or 24-hour clock.

To Set:

The microwave oven must be OFF.

1. 

Touch CLOCK once for 12-hour setting or twice for  

24-hour setting.

2. 

Touch the number keypads to enter the correct time of day.

3. 

Touch CLOCK.

Timer

NOTE:

 The Timer does not start or stop the microwave oven.

Cook functions may be used while the Timer is counting down. 

When the cook function is active in the display, touch TIMER to 

see the Timer countdown.

To Set:

1. 

Touch TIMER.

2. 

Touch the number keypads to enter desired time.

3. 

Touch START.
When the set time ends, the end-of-timer tone will sound.

4. 

While the Timer countdown is active in the display, touch 

PAUSE/CANCEL to cancel the Timer.
If a cook function countdown is active in the display, touch 

TIMER to show the Timer countdown, then touch PAUSE/

CANCEL to cancel the Timer. Touching PAUSE/CANCEL 

while a cook function countdown is active in the display will 

cancel the cook function, not the Timer.

Tones

Tones are audible signals that can be turned off.

To Turn Off/On Reminder Tones:

 With the door open, touch 

and hold the number keypad “6” for 5 seconds until a tone 

sounds. Repeat to turn tones back on.

To Turn Off/On All Tones:

 With the door open, touch and hold 

number keypad “5” for 5 seconds. Repeat to turn tones back on. 

(A tone will sound).
These tones indicate the following:

One tone


Valid entry


Control Lock activated or deactivated

Two tones


End of stage in multistage cooking


Reminder


During Defrost cycle, reminder to check, turn, rearrange, 

or separate food.

Three tones


End of Timer countdown

Four tones


End of cycle

Control Lock

The Control Lock disables the control panel keypads to avoid 

unintended use of the microwave oven.

To Lock/Unlock Control: 

The microwave oven must be OFF. 

Touch and hold PAUSE/CANCEL for about 3 seconds, until the 

tone sounds and the LOCK icon appears in the display. Repeat 

to unlock and clear the display.
If any cook function control is touched while the Control Lock 

is active, a tone will sound.

Language

The default display language is English, but it may be set to 

French. Two display messages are affected: “End” (English) or 

“Fin” (French), and “door” (English) or “PrtE” (“porte” - French).

To Set Language to French:

 With the microwave oven door 

open, touch and hold POWER LEVEL for about 5 seconds until 

a tone sounds. To change back to English, disconnect power, 

then reconnect power to microwave oven.

Weight Entry Mode

The default weight entry mode for Weight Defrost is imperial 

(pounds) but may be set to metric (grams). This setting does 

not affect any other program besides Weight Defrost. See the 

“Weight Defrost/Timed Defrost” section.

To Set Weight Entry to Metric:

 With the microwave oven door 

open, touch and hold number keypad “0” for about 5 seconds 

until a tone sounds.

Summary of Contents for WMC11009

Page 1: ...bsite at www whirlpool ca FOUR À MICRO ONDES Guide d utilisation et d entretien Pour des questions à propos des caractéristiques du fonctionnement rendement des pièces accessoires ou dépannage composer le 1 800 253 1301 ou visitez notre site web à www whirlpool com Au Canada composer le 1 800 807 6777 ou visitez notre site web à www whirlpool ca Table of Contents Table des matières 2 Model Modèle ...

Page 2: ...ement Parts 14 WARRANTY 15 SÉCURITÉ DU FOUR À MICRO ONDES 16 INSTRUCTIONS D INSTALLATION 18 Déballage 18 Exigences d emplacement 18 Spécifications électriques 18 PIÈCES ET CARACTÉRISTIQUES 19 Plateau rotatif 19 TABLEAU DE COMMANDE DU FOUR À MICRO ONDES 19 Affichage 20 Mise en marche 20 Ajouter 30 secondes 20 Pause Annulation 20 Horloge 20 Minuterie 20 Signaux sonores 20 Verrouillage des commandes ...

Page 3: ...s with any appliance close supervision is necessary when used by children Do not operate the microwave oven if it has a damaged cord or plug if it is not working properly or if it has been damaged or dropped The microwave oven should be serviced only by qualified service personnel Call an authorized service company for examination repair or adjustment Do not cover or block any openings on the micr...

Page 4: ...WAVE ENERGY a Do not attempt to operate this oven with the door open since open door operation can result in harmful exposure to microwave energy It is important not to defeat or tamper with the safety interlocks b Do not place any object between the oven front face and the door or allow soil or cleaner residue to accumulate on sealing surfaces c Do not operate the oven if it is damaged It is part...

Page 5: ...ermal device may automatically turn the microwave oven off The microwave oven should work properly once it has cooled Electrical Requirements Observe all governing codes and ordinances Required A 120 volt 60 Hz AC only 15 or 20 amp electrical supply with a fuse or circuit breaker Recommended A time delay fuse or time delay circuit breaker A separate circuit serving only this microwave oven GROUNDI...

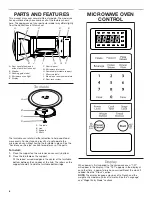
Page 6: ... rollers on the support should fit inside the turntable bottom ridge MICROWAVE OVEN CONTROL Display When power is first supplied to the microwave oven 1 01 will appear in the display If the 1 01 appears in the display at any other time a power failure has occurred Reset the clock if needed See the Clock section NOTE The display language may be set to French and the weight entry mode may be set to ...

Page 7: ...end of timer tone will sound 4 While the Timer countdown is active in the display touch PAUSE CANCEL to cancel the Timer If a cook function countdown is active in the display touch TIMER to show the Timer countdown then touch PAUSE CANCEL to cancel the Timer Touching PAUSE CANCEL while a cook function countdown is active in the display will cancel the cook function not the Timer Tones Tones are au...

Page 8: ...e evenly than irregularly shaped food Starting Temperature Room temperature foods will heat faster than refrigerated foods and refrigerated foods will heat faster than frozen foods Composition and Density Foods high in fat and sugar will reach a higher temperature and will heat faster than other foods Heavy dense foods such as meat and potatoes require a longer cook time than the same size of a li...

Page 9: ...Racks and bakeware supplied with the microwave oven on some models aluminum foil for shielding and approved meat thermometers may be used with the following guidelines To avoid damage to the microwave oven do not allow aluminum foil or metal to touch the inside cavity walls ceiling or floor Always use the turntable To avoid damage to the microwave oven do not allow contact with another metal objec...

Page 10: ...guide for preset cooking Food Serving Size Instructions Potato 1 2 3 or 4 medium 8 10 oz 227 283 g each similar in size Pierce each one several times with a fork Place on paper towel around turntable edges at least 1 2 5 cm apart Let stand 5 minutes after cooking Popcorn 3 3 oz 94 g Pop only one package at a time For bag sizes not listed in this section follow directions on package Pizza Reheat re...

Page 11: ...om 0 1 lb to 6 5 lbs 45 g to 2 9 kg 4 Touch START The display will count down the defrost time During defrosting 2 tones will sound These tones indicate it is time to check turn rearrange or separate food Open door turn food if necessary close door and touch START to resume defrosting When the cycle ends End will appear in the display and the end of cycle tones will sound 5 Touch PAUSE CANCEL or o...

Page 12: ...t Cover To avoid arcing and microwave oven damage the microwave inlet cover see the Parts and Features section should be kept clean Wipe with wet cloth MICROWAVE OVEN DOOR AND EXTERIOR The area where the microwave oven door and frame touch when closed should be kept clean Mild nonabrasive soaps and detergents Rinse with clean water and dry with soft lint free cloth Glass cleaner and paper towels o...

Page 13: ...o mode on some models is OFF Microwave oven makes humming noise This is normal and occurs when the power supply in the magnetron cycles on Microwave oven door looks wavy This is normal and will not affect performance Turntable will not operate Check the following Turntable Make sure turntable is correct side up and is sitting securely on the turntable support See the Turntable section Turntable su...

Page 14: ...ou can write to Whirlpool with any questions or concerns at Whirlpool Brand Home Appliances Customer eXperience Center 553 Benson Road Benton Harbor MI 49022 2692 Please include a daytime phone number in your correspondence In Canada Call the Whirlpool Customer eXperience Center toll free 1 800 807 6777 or visit our website at www whirlpool ca Our consultants provide assistance with Scheduling of ...

Page 15: ...nsumer purchase Proof of original purchase date is required to obtain service or replacement under this limited warranty 1 Service calls to correct the installation of your microwave to instruct you how to use your product to replace or repair house fuses reset circuit breakers or to correct house wiring or plumbing 2 Service calls to repair or replace light bulbs Consumable parts are excluded fro...

Page 16: ... adéquate Ne pas faire fonctionner le four à micro ondes si le cordon d alimentation ou la fiche de branchement est endommagé s il ne fonctionne pas correctement s il a subi des dommages ou s il est tombé Tous les travaux de service doivent être exécutés exclusivement par un personnel d entretien qualifié Contacter un centre de service autorisé pour les opérations d inspection de réparation ou de ...

Page 17: ...tion dangereuse à l énergie des micro ondes Il est important de ne pas entraver le fonctionnement correct du dispositif de verrouillage de sécurité b Ne pas placer d objet entre la surface avant du four et la porte et ne jamais laisser des souillures ou résidus de produits de nettoyage s accumuler sur les surfaces d étanchéité c Ne pas faire fonctionner le four lorsqu il est endommagé Il est parti...

Page 18: ...le peut commander l extinction automatique du four à micro ondes Le four à micro ondes devrait fonctionner correctement une fois refroidi Spécifications électriques Observer les dispositions de tous les codes et règlements en vigueur Nécessaire Une alimentation électrique de 120 volts 60 Hz CA seulement 15 ou 20 ampères protégée par fusibles ou disjoncteur Recommandé Un fusible temporisé ou un dis...

Page 19: ...ndes 2 Placer le plateau rotatif sur le support Insérer les protubérances arrondies au centre du dessous du plateau rotatif entre les 3 rayons de l axe Les roulettes sur le support devraient se loger à l intérieur du pourtour cranté du dessous du plateau rotatif TABLEAU DE COMMANDE DU FOUR À MICRO ONDES A B C D E K J I H G F A Poignée de porte pour les modèles sans bouton poussoir d ouverture de l...

Page 20: ...e en marche pour reprendre le programme La touche Pause Cancel pause annulation est également utilisée pour verrouiller et déverrouiller le tableau de commande Voir la section Verrouillage des commandes Horloge Il s agit d une horloge de 12 heures ou de 24 heures Réglage Le four à micro ondes doit être désactivé 1 Appuyer une fois sur CLOCK horloge pour 12 heures de réglage ou deux fois pour 24 he...

Page 21: ...chaleur qui fait cuire les aliments Pour éviter d endommager le four à micro ondes ne pas s appuyer ou laisser les enfants se balancer sur la porte du four à micro ondes Pour éviter d endommager le four à micro ondes ne pas faire fonctionner le four à micro ondes à vide Les biberons et les petits pots d aliments pour bébés ne doivent pas être chauffés dans le four à micro ondes Les vêtements fleur...

Page 22: ...elle de la chaleur même lorsque le programme de micro ondes sera terminé La durée du temps de repos dépend du volume et de la densité de l aliment Ustensiles de cuisson et vaisselle Les ustensiles de cuisson et la vaisselle doivent pouvoir être placés sur le plateau rotatif Toujours utiliser des mitaines de four ou des maniques lors de la manipulation parce que tout plat peut devenir chaud à cause...

Page 23: ...la puissance élevée Par exemple poisson entier et pain de viande 70 Moyenne élevée 7 Réchauffage d une seule portion d aliments Pourcentage Nom Chiffre Utilisation 60 6 Cuisson d aliments sensibles tels que les mets à base d oeufs et de fromage pudding et crèmes anglaises Cuisson de mets en sauce non remuables tels que les lasagnes 50 Moyenne 5 Cuisson de jambon de volaille entière et de morceaux ...

Page 24: ...uctions Frozen Entree Plat surgelé 8 7 à 9 oz 198 à 255 g ou 11 10 à 12 oz 283 à 340 g Sortir de l emballage Dégager l opercule sur 3 côtés Si le plat ne se trouve pas dans un contenant pour micro ondes le placer sur une assiette le couvrir d une pellicule de plastique et laisser une ouverture d échappement de l air Laisser reposer 2 à 3 minutes après la cuisson Dinner Plate Assiettée réfrigérée 1...

Page 25: ...n marche Le compte à rebours de la durée de décongélation s affiche Pendant la décongélation 2 signaux sonores retentissent Ces signaux sonores indiquent qu il convient d inspecter réagencer ou séparer les aliments Ouvrir la porte tourner les aliments si nécessaire fermer la porte et appuyer sur START mise en marche pour poursuivre la décongélation À la fin du programme End fin apparaît sur l affi...

Page 26: ...es dommages causés au four à micro ondes le couvercle orifice d introduction des micro ondes voir la section Pièces et caractéristiques doit être maintenu propre Essuyer avec un chiffon humide PORTE DU FOUR À MICRO ONDES ET EXTÉRIEUR La surface où la porte et le cadre du four à micro ondes se touchent quand la porte est fermée doit être maintenue propre Savons et détergents doux non abrasifs Rince...

Page 27: ...rte Sur certains modèles si une cale d espacement est fixée à l intérieur de la porte la retirer puis bien fermer la porte Si un message concernant la porte s affiche la porte a été fermée depuis au moins 5 minutes sans que le four à micro ondes ait été mis en marche Le but du message est d éviter une mise en marche accidentelle du four à micro ondes Ouvrir et fermer la porte puis démarrer le prog...

Page 28: ...ier le système électrique du domicile par un électricien qualifié Brouillage par la radio le téléviseur le téléphone sans fil etc Vérifier ce qui suit Proximité Éloigner l appareil du four à micro ondes ou ajuster l antenne de la radio ou du téléviseur Si le four à micro ondes est branché sur la même prise essayer une autre prise pour l appareil électronique Saleté Vérifier que la porte du four à ...

Page 29: ...ttant toute question ou problème à Whirlpool Brand Home Appliances Customer eXperience Center 553 Benson Road Benton Harbor MI 49022 2692 Veuillez indiquer dans votre correspondance un numéro de téléphone où l on peut vous joindre dans la journée Au Canada Téléphoner sans frais au Centre pour l eXpérience de la clientèle au 1 800 807 6777 ou visiter notre site internet www whirlpool ca Nos consult...

Page 30: ...e couvrir le coût des pièces de remplacement spécifiées par l usine et de la main d œuvre nécessaires pour corriger les vices de matériaux et de fabrication qui existaient déjà lorsque ce four à micro ondes a été acheté S il est remplacé votre appareil restera sous garantie pour la durée restant à couvrir de la période de garantie sur le produit d origine Voir les instructions de réparation LE SEU...

Page 31: ...lité ou en cas de dépannage ou de réparation nécessaire sur ce gros appareil ménager autre que les responsabilités énoncées dans la présente garantie Si vous souhaitez une garantie plus étendue ou plus complète que la garantie limitée fournie avec ce gros appareil ménager adressez vous à Whirlpool ou à votre détaillant pour obtenir les modalités d achat d une garantie étendue LIMITATION DES RECOUR...

Page 32: ... 2016 Whirlpool Used under license in Canada All rights reserved Utilisée sous licence au Canada Tous droits réservés W10887806A SP PN W10887820 6 16 ...

Reviews: