background image

7

3. 

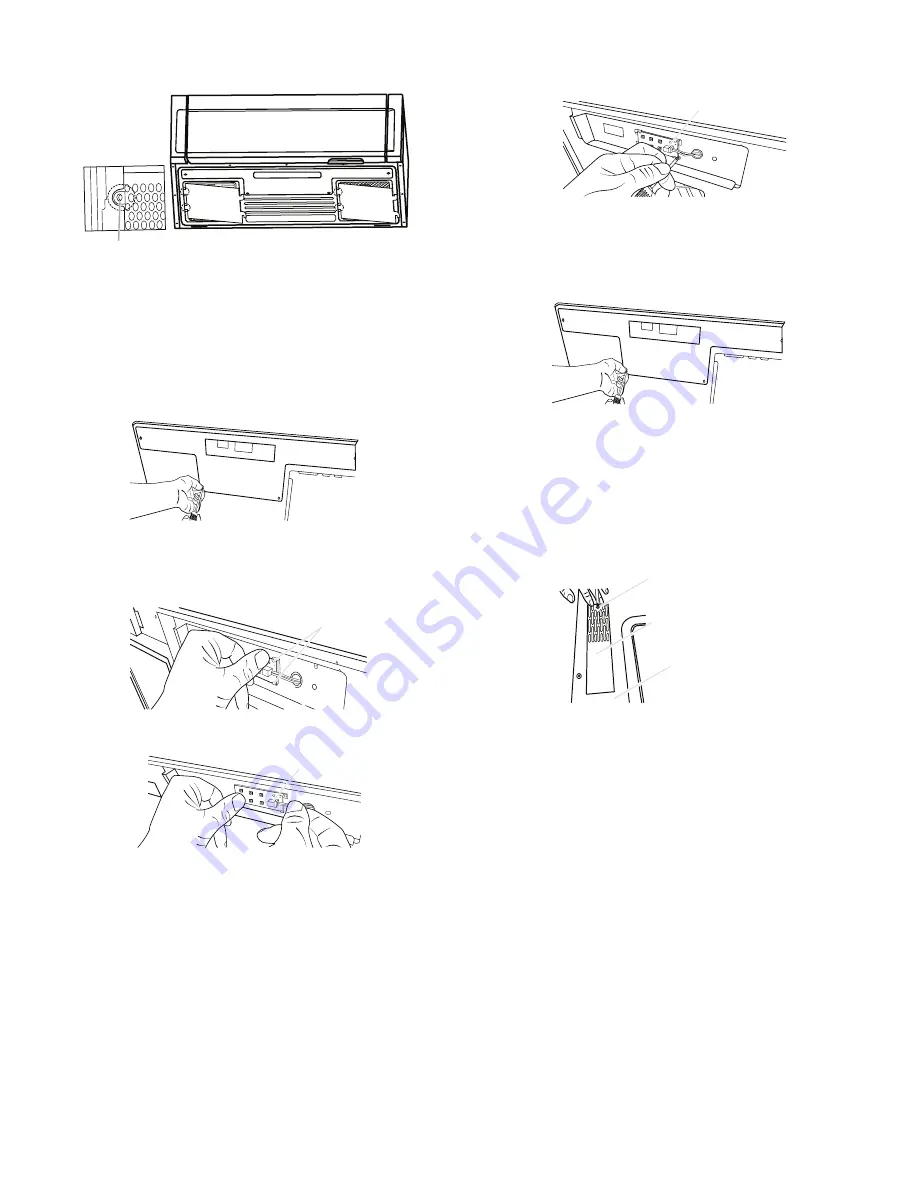
Replace a new charcoal filter and reattach it back to the 

bottom plate, and make sure both left and right sides insert to 

the bottom plate slots.

4. 

Put the grease filter back to the bottom plate.  


Cooktop light:

 The cooktop light is located on the underside 

of the microwave oven and is replaceable. 

To replace the cooktop light refer the following steps:

1. 

Using a philips screwdriver, remove the 4 screws from the “T” 

shaped bottom lighting cover.

2. 

Push the 2 hooks backward, and take the LED out. 

3. 

Unplug the terminal from the LED board.

4. 

Replace a new LED, press it back between two hooks and 

plug in the terminal.

5. 

Using a Phillips screwdriver, reattach the 4 screws back to “T” 

shape bottom lighting cover.


Cavity light:

 The cavity light is located at the top front of 

the microwave oven, under the cover, and is replaceable.

To replace the cavity light refer the following steps:

1. 

Using a Phillips screwdriver, remove the second left vent top 

cover screw from the top front of the microwave oven.

Slots

Terminal

Terminal

Screw

Second left vent
top cover

Top front of
micowave oven

Hook

Summary of Contents for WML75011HB

Page 1: ...essages in this manual and on your appliance Always read and obey all safety messages This is the safety alert symbol This symbol alerts you to potential hazards that can kill or hurt you and others All safety messages will follow the safety alert symbol and either the word DANGER or WARNING These words mean follow instructions instructions DANGER WARNING When using electrical appliances basic saf...

Page 2: ...t always present THIS COULD RESULT IN VERY HOT LIQUIDS SUDDENLY BOILING OVER WHEN THE CONTAINER IS DISTURBED OR A SPOON OR OTHER UTENSIL IS INSERTED INTO THE LIQUID To reduce the risk of injury to persons Do not overheat the liquid Stir the liquid both before and halfway through heating it Do not use straight sided containers with narrow necks After heating allow the container to stand in the micr...

Page 3: ...is counting down To cancel timer touch Timer control while the Timer countdown is active in the display Control Lock Activate to avoid unintended start Touch and hold the Cancel keypad for about 3 seconds until 2 tones sound and the CONTROL LOCKED appears in the display When locked touching any button on the keyboard except for the hood control buttons and Cancel will not work Repeat to unlock con...

Page 4: ...and clay Follow manufacturer recommendations Silicone bakeware Follow manufacturer recommendations Wax paper Do Not Use Metal cookware and bakeware Straw or wicker Gold silver or pewter Non approved meat thermometers skewers Twist ties Foil liners such as sandwich wrappers Staples Objects with gold or silver trim or with metallic glaze To Test Cookware Dinnerware Place dish in microwave oven with ...

Page 5: ...ffect how the liquid heats Beverages in cups with smaller openings may heat faster 3 Casserole 1 2 3 4 cups 250mL 1 L Place in microwave safe container and cover with plastic wrap Stir and let stand 2 3minutes after reheating 4 Dinner Plate Senses 1 serving 1 plate 8 16 oz 227 454g Place food on microwave safe plate cover with plastic wrap and vent 5 Pizza 1 2 3 slices 4 oz 113g each Place on pape...

Page 6: ... and then pull down from the bottom plate 2 Clean the grease filter monthly or replace with new grease filter if necessary 3 Put the grease filter back to the bottom plate Charcoal filters Charcoal filters are underside of microwave oven The charcoal filter cannot be cleaned and should be replaced about every 6 months NOTE For recirculation Do not operate the microwave oven without the filters in ...

Page 7: ... cover 2 Push the 2 hooks backward and take the LED out 3 Unplug the terminal from the LED board 4 Replace a new LED press it back between two hooks and plug in the terminal 5 Using a Phillips screwdriver reattach the 4 screws back to T shape bottom lighting cover Cavity light The cavity light is located at the top front of the microwave oven under the cover and is replaceable To replace the cavit...

Page 8: ...of micowave oven Following is a list of available parts and supplies which may be purchased separately Please refer to the Warranty section for contact information Replacement Parts Turntable Turntable support and rollers Turntable hub Grease filter Charcoal filter Cooktop light bulb Cavity light bulb Cleaning Supplies Heavy duty degreaser Affresh Kitchen Appliance Cleaner Affresh Stainless Steel ...

Page 9: ... cavity walls microwave inlet cover cooking rack supports and area where the door touches the frame can cause arcing See General Cleaning in the Microwave Oven Care section Turntable alternates rotation directions This is normal and depends on motor rotation at the beginning of the cycle Display shows messages Enter clock with flashing digits means there has been a power failure Reset the clock A ...

Page 10: ...cts or damage caused by the use of non genuine Whirlpool parts or accessories 6 Conversion of products from natural gas or propane gas 7 Damage from accident misuse abuse fire floods acts of God or use with products not approved by Whirlpool 8 Repairs to parts or systems to correct product damage or defects caused by unauthorized service alteration or modification of the appliance 9 Cosmetic damag...

Page 11: ...11 NOTES ...

Page 12: ...W11236923A SP PN W11236929 2018 Whirlpool All rights reserved 03 18 NOTES ...

Reviews: