background image

2

PROPER DISPOSAL OF 

YOUR OLD REFRIGERATOR

IMPORTANT: Child entrapment and suffocation are not problems of the 
past. Junked or abandoned refrigerators are still dangerous, even if 
they will sit for “just a few days.” If you are getting rid of your old 
refrigerator, please follow these instructions to help prevent accidents.

Before You Throw Away Your Old Refrigerator or Freezer:

Take off the doors.

Leave the shelves in place so that children may not easily climb 
inside.


Using the Controls

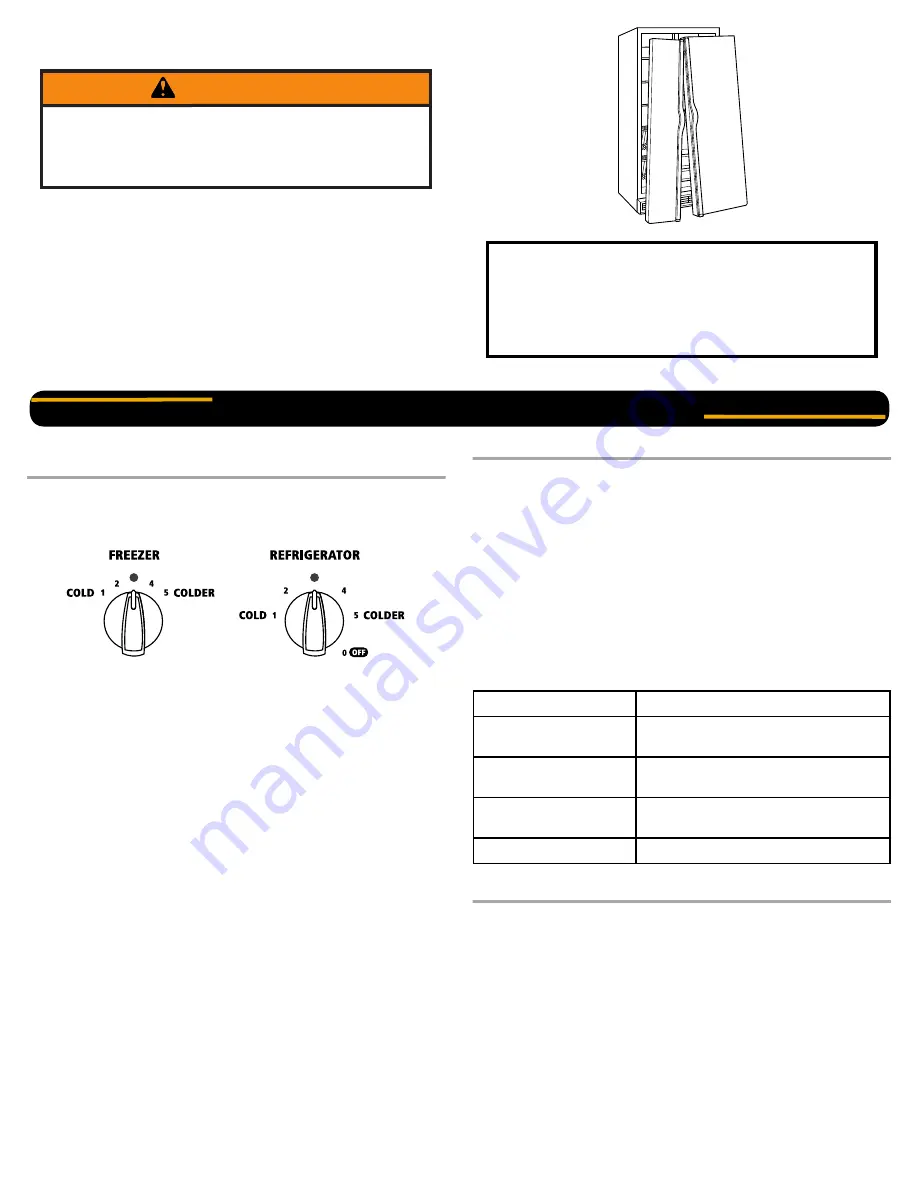
For your convenience, your refrigerator controls are preset at the 
factory. When you first install your refrigerator, make sure that the 
controls are still preset. The Refrigerator Control and the Freezer 
Control should both be set to the “mid-settings.” 

IMPORTANT:

Your product will not cool when the REFRIGERATOR Control is set 
to OFF.

The Refrigerator Control adjusts the refrigerator compartment 
temperature. The Freezer Control adjusts the freezer compartment 
temperature. Settings to the left of the mid-setting make the 
temperature less cold. Settings to the right of the mid-setting make 
the temperature colder.

Wait 24 hours before you put food into the refrigerator. If you add 
food before the refrigerator has cooled completely, your food may 
spoil.

NOTE: Adjusting the Refrigerator and Freezer Controls to a higher 
(colder) than recommended setting will not cool the compartments any 
faster.

Adjusting Controls

Give the refrigerator time to cool down completely before adding food. It 
is best to wait 24 hours before you put food into the refrigerator. The 
settings indicated in the previous section should be correct for normal 
household refrigerator usage. The controls are set correctly when milk 
or juice is as cold as you like and when ice cream is firm. 

Turn the control right (clockwise) to make the compartment colder. 

Turn the control left (counterclockwise) to make it less cold. 

To turn the cooling system off, turn the Refrigerator Control 
counterclockwise until it reaches the OFF position.

If you need to adjust temperatures in the refrigerator or freezer, use the 
settings listed in the chart below as a guide. Wait at least 24 hours 
between adjustments.

Crisper Humidity Control 

(on some models)

You can control the amount of humidity in the moisture-sealed crisper. 
Adjust the control to any setting between LOW and HIGH.

LOW (open) for best storage of fruits and vegetables with skins. 

HIGH (closed) for best storage of fresh, leafy vegetables. 

Suffocation Hazard

Remove doors from your old refrigerator. 

Failure to do so can result in death or brain damage.

WARNING

Important information to know about disposal of 
refrigerants:

Dispose of refrigerator in accordance with Federal and Local 
regulations. Refrigerants must be evacuated by a licensed, 
EPA certified refrigerant technician in accordance with 
established procedures.

OPERATING YOUR REFRIGERATOR

CONDITION/REASON:

ADJUSTMENT:

REFRIGERATOR 
too warm

REFRIGERATOR Control one setting 
higher 

FREEZER too warm/
too little ice

FREEZER Control one setting higher

REFRIGERATOR 
too cold

REFRIGERATOR Control one setting 
lower

FREEZER too cold

FREEZER Control one setting lower

Summary of Contents for WRS322FDAB01

Page 1: ...nce Always read and obey all safety messages This is the safety alert symbol This symbol alerts you to potential hazards that can kill or hurt you and others All safety messages will follow the safety alert symbol and either the word DANGER or WARNING These words mean DANGER WARNING IMPORTANT SAFETY INSTRUCTIONS WARNING To reduce the risk of fire electric shock or injury when using your refrigerat...

Page 2: ...e adding food It is best to wait 24 hours before you put food into the refrigerator The settings indicated in the previous section should be correct for normal household refrigerator usage The controls are set correctly when milk or juice is as cold as you like and when ice cream is firm Turn the control right clockwise to make the compartment colder Turn the control left counterclockwise to make ...

Page 3: ... User Instructions or the Installation Instructions and Owner s Manual or Problem Solver for suggestions To Dispense Water 1 Press the WATER button to select water 2 Press a sturdy glass against the dispenser lever Hold the glass close to the water dispenser spout to ensure that the water dispenses into the glass 3 Remove the glass to stop dispensing IMPORTANT The small tray at the bottom of the d...

Page 4: ...e NOTE Your ice maker has an automatic shutoff As ice is made the ice cubes will fill the ice storage bin and the ice cubes will raise the wire shutoff arm to the OFF arm up position Do not force the wire shutoff arm up or down Removing and Replacing the Ice Storage Bin 1 Lift and hold open the ice maker door 2 Lift the wire shutoff arm so it clicks into the OFF up position Release the ice maker d...

Page 5: ...and slide it into place The filter cover door will automatically begin to close as the new filter is inserted 5 Close the filter cover door completely in order to snap the filter into place You may need to press hard 6 Flush the water system See Water and Ice Dispensers The following accessories are available for your refrigerator To order an accessory call 1 800 442 9991 and ask for the part numb...

Page 6: ...n you may hear normal operating sounds that are unfamiliar The following noises are normal Buzzing Clicking Heard when the water valve opens and closes to dispense water or fill the ice maker If the refrigerator is connected to a water line this is normal If the refrigerator is not connected to a water line turn off the ice maker Cracking Crashing Heard when ice is ejected from the ice maker mold ...

Page 7: ...in in 24 hours Temperature is too cold Controls are not set correctly for the surrounding conditions Adjust the controls to a warmer setting Check the temperature again in 24 hours Top refrigerator shelf is colder than lower shelves On some models air from the freezer enters the refrigerator compartment through vents near the top refrigerator shelf As a result the top shelf can be slightly colder ...

Page 8: ... installed in accordance with Whirlpool s published installation instructions 11 Replacement parts or repair labor on major appliances with original model serial numbers that have been removed altered or cannot be easily determined 12 Discoloration rust or oxidation of stainless steel surfaces The cost of repair or replacement under these excluded circumstances shall be borne by the customer DISCL...

Page 9: ...des autres est très importante Nous donnons de nombreux messages de sécurité importants dans ce manuel et sur votre appareil ménager Assurez vous de toujours lire tous les messages de sécurité et de vous y conformer AVERTISSEMENT DANGER AVERTISSEMENT réfrigérateur prendre quelques précautions fondamentales y compris les suivantes Pour réduire les risques d incendie de choc électrique ou des blessu...

Page 10: ...s aliments au réfrigérateur Les réglages indiqués dans la section précédente devraient être corrects pour l utilisation normale du réfrigérateur domestique Les réglages sont faits correctement lorsque le lait ou le jus est aussi froid que vous l aimez et lorsque la crème glacée est ferme Tourner la commande vers la droite dans le sens horaire pour rendre le compartiment plus froid Tourner la comma...

Page 11: ... installation et le manuel d utilisation ou Résolution de problèmes pour des suggestions sur la marche à suivre Distribution d eau 1 Appuyer sur le bouton WATER eau pour sélectionner la distribution d eau 2 Appuyer un verre robuste contre le levier du distributeur Tenir le verre près de la canule du distributeur d eau pour que l eau coule dans le verre 3 Retirer le verre pour arrêter la distributi...

Page 12: ...s aucun autre glaçon ne peut être fait REMARQUE Votre machine à glaçons a un arrêt automatique Au fur et à mesure de la fabrication de la glace les glaçons remplissent le bac d entreposage de glaçons Les glaçons soulèvent le bras de commande en broche à la position OFF élevée Ne pas forcer le commutateur du bras en broche vers le haut ou vers le bas Pour retirer et réinstaller le bac à glaçons 1 S...

Page 13: ...u logement du filtre entame un mouvement automatique de fermeture à mesure que l on insère le filtre neuf 5 Fermer complètement le clapet du logement du filtre pour emboîter le filtre et le mettre en place Il faudra peut être appuyer fortement 6 Purger le circuit d eau Voir Distributeurs d eau et de glaçons Les accessoires de réfrigérateur suivants sont disponibles Pour commander composer le 1 800...

Page 14: ...s Se produit lorsque le robinet d eau s ouvre et se referme pour distribuer de l eau ou remplir la machine à glaçons Si le réfrigérateur est raccordé à une canalisation d arrivée d eau cela est normal Éteindre la machine à glaçons si le réfrigérateur n est pas raccordé à une canalisation d arrivée d eau Craquement Écrasement Se produit lorsque la glace est éjectée du moule à glaçons Bruit d éclate...

Page 15: ...e Le réglage des commandes n est pas adapté à l environnement de l appareil Ajuster les commandes à un réglage plus chaud Contrôler à nouveau la température 24 heures plus tard La tablette supérieure du réfrigérateur est plus froide que les tablettes inférieures Sur certains modèles l air en provenance du congélateur pénètre dans le compartiment de réfrigération par les évents situés à proximité d...

Page 16: ...x instructions d installation fournies par Whirlpool 11 Les pièces de rechange ou la main d œuvre pour les gros appareils ménagers dont les numéros de modèle de série ont été enlevés modifiés ou ne peuvent pas être facilement identifiés 12 La décoloration ou l oxydation des surfaces en acier inoxydable ou encore l apparition de rouille sur ces surfaces Le coût d une réparation ou d un remplacement...

Reviews: