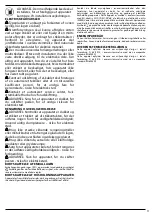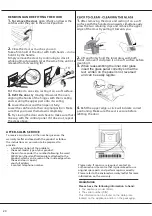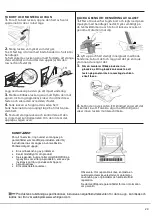
REMOVING AND REFITTING THE DOOR
1.
To remove the door
, open it fully and lower the
catches until they are in the unlock position.
2.
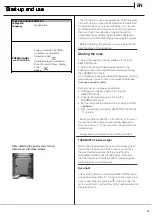
Close the door as much as you can.
Take a firm hold of the door with both hands – do not
hold it by the handle.
Simply remove the door by continuing to close it
while pulling it upwards (a) at the same time until it is
released from its seating (b).
~60°
a
b
~15°
Put the door to one side, resting it on a soft surface.
3.
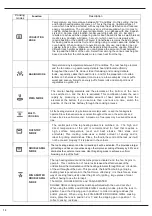
Refit the door
by moving it towards the oven,
aligning the hooks of the hinges with their seating
and securing the upper part onto its seating.
4.
Lower the door and then open it fully.
Lower the catches into their original position: Make
sure that you lower them down completely.
5.
Try closing the door and check to make sure that i
lines up with the control panel. If it does not, repeat
the steps above.
1.
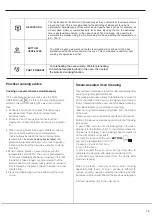
After removing the door and resting it on a soft
surface with the handle downwards, simultaneously
press the two retaining clips and remove the upper
edge of the door by pulling it towards you.
2.
Lift and firmly hold the inner glass with both
hands, remove it and place it on a soft surface before
cleaning it.
3.
4.
Refit the upper edge: a click will indicate correct
positioning. Make sure the seal is secure before
refitting the door
When reassembling the inner door glass
insert the glass panel correctly so that the
text written on the panel is not reversed
and can be easily legible.
AFTER-SALES
SERVICE
To receive assistance, call the number given on the
warranty leaflet enclosed with the product or follow
the instructions on our website. Be prepared to
provide:
•
a brief description of the problem;
•
the exact model type of your product;
•
the assistance code (the number following the word
SERVICE on the identification plate attached to the
product, which can be seen on the inside edge when
the oven door is open);
•
your full address;
•
a contact telephone number.
Please note: If repairs are required, contact an
authorised service centre that is guaranteed to use
original spare parts and perform repairs correctly.
Please refer to the enclosed warranty leaflet for more
information on the warranty.
Assistance
Please have the following information to hand:
• The appliance model (Mod.).
• The serial number (S/N).
This information can be found on the data plate
located on the appliance and/or on the packaging.
20

