background image

U s e   &   C a r e   G u i d e

Microwave 

Hood

Combination

4619-652-60251/8169742

Model
YKHMS145J

www.kitchenaid.com/canada

1•800•461•5681

Call our Customer Interaction

Center with questions 

or comments.

A Note to You ............................2
Microwave Oven Safety............3
Removing and Replacing 
the Microwave Oven .................6
Getting to Know Your 
Microwave Oven........................7

Operating tips ...........................7
Electrical connection.................7
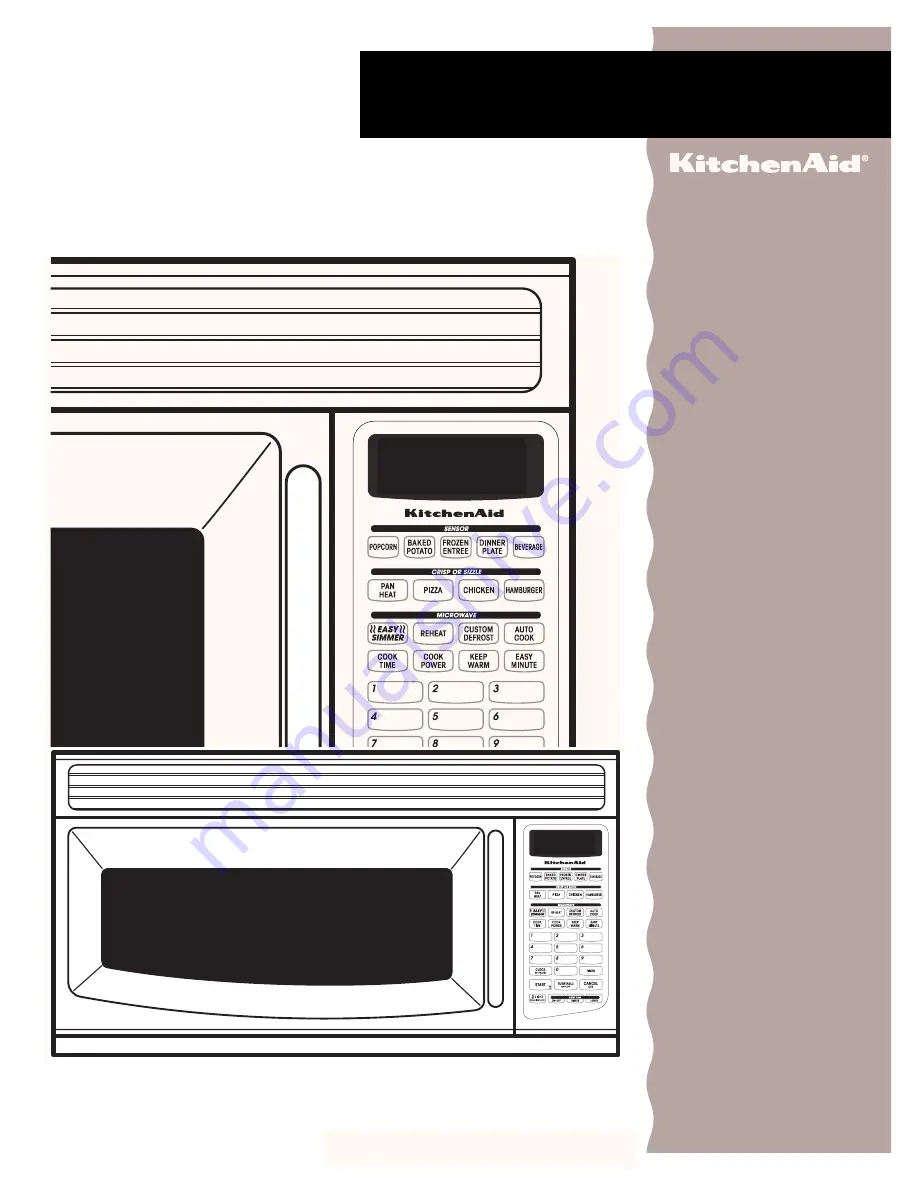
Microwave oven features..........8
Control panel features ..............9
Using the child lock.................11
Using the demo/
learning feature .......................11
Using the vent fan ..................12
Using the cooktop/
countertop light .......................12
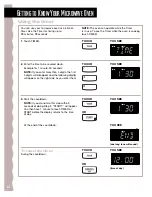
Setting the clock .....................13
Using the timer .......................14

Using Your Microwave Oven ..15

Cooking at high cook power ...15
Cooking at different 
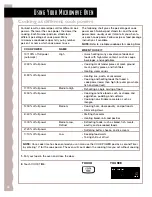
cook powers ...........................16
Cooking in stages ...................18
Using AUTO COOK ................20
Using EASY SIMMER ............21
Using REHEAT .......................22
Using CUSTOM DEFROST....23
Using KEEP WARM................26
Sensor cooking .......................27
Using CRISP OR SIZZLE.......28
Using EASY MINUTE .............29
Changing preset cooking times..29
Using aluminum foil ................30
Cooking you should not do 
in your microwave oven............30
Using 2-4 Plates .....................30
Using the cooking rack ...........30

Caring for Your 
Microwave Oven......................31

Installing and caring for filters ..31
Replacing the cooktop 
and oven lights .......................32

Questions and Answers .........33
Troubleshooting ......................34
Requesting Assistance 
or Service.................................36
Warranty...................................40 

Summary of Contents for YKHMS145J

Page 1: ...ooktop countertop light 12 Setting the clock 13 Using the timer 14 Using Your Microwave Oven 15 Cooking at high cook power 15 Cooking at different cook powers 16 Cooking in stages 18 Using AUTO COOK 20 Using EASY SIMMER 21 Using REHEAT 22 Using CUSTOM DEFROST 23 Using KEEP WARM 26 Sensor cooking 27 Using CRISP OR SIZZLE 28 Using EASY MINUTE 29 Changing preset cooking times 29 Using aluminum foil 3...

Page 2: ...s book After checking Troubleshooting additional help can be found by checking the Requesting Assistance or Service section or by calling the telephone number above When calling you will need to know your appliance s complete model number and serial number You can find this information on the model and serial number label plate see diagram in the Getting to Know Your Microwave Oven section Keep th...

Page 3: ...on Instructions Some products such as whole eggs in the shell and sealed containers for example closed glass jars may explode and should not be heated in the microwave oven Use the microwave oven only for its intended use as described in this manual Do not use corrosive chemicals or vapors in the microwave oven This type of oven is specifically designed to heat cook or dry food It is not designed ...

Page 4: ...hood or filter When flaming foods under the hood turn the fan on Use care when cleaning the vent hood filter Corrosive cleaning agents such as lye based oven cleaners may damage the filter Do not cover or block any openings on the microwave oven Do not store this microwave oven outdoors Do not use the microwave oven near water for example near a kitchen sink in a wet base ment or near a swimming p...

Page 5: ... plugged into an outlet that is properly installed and grounded WARNING Improper use of the grounding plug can result in a risk of electric shock Consult a qualified electrician or serviceman if the grounding instructions are not completely under stood or if doubt exists as to whether the micro wave oven is properly grounded Electrical requirements Observe all governing codes and ordinances A 120 ...

Page 6: ...binet B C A D F E 5 Grasp the microwave oven Rotate the microwave oven downward Be careful that door does not swing open Lift off the support tabs F at the bottom of the mounting plate Set the microwave oven aside on a protected surface To replace 1 Carefully lift microwave oven and hang it on the support tabs at the bottom of the mounting plate 2 Rotate the front of the microwave oven cabinet dow...

Page 7: ...ections supplied with the browning dish Electrical connection If your electric power line or outlet voltage is less than 110 volts cooking times may be longer Have a qualified electrician check your electrical system Never cook or reheat a whole egg inside the shell Steam buildup in whole eggs may cause them to burst and possibly damage the oven Slice hard boiled eggs before heating In rare cases ...

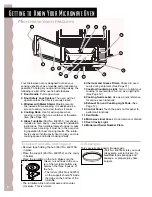
Page 8: ...e unless the door is securely closed 3 Window with Metal Shield Shield prevents microwaves from escaping It is designed as a screen to allow you to view food as it cooks 4 Cooking Rack Use for extra space when cooking in more than one container at the same time See Page 30 5 Glass Turntable Part No 4393751 not shown Included in oven cavity see below for installation instructions This turntable rot...

Page 9: ...to preheat a pan without entering a cook power or time See Page 28 8 PIZZA Touch this pad to heat one of three sizes of pizza without entering a cook time Touch COOK POWER to adjust doneness See Page 28 9 HAMBURGER Touch this pad to cook 1 to 4 hamburgers without entering a cook time Touch COOK POWER to adjust doneness See Page 28 10 CHICKEN Touch this pad to bake 1 to 4 pieces of chicken without ...

Page 10: ... the display returns to the time of day and you have to start over Interrupting cooking You can stop the oven during a cycle by opening the door The oven stops heating and the fan stops but the light stays on To restart cooking close the door and TOUCH Audible signals Your microwave oven comes with audible signals that can guide you when setting and using your oven A programming tone will sound ea...

Page 11: ...ill be turned back on when cooking is over or when you touch CANCEL OFF NOTE You cannot turn off the turntable when using an auto function Control panel features cont Using the child lock The Child Lock locks the control panel so children cannot use the microwave oven when you do not want them to To lock the control panel TOUCH and hold for 5 seconds Two tones will sound and will appear on the dis...

Page 12: ...power the fan will start at speed 1 The next time the fan is turned on it will start at the last speed used 12 The pads on the bottom right of the control panel control the 5 speed exhaust fan 1 Turn on the fan and choose fan speed Touch the HIGHER pad to increase fan speed Touch the LOWER pad to decrease fan speed The display will show FAN and a number from 1 to 5 to indicate fan speed NOTE If th...

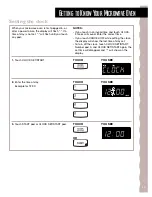
Page 13: ...ay Example for 12 00 3 Touch START pad or CLOCK SET START pad TOUCH YOU SEE TOUCH YOU SEE TOUCH YOU SEE OR ENTER TIME START TIME NOTES If you touch in an invalid time and touch CLOCK 3 tones will sound Enter the correct time If you touch CANCEL OFF while setting the clock the display will show the last time of day set To turn off the clock touch CLOCK SET START Number pad 0 and CLOCK SET START aga...

Page 14: ...on the right side as you enter them 3 Start the countdown NOTE If you do not do this step within 5 seconds of doing Step 2 START will appear You then have 1 minute to touch TIMER or START before the display returns to the time of day At the end of the countdown To cancel the timer During the countdown ENTER TIMER ENTER TIMER TIMER TIMER YOU SEE one long tone will sound time of day OR TOUCH YOU SEE...

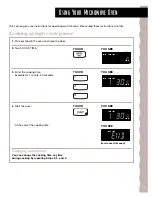
Page 15: ...king time Changing instructions You can change the cooking time any time during cooking by repeating Steps 2 3 and 4 TOUCH YOU SEE TOUCH YOU SEE four tones will sound ENTER POWER COOK TIME ENTER POWER COOK TIME TOUCH YOU SEE POWER COOK TIME YOU SEE COOK TIME This section gives you instructions for operating each function Please read these instructions carefully Cooking at high cook power ...

Page 16: ...wer 1 10 of full power WHEN TO USE IT Quick heating many convenience foods and foods with high water content such as soups beverages and vegetables Cooking small tender pieces of meat ground meat poultry pieces and fish fillets Heating cream soups Heating rice pasta or casseroles Cooking and heating foods that need a cook power lower than high for example whole fish and meat loaf Reheating a singl...

Page 17: ... the oven At the end of the cooking time Changing instructions You can change the cooking time or cook power any time during cooking by repeating Steps 2 3 and or 4 and 5 TOUCH YOU SEE POWER COOK TIME YOU SEE four tones will sound COOK TIME TOUCH YOU SEE TOUCH YOU SEE OR ENTER POWER COOK TIME TOUCH YOU SEE ENTER POWER COOK ENTER POWER COOK repeat until desired cook power appears ...

Page 18: ...OST it must be the first stage 1 Put your food in the oven and close the door 2 Touch COOK TIME 3 Enter the cooking time for the first stage Example for 7 minutes 30 seconds 4 Set the cook power for the first stage Example for 50 cook power 5 Repeat Steps 2 3 and 4 to set the cooking time and cook power for each additional stage TOUCH YOU SEE TOUCH YOU SEE ENTER POWER COOK TIME ENTER POWER COOK TI...

Page 19: ...ge s will count down At the end of the cooking time Changing instructions You can change cooking times or cook powers for a stage any time after that stage starts by repeating Steps 2 3 and or 4 and 5 TOUCH YOU SEE POWER COOK TIME 1 2 YOU SEE four tones will sound COOK TIME first stage when cooking with 2 stages ...

Page 20: ...ice 3 times 4 times 5 times 6 times 7 times This chart shows you how to choose a type of food and the amounts you can choose for each type You must touch AUTO COOK once before choosing the food type Because this food is cooked by the sensor you don t need to enter a quantity The amount shown here is the amount you can cook After you choose the food type and touch START SENSE appears on the display...

Page 21: ... 14 8 mL oil to the water before boiling Use the following method Changing instructions You can change the simmering time while simmering by repeating Steps 3 and 4 YOU SEE TOUCH YOU SEE SENSOR SIM 3 SENSOR SIM TIME 3 TOUCH YOU SEE TOUCH YOU SEE SENSOR SIM TIME 3 SENSOR SIM TIME 3 Place container with water in the oven and follow Steps 2 4 setting the simmer time at 1 second At the end of the sign...

Page 22: ...time do not touch REHEAT again Touch COOK POWER before you touch START See Changing preset cooking times in the Using Your Microwave Oven sec tion When reheating a large 4 oz 113 g muffin or bagel use the 2 piece setting The 1 piece setting warms 1 regular size muffin or bagel or 2 small dinner rolls once AMOUNTS YOU CAN CHOOSE 1 to 3 slices 5 oz 127 g each 1 to 4 cups 250 mL 1L 1 to 4 cups 250 mL...

Page 23: ...times in the Using Your Microwave Oven section See the Custom defrost chart later in this section for defrosting directions for each food To defrost items not listed in the Custom defrost chart use 30 cook power Refer to a reliable cookbook for defrosting information For even complete defrosting The shape of the package affects how quickly food will defrost Shallow packages will defrost more quick...

Page 24: ...round Beef Bulk Ground Beef Patties Round Steak Tenderloin Steak Pot Roast Chuck Roast Rib Roast Rolled Rump Roast Stew Beef Lamb Cubes for Stew Chops 1 in 25 4 mm thick Pork Chops 1 2 in 12 7 mm thick Hot Dogs Spareribs Country Style Ribs Loin Roast Boneless Sausage Links Sausage Bulk Fish setting SPECIAL INSTRUCTIONS Place in a microwavable baking dish Carefully separate fillets under cold water...

Page 25: ...d CUSTOM DEFROST gives best results when the food to be thawed is completely frozen If the food is partially defrosted always set a lower food weight for a shorter defrosting time to prevent cooking the food Weight conversion chart You are probably used to food weights as being in pounds and ounces that are fractions of a pound for example 4 ounces equals 1 4 lb 113 g However in order to enter foo...

Page 26: ...f additional Keep Warm time is desired Food cooked covered should be covered during Keep Warm Pastry items pies turnovers etc should be uncovered during Keep Warm Complete meals kept warm on a dinner plate should be covered during Keep Warm Do not use more than one complete Keep Warm cycle The quality of some foods will suffer with extended time TOUCH YOU SEE TOUCH YOU SEE When the last cooking cy...

Page 27: ...r failure If you start sensor cooking during the warm up SENSE shows on the display until the warm up is over Microwave energy will not be turned on until the sensor is warm When cooking foods for a long time allow the oven to cool down before sensor cooking again Popcorn brands make a difference How well your popcorn cooks will depend on the brand of popcorn and how much fat it has in it Try seve...

Page 28: ... times for 12 30 48 cm pizza 3 Touch COOK POWER to adjust cooking time for more or less well done 4 Touch START to begin cooking If you do not touch START within 5 seconds after Step 2 cooking will begin automatically To use CHICKEN 1 Use PAN HEAT 2 Touch once 1 piece twice 2 pieces 3 times 3 pieces 4 times 4 pieces 3 Touch COOK POWER to adjust cooking time for more or less well done 4 Touch START...

Page 29: ...R except for the POPCORN setting For an auto function you can only change For example in REHEAT after choosing the type of food and entering the quantity To lengthen cooking time To shorten cooking time To reset to the original cooking time three times POWER COOK TIME REHEAT AUTO once example for auto reheat REHEAT AUTO REHEAT AUTO twice If you touch EASY MINUTE during cooking the oven will cook a...

Page 30: ...n on left TOUCH to Start NOTE You cannot choose Turntable Off during auto cook functions Using 2 4 Plates Cooking you should not do in your microwave oven Do not do canning of foods in the oven Closed glass jars may explode resulting in damage to the oven Do not use the microwave oven to sterilize objects baby bottles etc It is difficult to keep the oven at the high temperature needed for safe ste...

Page 31: ...nse well and shake to dry Do not use ammonia corrosive cleaning agents such as lye based oven cleaners or place in a dishwasher The filter will turn black or could be damaged 5 To replace the charcoal filters push each filter to the back of the opening between the upper and lower lips against the springs Swing the front of the filter up against the upper lip Slide the filter forward while pushing ...

Page 32: ...418 Use a soft tissue to handle the lamp or wear a cotton glove Do not touch lamp with your bare fingers 6 Close the bulb cover 7 Slide the top of the vent grille into place Push the bottom until it snaps into place Replace the mounting screws 8 Plug in microwave oven or reconnect power To order bulbs call 1 800 807 6777 and follow the instructions and telephone prompts you hear If you prefer you ...

Page 33: ...epending on the rotation of the motor when the cooking cycle begins This appearance is normal and does not affect the operation of your oven You hear the sound of the transformer when the magnetron tube cycles on As the food becomes hot it will conduct the heat to the dish Be prepared to use hot pads to remove food after cooking Steam is normally produced during cooking The microwave oven has been...

Page 34: ...efore calling for assistance or service If you still need help see the Requesting Assistance or Service section Microwave oven does not work PROBLEM Nothing works The microwave oven will not run Cooking times PROBLEM Food is not cooked enough The display shows a time counting down but the oven is not cooking CAUSE The electric supply to your home or wall outlets is low or lower than normal Your el...

Page 35: ...haft The support is not operating correctly Remove the turntable and restart the oven If the support still does not move call a designated service technician for repair Cooking without the turntable can give you poor results Tones CAUSE You have turned off the tone See the Audible signals section on Page 10 If none of these items are causing your problem see Requesting Assistance or Service PROBLE...

Page 36: ... assist you When calling Please know the purchase date and the complete model and serial number of your appliance see the A Note to You section This information will help us better respond to your request For further assistance If you need further assistance you can write to KitchenAid with any questions or concerns at Customer Interaction Center KitchenAid Canada 1901 Minnesota Court Mississauga ...

Page 37: ...d modifications made to the appliance H Replacement parts or repair labor costs for units operated outside Canada I Travel or transportation expenses for customers who reside in remote areas KITCHENAID CANADA WILL PAY FOR Replacement parts and repair labor costs to correct defects in materials or workmanship Service must be provided by a KitchenAid designated servicing company Replacement of parts...

Page 38: ...ge 14 Utilisation de la minuterie 15 Utilisation du four à micro ondes 16 Cuisson à la puissance maximale 16 Cuisson à différentes puissances 17 Cuisson par étapes 19 Utilisation de AUTO COOK Cuisson automatique 21 Utilisation de EASY SIMMER Mijotage facile 22 Utilisation de REHEAT Réchauffage 23 Utilisation de CUSTOM DEFROST Decongelation sur commande 24 Utilisation de KEEP WARM Garder su chaud 2...

Page 39: ...e consulter d abord la section Dépannage dans cette brochure Après avoir consulté la section Dépannage on peut également obtenir de l aide à la section Demande d assistance ou de service ou en téléphonant à l un des numéros mentionnés ci dessus Lors de votre appel vous devrez communiquer le numéro de série et le numéro de modèle au complet de l appareil Vous pouvez trouver cette information sur la...

Page 40: ...se de courant convenablement reliée à la terre Voir les INSTRUCTIONS DE LIAISON À LA TERRE présentées dans cette section et dans les instructions d installation fournies Installer ou placer le four à micro ondes uniquement selon les instructions d installation fournies Certains produits comme les oeufs entiers dans leur coquille et les récipients fermés par exemple les bocaux en verre fermés peuve...

Page 41: ...cro ondes Ne pas remiser ce four à micro ondes à l extérieur Ne pas utiliser le four à micro ondes à proximité d eau par exemple près d un évier de cuisine dans un sous sol humide ou près d une piscine ou à un emplacement similaire Ne pas immerger le cordon ou la fiche de branchement dans l eau Garder le cordon d alimentation loin des surfaces chauffées Ne pas laisser le cordon d alimentation pend...

Page 42: ...menté par un circuit indépendant Spécifications électriques INSTRUCTIONS DE MISE À LA TERRE Pour appareils ménagers connectés par un cordon de courant électrique Il faut que le four à micro ondes soit relié à la terre En cas de court circuit électrique la liaison à la terre réduit le risque de choc électrique et dis pose d un itinéraire direct d acheminement à la terre Le four à micro ondes est do...

Page 43: ...Saisir le four à micro onde Faire pivoter le four à micro ondes vers le bas Faire attention et voir à ce que la porte ne s ouvre pas Soulever les languettes d appui F situées à la base du plateau de fixation Mettre le four à micro ondes de côté sur une surface protégée Réinstallation 1 Soulever doucement le four à micro ondes et l accrocher aux languettes de support situées à la base dela plaque d...

Page 44: ...oquille L accumulation de vapeur Connexion électrique Si la tension de la ligne d alimentation électrique ou de la prise de courant est inférieure à la tension normale de 110 volts le temps de cuisson peut être plus long Demander à un électricien qualifié d inspecter l installation électrique dans les oeufs entiers peut faire exploser l oeuf et risque d endommager le four Trancher les oeufs bouill...

Page 45: ...3 Hublot avec grille métallique La grille métallique empêche les micro ondes de s échapper Il s agit d une grille comme un écran qui permet à l utilisateur de voir les aliments dans le four au cours de la cuisson 4 Grille de cuisson Utiliser cette grille pour avoir plus d espace lorsqu on désire faire cuire simultanément plus d un plat Voir page 30 5 Plateau tournant en verre N de pièce 4393751 no...

Page 46: ...quantité d humidité détectée de l aliment Voir page 27 7 PAN HEAT Chauffage de plat à cuisson Appuyer sur cette touche pour préchauffer un plat à cuisson sans entrer une puissance ou un temps de cuisson Voir page 28 8 PIZZA Appuyer sur cette touche pour chauffer l une des trois tailles de pizza sans entrer un temps de cuisson Appuyer sur COOK POWER puissance de chauffage pour ajuster le résultat d...

Page 47: ... sur cette touche pour faire tourner et arrêter le plateau tournant Voir page 12 25 LIGHT ON NIGHT OFF Allumage Veilleuse Éteindre Appuyer sur cette touche pour allumer la lumière ou la veilleuse ou pour les éteindre Voir page 12 26 VENT FAN ON OFF higher or lower Ventilateur en fonction ou arrêté vitesse plus rapide ou plus lente Appuyer sur cette touche pour mettre le ventilateur en fonction ou ...

Page 48: ...ndant que vous entrez une caractéristique dissimulée ou en sortez par exemple verrouillage de sécurité ou l heure du jour Trois signaux sonores seront entendus si vous avez fait une entrée incorrecte Familiarisation du Four àÀ Micro ondes Caractéristiques du tableau de commande suite Pour désactiver la programmation des signaux sonores APPUYER SUR et tenir pendant 5 secondes Pour remettre en march...

Page 49: ...che CANCEL OFF annulation arrêt REMARQUE On ne peut pas arrêter le plateau tournant lorsqu on utilise une fonction auto Caractéristiques du tableau de commande suite Utilisation du verrouillage de sécurité Le verrouillage de sécurité immobilise le tableau de commande de sorte que les enfants ne peuvent pas utiliser le four à micro ondes quand vous ne désirez pas qu ils l utilisent Pour verrouiller...

Page 50: ...fois que le ventilateur est mis en marche il commencera à la dernière vitesse utilisée 2 Les touches au bas à droite du tableau de commande commandent le ventilateur à 5 vitesse 1 Mettre le ventilateur en marche et choisir la vitesse du ventilateur Appuyer sur la touche HIGHER plus vite pour augmenter la vitesse du ventilateur Appuyer sur la touche LOWER plus lente pour la vitesse du ventilateur L...

Page 51: ...CLOCK SET START APPUYER SUR AFFICHAGE APPUYER SUR AFFICHAGE APPUYER SUR AFFICHAGE OU ENTER TIME START TIME REMARQUES Si on appuie sur une heure incorrecte et on appuie sur CLOCK Horloge 3 signaux sonores seront entendus Entrer l heure correcte Si on appuie sur CANCEL OFF Annulation Arrêt pendant le réglage de l horloge l afficheur indiquera la dernière heure du jour réglée Pour arrêter l horloge a...

Page 52: ...rez 3 Commencer le compte à rebours REMARQUE Si vous n exécutez pas cette étape dans l intervalle de 5 secondes après l étape 2 START apparaîtra Vous avez alors 1 minute pour appuyer sur TIMER ou START avant que l fficheur retourne à l heure du jour À la fin du compte à rebours Pour annuler la minuterie Durant le compte à rebours ENTER TIMER ENTER TIMER TIMER TIMER AFFICHAGE un long signal sonore ...

Page 53: ...structions On peut changer le temps de cuisson à tout moment au cours de la cuisson en répétant les étapes 2 3 et 4 APPUYER SUR AFFICHAGE APPUYER SUR AFFICHAGE quatre signaux sonores seront entendus ENTER POWER COOK TIME ENTER POWER COOK TIME APPUYER SUR AFFICHAGE POWER COOK TIME AFFICHAGE COOK TIME On présente dans cette section les instructions pour utiliser chaque fonction Lire attentivement ce...

Page 54: ...une puissance de chauffage moindre que maximale p ex poisson entier et pain de viande Réchauffage d une seule portion d aliments Cuisson nècessitant une attention spéciale comme les plats à base de fromage et d oeufs poudings et crème anglaise Cuisson de plats en sauce non remuable ex lasagne Cuisson de jambon volaille en entier et rôtis Mijotage des ragoûts Pour fondre la chocolat Chauffage du pa...

Page 55: ...s de cuisson ou la puissance de chauffage à tout moment au cours de la cuisson en répétant les étapes 2 3 et ou 4 et 5 APPUYER SUR AFFICHAGE POWER COOK TIME AFFICHAGE quatre signaux sonores seront entendus COOK TIME APPUYER SUR AFFICHAGE APPUYER SUR AFFICHAGE OU ENTER POWER COOK TIME APPUYER SUR AFFICHAGE ENTER POWER COOK ENTER POWER COOK répéter jusqu à ce que la puissance de chauffage désirée ap...

Page 56: ...a première étape 1 Placer l aliment dans le four et fermer la porte 2 Appuyer sur COOK TIME 3 Entrer le temps de cuisson pour la première étape Exemple pour 7 minutes 30 secondes 4 Régler la puissance de chauffage la première étape Exemple pour 50 de la puissance de chauffage 5 Répéter les étapes 2 3 et 4 pour régler le temps de cuisson et la puissance de chauffage pour chaque étape additionnelle ...

Page 57: ...à rebours À la fin du temps de cuisson Changement d instructions On peut changer les temps de cuisson ou les puissances de chauffage pour une étape à tout moment après que l étape commence en répétant les étapes 2 3 et ou 4 et 5 APPUYER SUR AFFICHAGE POWER COOK TIME 1 2 AFFICHAGE quatre signaux sonores seront entendus COOK TIME première étape lors de la cuisson à 2 étapes ...

Page 58: ...oisir pour chaque type Vous devez appuyer sur AUTO COOK une fois avant de choisir le type d aliments Puisque cet aliment est cuit par détection vous n avez pas à entrer une quantité La quantité indiquée ici est la quantité que vous pouvez faire cuire Après avoir choisi le type d aliment et après avoir appuyé sur la touche START SENSE Détection apparaît sur l afficheur Aussi le détecteur a besoin d...

Page 59: ... 14 8 mL d huile à l eau avant de faire bouillir Utiliser la méthode suivante Changement d instructions On peut changer le temps de mijotage pendant le mijotage en répétant les étapes 3 et 4 22 Cette fonction met en oeuvre un détecteur qui nécessite une période de réchauffage de 2 minutes et 30 secondes lorsque le four est connecté au courant électrique ou après une panne d électricité Si on met e...

Page 60: ...glage pour tranche de pizza Si vous avez besoin de plus ou de moins de temps de cuisson ne pas toucher de nouveau REHEAT Appuyer sur COOK POWER Puissance de chauffage avant de toucher à START Voir Changement des temps de cuisson préréglés à la section Utilisation du four à micro ondes Lors du réchauffage d un gros muffin 4 oz 113 g ou d un bagel utiliser le réglage pour 2 pièces Le réglage pour 1 ...

Page 61: ...Voir le tableau de décongélation sur commande plus loin dans cette section pour les directives de décongélation pour chaque aliment Pour décongeler des articles non indiqués sur le Tableau de décongélation sur commande utiliser 30 de la puissance de chauffage Se référer à un livre de recettes fiable pour des renseignements au sujet de la décongélation Pour une décongélation égale et complète La fo...

Page 62: ...cubes pour ragoût Côtelettes épaisseur 1 po 25 4 mm Porc Côtelette épaisseur 1 2 po 12 7 mm Hot Dogs côtes style campagnard rôti de longe désossé saucisses en chapelet Saucisse vrac Réglage pour poisson INSTRUCTIONS SPÉCIALES Placer dans un plat à cuisson pour micro ondes Séparer soigneusement les filets sous l eau froide Placer dans un plat à cuisson pour micro ondes Faire couler l eau froide sur...

Page 63: ...uits alimentaires crus CUSTOM DEFROST donne les meilleurs résultats lorsque l aliment à décongeler est complètement gelé Si Tableau de conversion des poids Vous avez probablement l habitude de lire les poids en livres et en onces qui sont des fractions de livre p ex 4 onces 1 4 lb 113 g Cependant pour entrer le poids d un aliment au réglage CUSTOM DEFROST on doit indiquer le poids en livres et en ...

Page 64: ...oivent demeurer couverts pendant le programme Keep Warm Les produits de pâtisserie tartes chaussons etc ne devraient pas être couverts pendant la période Keep Warm Des repas complets gardés tièdes sur une assiette doivent être recouverts pendant la période Keep Warm Ne pas utiliser Keep Warm pendant plus d un programme complet La qualité de certains aliments pourrait être affectée par une prolonga...

Page 65: ...s ne sera pas activée avant que le détecteur soit tiède Lorsque les aliments sont cuits pendant une période prolongée laisser le four se refroidir avant de faire de nouveau la cuisson par détection Les marques de maïs soufflé font une différence La qualité de la cuisson de votre maïs dépendra de la marque de maïs soufflé et de la quantité de matières grasses dans le maïs Essayer plusieurs marques ...

Page 66: ...juster le temps de cuisson pour un résultat de cuisson plus ou moins cuit 4 Appuyer sur la touche START pour mettre la cuisson en marche Si vous n appuyez pas sur START dans l intervalle de 5 secondes après l étape 2 la cuisson commencera automatiquement Pour utiliser CHICKEN 1 Utiliser PAN HEAT 2 Appuyer sur 1 fois 1 morceau 2 fois 2 morceau 3 fois 3 morceau 4 fois 4 morceau 3 Appuyer sur COOK PO...

Page 67: ...atique vous pouvez seulement changer les Par exemple dans la fonction REHEAT après avoir choisi le type d aliments et après avoir entré la quantité Pour prolonger le temps de cuisson Pour raccourcir le temps de cuisson Pour remettre en marche le temps de cuisson original trois fois POWER COOK TIME REHEAT AUTO une fois exemple pour réchauffage automatique REHEAT AUTO REHEAT AUTO deux fois Si vous a...

Page 68: ...tiliser le four pour la stérilisation d objets comme biberons etc Il est difficile de maintenir la température élevée nécessaire pour une bonne stérilisation Utilisation du papier d aluminium On ne doit pas utiliser un récipient métallique dans un four à micro ondes Il y a cependant certaines exceptions Lorsqu on achète un aliment ou mets pré emballés dans un récipient en aluminium voir les instru...

Page 69: ...e pas laisser le récipient placé sur la grille toucher le plafond ou les parois du four Ne pas utiliser la grille avec le plat de brunissment Ne pas placer un récipient métallique sur la grille Ne pas remiser la grille métallique dans le four Ne pas faire fonctionner le four lorsque la grille est placée sur le fond du four ceci pourrait faire subir des dommages à la finition intérieure du four Uti...

Page 70: ...e nettoyage à base de lessive et ne pas placer les filtres dans un lave vaisselle Le filtre deviendra noir et pourrait être endommagé 5 Pour réinstaller les filtres au charbon pousser chaque filtre vers l arrière de l ouverture entre les lèvre supérieure et inférieure contre les ressorts Abaisser le devant du filtre contre la lèvre supérieure Faire glisser le filtre vers l avant tout en le poussan...

Page 71: ...r manipuler les ampoules ou porter un gant de coton Ne pas toucher les ampoules avec les doigts nus 6 Rabattre le cabochon 7 Insérer le sommet de la grille d évent dans son logement Pousser par dessous pour exécuter l emboîtement Réinstaller les vis de montage 8 Reconnecter l alimentation électrique ou brancher le four à micro ondes Cabochon de la lampe Pour commander les ampoules composer le 1 80...

Page 72: ...t tourne dans le sens horaire ou antihoraire selon la rotation du moteur lorsque le programme de cuisson commence Cette apparence est normale et elle n affecte pas le fonctionnement du four Il s agit du son émis par le transformateur lors du fonctionnement du magnétron Le contenu du plat s échauffe et transmet de la chaleur au plat par conduction Utiliser des mitaines de four pour enlever les alim...

Page 73: ...vant de faire un appel pour assistance ou service Si vous avez encore besoin d aide voir la section Demande d assistance ou de service Le four à mirco ondes ne fonctionne pas PROBLÈME Rien ne fonctionne Le four à micro ondes ne fonctionne pas Temps de cuisson PROBLÈME Les aliments ne sont pas suffisamment cuits L afficheur montre un compte à rebours mais le four ne cuit pas CAUSE L alimentation él...

Page 74: ...pas correctement Retirer le plateau tournant et remettre le four en marche Si le support ne tourne pas faire venir un technicien dépanneur désigné pour la réparation La cuisson sans le plateau tournant peut donner des résultats médiocres de cuisson Signaux sonores CAUSE Vous avez désactivé le signal sonore Voir à la page 10 la section Signaux sonores Si aucune de ces situations ne cause votre prob...

Page 75: ...us d assistance Si vous avez besoin de plus d assistance vous pouvez écrire à KitchenAid en soumettant toute question ou préoccupation au Centre d interaction avec la clientèle KitchenAid Canada 1901 Minnesota Court Mississauga Ontario L5N 3A7 Veuillez indiquer dans votre correspondance un numéro de téléphone où l on peut vous joindre le jour Si vous avez besoin service Contacter le service d appa...

Page 76: ...39 Notes ...
Page 77: ... systèmes imputables à des modifications non autorisées exécutées sur l appareil H Coûts des pièces de remplacement ou de la main d oeuvre de réparation pour les appareils fonctionnant hors du Canada I Les dépenses de voyage ou de transport pour les clients qui habitent dans des régions éloignées KITCHENAID CANADA PAIERA POUR Coûts de remplacement des pièces et de la main d oeuvre pour réparation ...

Reviews: