background image

17

KITCHENAID

®

 BUILT-IN OVEN & MICROWAVE 

WARRANTY

ONE YEAR LIMITED WARRANTY

For one year from the date of purchase, when this major appliance is operated and maintained according to instructions attached to or 
furnished with the product, KitchenAid or KitchenAid Canada (hereafter “KitchenAid”) will pay for factory specified parts and repair 
labor to correct defects in materials or workmanship. Service must be provided by a KitchenAid designated service company.

SECOND THROUGH FIFTH YEAR LIMITED WARRANTY ON CERTAIN COMPONENT PARTS

In the second through fifth years from the date of purchase, when this appliance is operated and maintained according to instructions 
attached to or furnished with the product, KitchenAid or KitchenAid Canada will pay for factory specified parts for the following 
components if defective in materials or workmanship: 

Electric element

Solid state touch control system parts

SECOND THROUGH TENTH YEAR LIMITED WARRANTY

On microwave ovens only, in the second through tenth years from date of purchase, when this major appliance is operated and 
maintained according to instructions attached to or furnished with the product, KitchenAid will pay for factory specified parts for the 
stainless steel oven cavity/inner door if the part rusts through due to defects in materials or workmanship.

ITEMS KITCHENAID WILL NOT PAY FOR

1. Service calls to correct the installation of your major appliance, to instruct you how to use your major appliance, to replace or repair 

house fuses or to correct house wiring or plumbing.

2. Service calls to repair or replace appliance light bulbs, air filters or water filters. Those consumable parts are excluded from warranty 

coverage.

3. Repairs when your major appliance is used for other than normal, single-family household use.
4. Damage resulting from accident, alteration, misuse, abuse, fire, flood, acts of God, improper installation, installation not in 

accordance with electrical or plumbing codes, or use of products not approved by KitchenAid.

5. Replacement parts or repair labor costs for units operated outside the United States or Canada.
6. Pickup and delivery. This major appliance is designed to be repaired in the home.
7. Repairs to parts or systems resulting from unauthorized modifications made to the appliance.
8. Expenses for travel and transportation for product service in remote locations.
9. The removal and reinstallation of your appliance if it is installed in an inaccessible location or is not installed in accordance with 

published installation instructions.

DISCLAIMER OF IMPLIED WARRANTIES; LIMITATION OF REMEDIES

CUSTOMER'S SOLE AND EXCLUSIVE REMEDY UNDER THIS LIMITED WARRANTY SHALL BE PRODUCT REPAIR AS PROVIDED 
HEREIN. IMPLIED WARRANTIES, INCLUDING WARRANTIES OF MERCHANTABILITY OR FITNESS FOR A PARTICULAR PURPOSE, 
ARE LIMITED TO ONE YEAR OR THE SHORTEST PERIOD ALLOWED BY LAW. KITCHENAID SHALL NOT BE LIABLE FOR 
INCIDENTAL OR CONSEQUENTIAL DAMAGES. SOME STATES AND PROVINCES DO NOT ALLOW THE EXCLUSION OR LIMITATION 
OF INCIDENTAL OR CONSEQUENTIAL DAMAGES, OR LIMITATIONS ON THE DURATION OF IMPLIED WARRANTIES OF 
MERCHANTABILITY OR FITNESS, SO THESE EXCLUSIONS OR LIMITATIONS MAY NOT APPLY TO YOU. THIS WARRANTY GIVES 
YOU SPECIFIC LEGAL RIGHTS AND YOU MAY ALSO HAVE OTHER RIGHTS, WHICH VARY FROM STATE TO STATE OR PROVINCE 
TO PROVINCE.

Outside the 50 United States and Canada, this warranty does not apply. Contact your authorized KitchenAid dealer to determine if 
another warranty applies.
If you need service, first see the “Troubleshooting” section of the Use & Care Guide. After checking “Troubleshooting,” additional help 
can be found by checking the “Assistance or Service” section or by calling KitchenAid. In the U.S.A., call 1-800-422-1230. In Canada, 
call 1-800-807-6777.

9/05

Keep this book and your sales slip together for future 
reference. You must provide proof of purchase or installation 
date for in-warranty service.

Write down the following information about your major appliance 
to better help you obtain assistance or service if you ever need it. 
You will need to know your complete model number and serial 
number. You can find this information on the model and serial 
number label located on the product.

Dealer name____________________________________________________

Address ________________________________________________________

Phone number __________________________________________________

Model number __________________________________________________

Serial number __________________________________________________

Purchase date __________________________________________________

Summary of Contents for YKHMS1850S

Page 1: ...6777 or visit our website at www KitchenAid ca ENSEMBLEFOURÀMICRO ONDES HOTTE Guided utilisationetd entretien Au Canada pour assistance installation ou service composez le 1 800 807 6777 ou visitez notre site web à www KitchenAid ca Table of Contents Table des matières 2 Model Modèle YKHMS1850S W10113152 ...

Page 2: ...RO ONDES HOTTE 18 Spécifications électriques 20 PIÈCES ET CARACTÉRISTIQUES 21 Plateau rotatif 21 Grille de cuisson 21 TABLEAU DE COMMANDE DU FOUR À MICRO ONDES 22 Affichage 22 Mise en marche 22 Ajouter une minute 22 Arrêt 22 Horloge 22 Signaux sonores 23 Minuterie 23 Verrouillage des commandes 23 Ventilateur d évacuation 23 Lampe de la table de cuisson 23 Mode de démonstration 23 UTILISATION DU FO...

Page 3: ... or dry food It is not designed for industrial or laboratory use As with any appliance close supervision is necessary when used by children Do not operate the microwave oven if it has a damaged cord or plug if it is not working properly or if it has been damaged or dropped The microwave oven should be serviced only by qualified service personnel Call an authorized service company for examination r...

Page 4: ...ENERGY a Do not attempt to operate this oven with the door open since open door operation can result in harmful exposure to microwave energy It is important not to defeat or tamper with the safety interlocks b Do not place any object between the oven front face and the door or allow soil or cleaner residue to accumulate on sealing surfaces c Do not operate the oven if it is damaged It is particula...

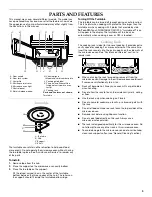
Page 5: ...vity space for cooking 2 or more containers at the same time Insert the rack securely into the rack supports on the side walls of the microwave oven See Assistance or Service section to reorder rack When not using the rack for cooking remove it from the microwave oven Damage to the microwave oven could result if someone unintentionally turns it on Rack will become hot Always use oven mitts or pot ...

Page 6: ...e up to 10 minutes with each additional touch of the control Touching ADD A MINUTE during a cook cycle will add 1 minute of cook time at the current cook power If the microwave oven has not been in use and the door has not been opened in the past 5 minutes the ADD A MINUTE control will not start the cooking cycle Open and close the door then touch ADD A MINUTE to start the cooking cycle Off The OF...

Page 7: ...ill cancel the cook function not the Timer To cancel the Timer touch TIMER or OFF while the countdown is active in the display The length of time can be changed during the countdown by repeating the above steps ControlLock The Control Lock shuts down the control panel pads to avoid unintended use of the microwave oven When the control is locked only the Vent Fan and Light pads will function To Loc...

Page 8: ...an larger pieces and uniformly shaped foods cook more evenly than irregularly shaped food Starting Temperature Room temperature foods will heat faster than refrigerated foods and refrigerated foods will heat faster than frozen foods Composition and Density Foods high in fat and sugar will reach a higher temperature and will heat faster than other foods Heavy dense foods such as meat and potatoes r...

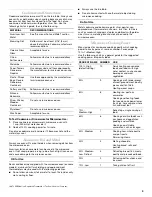
Page 9: ...owing chart as a general guide for the suggested cooking power of specific foods MATERIAL RECOMMENDATIONS Aluminum Foil Metal See Aluminum Foil and Metal section Browning Dish Bottom must be at least 3 16 5 mm above the turntable Follow manufacturer s recommendations Ceramic Glass Glass Acceptable for use China Earthenware Follow manufacturer s recommendations Melamine Follow manufacturer s recomm...

Page 10: ... time accordingly Many sensor cycles require the covering of foods Microwave safe containers or steamers with loose fitting lids are recommended The loose fitting lid allows enough steam to escape to be detected by the sensor When covering foods with plastic wrap be sure to leave a large enough vent opening to allow the steam to escape NOTES The microwave oven should be plugged in for at least 3 m...

Page 11: ... to clear the display and or stop reminder tones FOOD PAD QUANTITY INSTRUCTION Canned Vegetables 1 1 4 cups 250 mL 1 L Place in microwave safe container Cover with plastic wrap and vent Stir and let stand 2 3 minutes after cooking Fresh Vegetables 2 1 4 cups 250 mL 1 L Place in microwave safe container Add 2 4 tbs 30 60 mL water Cover with plastic wrap and vent Stir and let stand 2 3 minutes after...

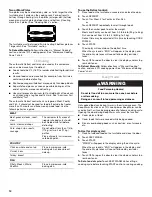
Page 12: ...me by touching COOK POWER 5 Touch START The display will count down the defrost time When the cycle ends END will appear in the display and the end of cycle tones will sound followed by reminder tones 6 Touch OFF or open the door to clear the display and or stop reminder tones To Defrost Manually Follow directions in Manual Cooking section and use 30 cooking power See Microwave Cooking Power chart...

Page 13: ...loth MICROWAVE OVEN DOOR AND EXTERIOR The area where the microwave oven door and frame touch when closed should be kept clean Mild nonabrasive soaps and detergents Rinse with clean water and dry with soft lint free cloth Glass cleaner and paper towels or nonabrasive plastic scrubbing pad Apply glass cleaner to towel not directly to surface Stainless Steel on some models To avoid damage to the micr...

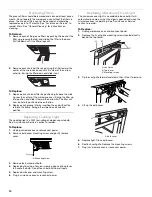
Page 14: ...ab into the frame Swing other side up and slide into position ReplacingCooktopLight The cooktop light is a 25W low voltage halogen capsule bulb See Assistance or Service section to reorder To Replace 1 Unplug microwave oven or disconnect power 2 Remove bulb cover mounting screw and gently remove cover A Mounting screw 3 Remove the burned out bulb 4 Replace bulb using a tissue or wearing clean cott...

Page 15: ... magnetron on and off Microwave oven door looks wavy This is normal and will not affect performance Turntable will not operate Has the tape been removed from turntable hub See Turntable section Is the turntable properly in place Make sure turntable is correct side up and is sitting securely on the turntable support Is the turntable support operating properly Remove turntable Remove and clean turnt...

Page 16: ...need replacement parts If you need to order replacement parts we recommend that you use only factory specified parts These factory specified parts will fit right and work right because they are made with the same precision used to build every new KITCHENAID appliance To locate factory specified parts in your area call us or your nearest KitchenAid designated service center InCanada Call the Kitche...

Page 17: ...irs to parts or systems resulting from unauthorized modifications made to the appliance 8 Expenses for travel and transportation for product service in remote locations 9 The removal and reinstallation of your appliance if it is installed in an inaccessible location or is not installed in accordance with published installation instructions DISCLAIMER OF IMPLIED WARRANTIES LIMITATION OF REMEDIES CU...

Page 18: ...quille et les récipients fermés par exemple les bocaux en verre fermés peuvent exploser et on ne doit pas les faire chauffer dans le four à micro ondes Utiliser le four à micro ondes uniquement pour les applications auxquelles il est destiné telles qu elles sont décrites dans ce manuel Ne pas utiliser de vapeurs ou de produits chimiques corrosifs dans le four à micro ondes Ce type de four est spéc...

Page 19: ...Lorsque vous flambez des aliments sous la hotte mettre le ventilateur en marche Nettoyer avec soin le filtre du ventilateur de la hotte Des agents de nettoyage corrosifs tels que les produits de nettoyage de four à base de soude peuvent endommager le filtre Ne pas couvrir ni obstruer toute ouverture sur le four à micro ondes Ne pas remiser ce four à micro ondes à l extérieur Ne pas utiliser le fou...

Page 20: ...é à la terre En cas de court circuit électrique la liaison à la terre réduit le risque de choc électrique car le courant électrique dispose d un itinéraire direct d acheminement à la terre Le four à micro ondes est doté d un cordon de courant électrique qui comporte un fil de liaison à la terre avec broche de liaison à la terre On doit brancher la fiche sur une prise de courant convenablement inst...

Page 21: ...cer correctement la grille sur ses supports situés sur les parois latérales du four Pour commander à nouveau la grille voir la section Assistance ou service Quand la grille n est pas utilisée pour la cuisson la retirer du four à micro ondes Le four risque d être endommagé si une personne le met en marche non intentionnellement La grille deviendra chaude Toujours utiliser des mitaines de four ou po...

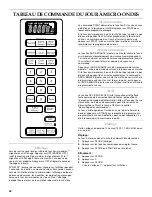
Page 22: ...lémentaire jusqu à 10 minutes à chaque fois qu on appuie à nouveau sur la commande Appuyer sur ADD A MINUTE lors d un programme de cuisson ajoutera 1 minute de durée de cuisson à la puissance en marche Si le four à micro ondes n a pas été utilisé et que la porte n a pas été ouverte pendant les 5 minutes précédentes la commande ADD A MINUTE ajouter une minute ne mettra pas en marche le programme de...

Page 23: ...fonction mais pas de la minuterie Pour annuler la minuterie appuyer sur TIMER ou OFF lorsque la minuterie est active sur l afficheur La durée de cuisson peut être réglée de nouveau durant le compte à rebours en répétant les étapes ci dessus Verrouillagedescommandes Le verrouillage des commandes désactive les touches du tableau de commande pour empêcher l utilisation non intentionnelle du four à mi...

Page 24: ...uiront plus vite que les gros morceaux et les aliments uniformes cuiront plus également que les aliments de forme irrégulière Température de début Les aliments à température ambiante chaufferont plus vite que les aliments réfrigérés et les aliments réfrigérés chaufferont plus vite que les aliments congelés Composition et densité Les aliments à haute teneur en gras et en sucre atteindront une tempé...

Page 25: ...s suivantes Ne pas laisser le papier d aluminium ou le métal toucher les parois le plafond ou le fond de la cavité intérieure Toujours utiliser le plateau rotatif Ne pas permettre un contact avec un autre objet en métal durant la cuisson Utilisation à éviter Les ustensiles de cuisson au four en métal l or l argent l étain les thermomètres à viande non approuvés les brochettes les attaches les doub...

Page 26: ...ée et la puissance de cuisson peuvent être modifiées après avoir appuyé sur START en répétant les étapes ci dessous POURCEN TAGE NOM CHIF FRE UTILISATION 100 Élevé par défaut 10 Chauffage rapide d aliments de commodité et aliments avec haute teneur en eau tels que soupes boissons et la plupart des légumes 90 9 Cuisson de petits morceaux tendres de viande viande hachée morceaux de volaille filets d...

Page 27: ... ondes doit être branché pendant au moins 3 minutes La cavité du four à micro ondes et l extérieur du contenant de cuisson doivent être secs La température ambiante ne doit pas être supérieure à 95 F 35 C Si la porte est ouverte pendant un programme de détection la détection s arrête et le programme est annulé Cuissonpardétection uneseulepression Utiliser le tableau suivant comme guide pour les to...

Page 28: ... et laisser une ouverture d échappement de l air Remuer et laisser reposer 2 à 3 minutes après la cuisson Légumes surgelés 3 1 à 4 tasses 250 mL à 1 L Les sortir de l emballage Les placer dans un contenant pour micro ondes et ajouter 2 à 4 c à soupe 30 à 60 ml d eau Recouvrir d une pellicule de plastique et laisser une ouverture d échappement de l air Remuer et laisser reposer 2 à 3 minutes après ...

Page 29: ... la fin du programme pour une décongélation plus uniforme Utiliser de petits morceaux de papier d aluminium pour protéger les extrémités d aliments telles que les ailes et pilons de poulet et les queues de poisson Voir d abord Papier d aluminium et métal Le système de décongélation automatique comporte 3 catégories viande volaille et poisson Il ne doit pas être utilisé pour un aliment laissé à l e...

Page 30: ...ls que les nettoyants à four à base d hydroxyde de sodium Eau chaude et détergent doux Faire tremper les filtres puis les frotter et les agiter pour déloger la saleté et la graisse incrustées Bien rincer et sécher en secouant Lave vaisselle Laver séparément pas avec de la vaisselle sale parce que les aliments peuvent se prendre dans les filtres CAVITÉ DU FOUR À MICRO ONDES Pour éviter d endommager...

Page 31: ...ons à récurer Nettoyant doux eau et chiffon SUPPORTS DE GRILLE Nettoyer souvent pour éviter l accumulation de saleté L accumulation de saleté peut entraîner la formation d arcs et endommager le four Ne pas utiliser de tampons à récurer savonneux nettoyants abrasifs tampons en laine d acier chiffons de lavage rugueux ou certains essuie tout recyclés Savon ou détergent non abrasif doux et chiffon br...

Page 32: ...alampedufourà micro ondes La lampe du four à micro ondes est une ampoule à culot candélabre Elle s allume automatiquement à l ouverture de la porte et durant le fonctionnement du four à micro ondes Voir la section Assistance ou service pour passer une nouvelle commande Remplacement 1 Débrancher le four à micro ondes ou déconnecter la source de courant électrique 2 Enlever les 2 vis de montage de l...

Page 33: ... La porte du four semble gondolée Ceci est normal et n affecte pas la performance Le plateau rotatif ne fonctionne pas Le ruban adhésif a t il été enlevé de l axe du plateau rotatif Voir la section Plateau rotatif Le plateau rotatif est il bien en place S assurer que le plateau rotatif est à l endroit et repose bien sur son support Le support du plateau rotatif fonctionne t il correctement Retirer...

Page 34: ...commander des pièces de rechange nous vous recommandons d employer uniquement des pièces spécifiées par l usine Les pièces spécifiées par l usine conviendront et fonctionneront bien parce qu elles sont fabriquées avec la même précision que celles utilisées dans la fabrication de chaque nouvel appareil KITCHENAID Pour localiser des pièces spécifiées par l usine dans votre région nous appeler ou con...

Page 35: ... être réparé à domicile 7 Les réparations aux pièces ou systèmes résultant d une modification non autorisée faite à l appareil 8 Les frais de voyage ou de transport pour le service d un produit dans les régions éloignées 9 La dépose et la réinstallation de votre appareil si celui ci est installé dans un endroit inaccessible ou n est pas installé conformément aux instructions d installation fournie...

Page 36: ...és Registered Trademark TM Trademark of KitchenAid U S A KitchenAid Canada licensee in Canada Marque déposée TM Marque de commerce de KitchenAid U S A Emploi sous licence par KitchenAid Canada au Canada 461965269331 1 07 Printed in China Imprimé en Chine ...

Reviews: