background image

6

Locate Wall Stud(s)

NOTE:

 If no wall studs exist within the cabinet opening, do not 

install the microwave oven.
See illustrations in “Possible Wall Stud Configurations.”

1.

Using a stud finder, locate the edges of the wall stud(s) within 
the opening.

2.

Mark the center of each stud, and draw a plumb line down 
each stud center. See illustrations in “Possible Wall Stud 
Configurations.”

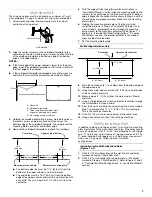
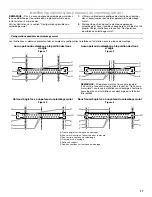
Possible Wall Stud Configurations

These depictions show examples of preferred installation configurations with the mounting plate.

No Wall Studs at End Holes

Figure 1

No Wall Studs at End Holes

Figure 2

NOTE:

 If wall stud is within 6" (15.2 cm) of the vertical 

centerline (see “Mark Rear Wall” section), only recirculation or 
roof venting installation can be done.

Wall Stud at One End Hole

Figure 3

Wall Studs at Both End Holes

Figure 4

A. End holes (on mounting plate)
B. Cabinet opening vertical centerline

C. Wall stud centerlines
D. Holes for lag screws

E. Support tabs

F. Mounting plate center markers

A

A

B

C

C

D

E

E
F

A

A

B

C

D

E

E

F

A

A,D

B

C

C

D

E

E

F

A,D

B

E

A,D

C

E

C

F

Summary of Contents for YWMH1162XVS

Page 1: ...0 VENTING DESIGN SPECIFICATIONS 11 ASSISTANCE 12 Replacement Parts 12 Accessories 12 SÉCURITÉ DE L ENSEMBLE FOUR À MICRO ONDES HOTTE 13 EXIGENCES D INSTALLATION 13 Outillage et pièces 13 Ôter du gabarit de carton 14 Exigences d emplacement 14 Dimensions du produit 14 Spécifications électriques 15 INSTRUCTIONS D INSTALLATION 15 Dépose de la plaque de montage 15 Réorientation du moteur du ventilateu...

Page 2: ... left sidewall make sure there is at least 6 15 2 cm of clearance between the wall and the microwave oven so that the door can open fully Some cabinet and building materials are not designed to withstand the heat produced by the microwave oven for cooking Check with your builder or cabinet supplier to make sure that the materials used will not discolor delaminate or sustain other damages Special R...

Page 3: ...ground prong Do not use an adapter Do not use an extension cord Failure to follow these instructions can result in death fire or electrical shock WARNING GROUNDING INSTRUCTIONS SAVE THESE INSTRUCTIONS For all cord connected appliances The microwave oven must be grounded In the event of an electrical short circuit grounding reduces the risk of electric shock by providing an escape wire for the elec...

Page 4: ...or wall or roof venting changes must be made to the venting system NOTE Skip this section if you are using recirculation installation Keep the damper assembly in case the venting method is changed or the microwave oven is reinstalled in another location where wall or roof venting may be used Wall Venting Installation Only 1 Remove screws attaching damper plate to top of microwave oven exterior Sli...

Page 5: ...e top of microwave oven and flat sides of blower motor face back of microwave oven Lower blower motor back into microwave oven IMPORTANT If blower motor is not positioned with flat sides facing the back of the microwave oven as shown performance will be poor 6 Reattach blower motor to back of microwave oven with 2 screws removed in Step 3 of Wall Venting Installation Only Securely tighten screws N...

Page 6: ...ctions show examples of preferred installation configurations with the mounting plate No Wall Studs at End Holes Figure 1 No Wall Studs at End Holes Figure 2 NOTE If wall stud is within 6 15 2 cm of the vertical centerline see Mark Rear Wall section only recirculation or roof venting installation can be done Wall Stud at One End Hole Figure 3 Wall Studs at Both End Holes Figure 4 A End holes on mo...

Page 7: ...plate closest to the wall stud centerline s See figures 1 2 and or 3 in Possible Wall Stud Configurations in Locate Wall Stud s section The blackened holes in the shaded areas are ideal hole locations 7 Set the mounting plate aside Wall Venting Installation Only 8 Mark the centerline 3 8 1 cm down from the bottom edge of the upper cabinet 9 Using measuring tape measure out 6 15 2 cm on both sides ...

Page 8: ...ing plate facing forward insert a 1 4 20 x 3 round head bolt through the end hole that fits over the 3 4 19 mm hole drilled in Step 3 of Installation for Wall Stud at One End Hole in the Drill Holes in Rear Wall section 2 Start a toggle nut on the bolt from the back of the mounting plate Leave enough space for the toggle nut to go through the wall and to open 3 Position mounting plate on the wall ...

Page 9: ...of the microwave oven is the heavy side Handle the microwave oven gently 1 Place a washer on each 1 4 20 x 3 flat head bolt and place inside upper cabinet near the 3 8 10 mm holes 2 Make sure the microwave oven door is closed and taped shut 3 Using 2 or more people lift microwave oven and hang it on support tabs at the bottom of mounting plate NOTE To avoid damage to the microwave oven do not grip...

Page 10: ...heet metal screw NOTE The screw cannot be installed if the damper assembly is not positioned as shown 2 Connect vent to damper assembly Complete Installation 1 Refer to the Use and Care Guide for instructions on how to install filters into your model 2 Plug microwave oven into grounded 3 prong outlet 3 Reconnect power 4 Check the operation of microwave oven by placing 1 cup 250 mL of water on the ...

Page 11: ...amper to open fully If venting through the roof and rectangular to round transition is used be sure there is at least 3 7 6 cm of clearance between the top of the microwave oven and the transition piece See Rectangular to Round Transition illustration Rectangular to Round Transition NOTE The minimum 3 7 6 cm clearance must exist between the top of the microwave oven and the rectangular to round tr...

Page 12: ...en door on the front frame of the microwave oven If you need additional assistance call us at our toll free number or visit our website listed in the Use and Care Guide Replacement Parts If any of the installation hardware needs to be replaced call us at our toll free number listed in the User Instructions Following is a list of available replacement parts You will need your model number located o...

Page 13: ...ppareil ménager Assurez vous de toujours lire tous les messages de sécurité et de vous y conformer AVERTISSEMENT DANGER Voici le symbole d alerte de sécurité Ce symbole d alerte de sécurité vous signale les dangers potentiels de décès et de blessures graves à vous et à d autres Tous les messages de sécurité suivront le symbole d alerte de sécurité et le mot DANGER ou AVERTISSEMENT Ces mots signifi...

Page 14: ...t certains matériaux de construction ne sont pas conçus pour résister à la chaleur émise par le four à micro ondes lors des opérations de cuisson Consulter le constructeur de la maison ou le fabricant des placards pour déterminer si les matériaux utilisés pourraient subir un changement de couleur une déstratification ou d autres dommages Exigences spéciales Pour une installation avec décharge mura...

Page 15: ...arge murale seulement 1 Ôter les vis fixant la plaque de support du clapet anti reflux à la partie supérieure de l extérieur du four à micro ondes Faire glisser la plaque de support du clapet anti reflux vers l avant du four à micro ondes et soulever AVERTISSEMENT Risque de choc électrique Brancher sur une prise à 3 alvéoles reliée à la terre Ne pas enlever la broche de liaison à la terre Ne pas u...

Page 16: ...ne installation avec décharge murale seulement 5 Faire pivoter le moteur du ventilateur pour que les orifices de sortie soient orientés vers le haut du four à micro ondes et que les côtés plats du moteur du ventilateur soient orientés vers l arrière du four à micro ondes Rabaisser le moteur du ventilateur dans le four à micro ondes A Orifice de sortie IMPORTANT Si le moteur du ventilateur n est pa...

Page 17: ...entent des exemples de configurations préférées d installation avec la plaque de montage Aucun poteau du colombage à la position des trous d angle Figure 1 Aucun poteau du colombage à la position des trous d angle Figure 2 REMARQUE Si le poteau mural se trouve à moins de 6 15 2 cm de l axe central vertical voir la section Tracé sur le mur arrière seule une installation sans décharge à l extérieur ...

Page 18: ...ssurant que sa rive inférieure est alignée avec l axe horizontal tracé à l étape 3 et que les trous d angle sont correctement indiqués S assurer que la plaque de montage est d aplomb 6 Tout en maintenant la plaque de montage en place trouver l axe central des poteaux du colombage marqués à l étape 2 de la section Identifier la position du des poteaux du colombage mural et marquer la position d au ...

Page 19: ...face à un poteau du colombage mural Figure 4 Percer des trous de 3 16 5 mm à travers les poteaux du colombage mural à l emplacement des trous d angle marqués à l étape 3 dans Tracé sur le mur arrière Fixation de la plaque de montage sur le mur REMARQUE Fixer la plaque de montage sur le mur dans les deux trous d angle percés dans les poteaux du colombage et ou à travers le panneau de gypse vis à tê...

Page 20: ...vis d ancrage Préparation du placard mural 1 Interrompre l alimentation électrique 2 Retirer tout le contenu du placard mural 3 Placer le gabarit placard mural contre le fond du placard mural et le fixer avec du ruban adhésif ou des punaises Veiller à aligner l axe central du gabarit avec l axe vertical central tracé sur le mur arrière Les flèches rear wall mur arrière doivent être contre le mur a...

Page 21: ...ondes et le suspendre aux pattes de support situées en bas de la plaque de montage REMARQUE Pour éviter d endommager le four à micro ondes ne pas prendre prise sur la porte ou la poignée de la porte durant les manutentions du four à micro ondes 4 Alors que l avant du four à micro ondes est encore incliné enfiler le cordon d alimentation à travers le trou de passage percé dans le fond du placard mu...

Page 22: ...ible d installer la vis si le module du clapet anti reflux n est pas positionné comme on le voit sur l illustration 2 Connecter le conduit d évacuation au module du clapet anti reflux Achever l installation 1 Pour l installation de filtres sur l appareil voir le Guide d utilisation et d entretien 2 Brancher le four à micro ondes sur une prise à trois alvéoles reliée à la terre 3 Reconnecter la sou...

Page 23: ...ffisant à l intérieur du mur pour que le clapet anti reflux puisse manœuvrer librement Dans le cas de la décharge à travers le toit si on doit utiliser un raccord de transition de rectangulaire à rond veiller à disposer d un espace libre d au moins 3 7 6 cm entre le sommet du four à micro ondes et le raccord de transition Voir l illustration Raccord de transition rectangulaire rond Raccord de tran...

Page 24: ...mentaire est nécessaire composer le numéro sans frais ou consulter notre site web indiqué dans le Guide d utilisation et d entretien Pièces de rechange S il est nécessaire de remplacer n importe quel élément du matériel d installation contactez nous au numéro sans frais indiqué dans les Instructions d utilisation Vous trouverez ci après une liste des pièces de rechange disponibles Vous aurez besoi...

Reviews: