background image

SETUP  MODE  PASSWORD  PROTECTION 
ACCESS

The MPM4 is equipped with a lockout function to prohibit 
unauthorized  modification  of  the  system  setup 
parameters.    Setup  Mode  is  accessible  to  the  system 
installer  in  new  units  and  the  Mode  Select  button  is 
illuminated to indicate this condition. A default password 
sequence (Zone 1, Zone 2, Zone 3, Zone 4) is encoded in 
the unit, but only becomes effective when the Mode Select 
button  is  held  in  for  four  seconds,  which  activates  the 
password  and  denies  access  to  the  Setup  mode.    The 
Mode  Select  light  goes  out  and  only  Normal  Mode  is 
available to the system operator.

Unlocking Setup Mode

To gain access to Setup Mode, press and hold the Mode 
Select  button  until  the  In  and  Zone  buttons  on  the  left 
illuminate.   Enter the password code sequence on them 
and then press and release the Mode Select button.   The 
Routing display will blink once if the correct code sequence 
has  been  entered,  and  the  Mode  Select  button  will 
illuminate  to  indicate  that  the  Setup  Mode  functions  are 
unlocked.  Entering an incorrect code will return the MPM4 
to Normal Mode.

Changing the Password

Custom passwords can be created by the system installer 
to protect the settings of the Setup Mode.  Passwords can 
be  from  0  to  8  characters  long  and  are  created  from 
pushing a pattern of the In and Zone buttons.

To  change  the  password,  simultaneously  push  and 
release the Zone 1, Zone 4 and Mode Select buttons.  The 
In and Zone buttons on the left all illuminate.   Push the 
desired  sequence  of  buttons  and  then  activate  it  by 
pushing the Mode Select button, which will begin flashing.  
The password sequence must then be correctly repeated, 
followed by pushing the Mode Select button to validate it.   
Successful reentry will cause the Routing display to flash 
twice and the Mode Select button to be fully illuminated.   
An incorrect verification sequence will cause the MPM4 to 
exit  the  Password  Change  mode.    Setup  Mode  is  still 
accessible  and  the  previous  valid  password  is  still 
recognized by the MPM4.

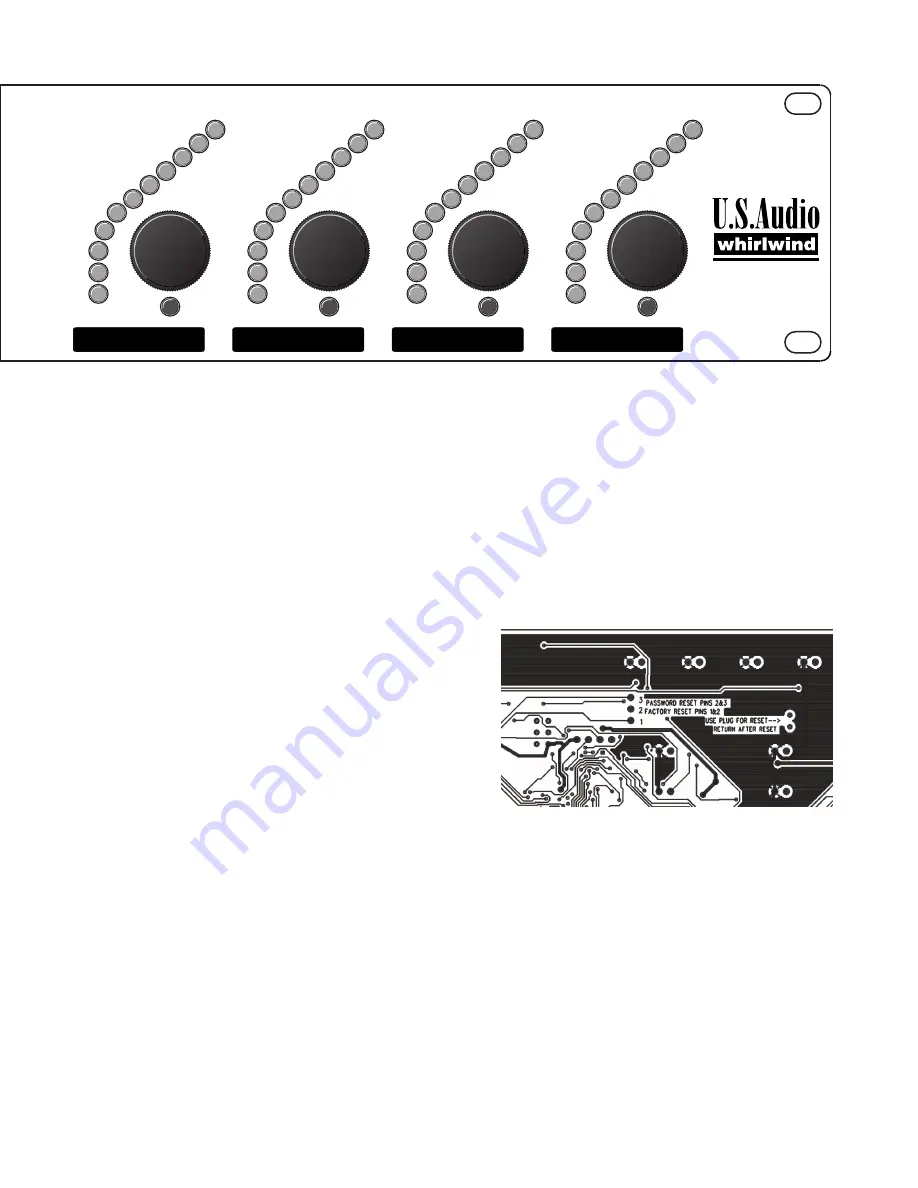
In the event Setup Mode adjustments are required and the 
password  is  unknown,  it  is  possible  to  reset  the  MPM4 
back to the default password.  Disconnect the power from 
the unit and locate the two-pin shorting jumper on the back 
of the display circuit board behind the LED matrix inside 
the MPM4.  Remove the jumper plug and push it onto the 
Password Reset pins #2 and #3 located on the three-pin 
reset header to the left.  (See diagram.) 

Apply power, wait for the turn on sequence to complete and 
remove power.  Return the two-pin jumper plug to its storage 
pins.  The password is now reset to (Zone 1, Zone 2, Zone 3, 
Zone 4) and Setup Mode is automatically unlocked. 

Low EQ

-36

-30

-24

-18

-12

-6

-3

0

+3

+6

+12

-15

ZONE

1

Clip

Level

MPM

4

MUSIC-PAGING

MANAGER

Lo Mid

-36

-30

-24

-18

-12

-6

-3

0

+3

+6

+12

-15

ZONE

2

Clip

Level

Hi Mid

-36

-30

-24

-18

-12

-6

-3

0

+3

+6

+12

-15

ZONE

3

Clip

Level

 Hi EQ

-36

-30

-24

-18

-12

-6

-3

0

+3

+6

+12

-15

ZONE

4

Level

+15

flat

+15

flat

+15

flat

+15

flat

Clip

RESET JUMPER VIEW

CAUTION: CONFIRM POSITION OF THE JUMPER PLUG 
BEFORE  REPOWERING  WHEN  DOING A  PASSWORD 
RESET. IF THE PLUG IS MISTAKENLY PUT ONTO THE 
FACTORY  RESET  PINS  #1  AND  #2,  ALL  SYSTEM 
SETTINGS  WILL  BE  RESET  TO  FACTORY  DEFAULTS 
AND THE CURRENT SETUP WILL BE LOST.

5

Summary of Contents for MPM4

Page 1: ... or a remote control in each zone make source selection and level adjustments easy and convenient Occupying two rack spaces and designed for continuous operation the MPM4 includes all the features necessary to operate most multi zone sound system installations in night clubs sports bars health clubs offices restaurants or anywhere paging and or priority inputs are required FEATURES Simple convenie...

Page 2: ...ttenuators All functions shall be adjusted and controlled through front panel controls and rear panel switches A password lockout feature shall be available to prevent unauthorized alteration of system setup functions The unit shall store all system settings in non volatile EEPROM The unit shall be standard rack mount 19 wide 3 5 2RU high with a depth of 10 behind the rack mounting ears The unit s...

Page 3: ... until mode is exited It is not possible to assign anything in this mode Encoders are input level controls for source inputs 1 4 Meters measure preamp outputs Clip LED monitors source input only Control Range 20dB to 20DB Meter Range 36dB to 12dB PASSWORD ACCESS INPUT TRIM MODE MATRIX AREA ACTIONS ENCODER METER AREA ACTIONS SETUP MPM4 SETUP MODE CONTROL SUMMARY The flashing In or Zone button indic...

Page 4: ... Setup Mode LEDs The Setup Mode LEDs are off in Normal Mode PriorityActive Mode Priority Inputs replace or mix with the Source Inputs in any Zone to which they are assigned When a Priority Input signal is received the corresponding Priority Input LED illuminates The Routing Matrix LEDs in the Zones that have this Priority Input assigned to them flash while the Priority Input is active Any Source I...

Page 5: ...ttons and then activate it by pushing the Mode Select button which will begin flashing The password sequence must then be correctly repeated followed by pushing the Mode Select button to validate it Successful reentry will cause the Routing display to flash twice and the Mode Select button to be fully illuminated An incorrect verification sequence will cause the MPM4 to exit the Password Change mo...

Page 6: ...et connects to the incomingAC line to the Power Supply The MPM4 operates with 100 250VAC and is rated at 25 Watts All settings of the MPM4 are saved in non volatile memory through power cycling The MPM4 powers up with the same settings that it had when power was removed All settings are recorded ten seconds after any control change is made Remote Controls The Remote Control Connections allow optio...

Page 7: ...udio from the Priority Inputs is added to or replaces Source Input audio in any Zone to which the Priority Input is assigned The Priority Inputs assigned within each Zone have a cascading hierarchy with signal input on P3 muting P4 input on P2 mutes P3 and P4 and input on P1 mutes all three The MIC LINE female XLR Input accepts balanced mic or line signals with levels up to 24dB Phantom power is a...

Page 8: ... by coordinating the output gain of the MPM4 to the inputs of the Zone power amps This is an analog final output gain stage with 20dB of gain and 60dB of attenuation adjustable in 1dB steps Each encoder detent equals 1dB Unity Gain is at the 0 position of the Control Position Indicator LED Output gain in conjunction with the of gain and attenuation in the Input Trim controls and the Priority Assig...

Page 9: ...peration of the paging function For this installation a paging mic is plugged into Priority Input 1 All paging microphones used with the MPM4 should have an ON OFF switch Select the Priority Assign mode and clear all Priority Assignments all Routing LEDs off in the desired Zone Assign Priority In 1 to the Zone and set the level control to minimum Connect the paging mic to Priority Input 1 Select t...

Page 10: ...output buffers As with the Audio Inputs the device used for Level Trims is made by Burr Brown The XLR and RCA outputs use separate buffers This allows both outputs to be used simultaneously without concern for loading Digital Signal Processor The Whirlwind MPM4 features anAnalog Devices SHARC processor This processor features very high performance and allows the use of 32 bit floating point repres...

Page 11: ...cted Priority Input is forced on and other priorities are forced off This means that the Priority signal is routed through to the outputs un gated DSPPriority Output Levels and Priority Override Priority Levels may be adjusted in Priority Assign mode to set the level of each channel of priority audio within each zone relative to the Source Inputs When Priority Zone Level Override has been turned o...

Page 12: ... Priority Trim Controls Priority Assign Level Controls Zone Max Level Controls All EQ Band Level Controls AC Voltage Requirement Power Consumption Size Width Height Depth Weight 12 Illuminates 1dB below 0dBfs Less than 01 Less than 01 80Hz boost variable cut 600Hz 2 5kHz 8kHz boost variable cut MPM4 Output EQ 25 20 15 10 5 0 5 10 15 20 25 10 100 1000 10000 100000 MPM4 Input EQ 25 20 15 10 5 0 5 10...

Reviews: