background image

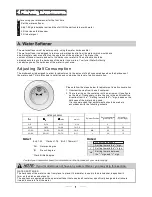
1. The salt container must only be refilled when the salt warning light in the control panel comes on.

Depending on how well the salt dissolve s, the salt warning light may still be on even though the
salt container is filled.
If there is no salt warning light in the con trol panel (for some Mode ls),you can estimate when to fill
the salt into the softener by the cycles that the dishwasher has run.

2. If there are spills of the salt, a soak or a rapid program should be run to remove the excessive sa lt.

Always use the salt intended for use with dishwasher.
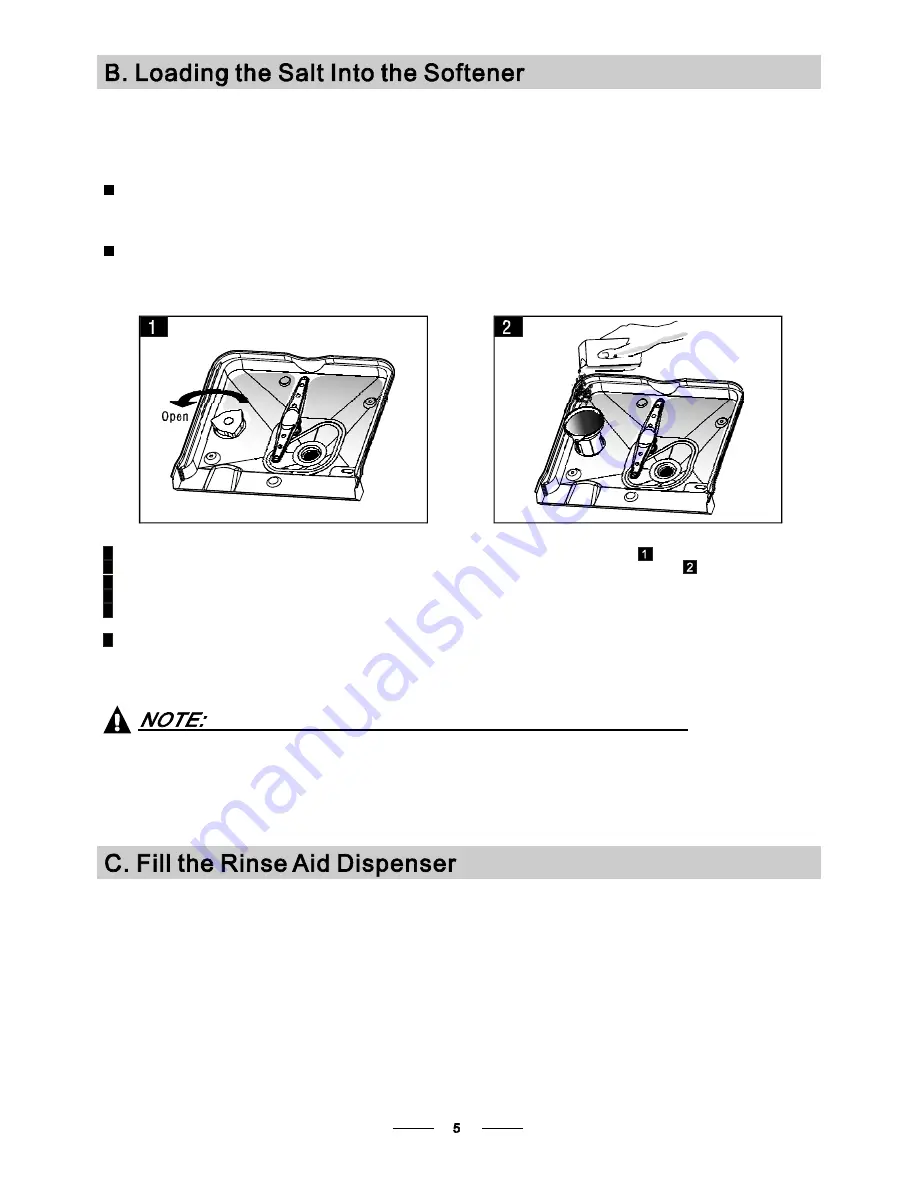
The salt c ontain er is located beneath the lower basket and should be fill ed as explained
in t he foll owing:

Attention!

Only use salt spe cif ically desi gne d for t he use i n dishwashers! Every other type of
salt not speci fically de sig ned fo r the u se in a d ishwas her, espe cially table salt, will
damage the w ater sof tener. I n case of damages caused by the use of unsuitable
salt t he ma nuf act urer does not give any wa rranty nor is liable for any damages caused.

Only fil l wi th salt just b efore starting one of the co mp let e washing p rograms.
This wi ll prevent any g rains of s alt or salty wate r, which ma y have been spilled,
remaining on the bottom of the machi ne for any period of time, which may cause
corrosi on.

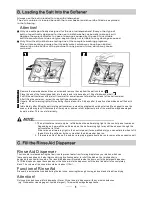
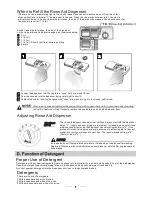
The rinse aid is released d uring the final rinse to prevent water from forming droplets on your dishes, which can
leave spots and streaks. It also improves drying by allowing water to roll off the dishes. Your dishwasher is
designed to use liquid rins e aids. The rinse a id dispenser is located inside the door next to the detergent dispense r.
To fill the dispenser, open the cap and pour the rinse aid into the dispenser until the level indicator turns completely
black. The volume of the rinse aid container is about 110ml.

Rinse Aid Dispenser

Function of Rinse Aid

Rinse aid is automatically added during the last rinse, ensuring thorough rinsing, and spot and streak free drying.

Attention!

Only use branded rinse aid for dishwasher. Never fill the rinse aid dis penser with any o ther substances

(e.g. Dishwasher cleaning agent, liquid detergent). This would damage the appliance.

A

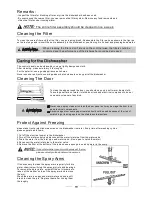
Remove the lower basket and then unscrew and remove the cap from the salt container.

B

Pl ace the end of the funnel(supplied) into the hole and introduce about 1.5kg of d ishwasher salt.

C

Full fil l the salt container with water.It is normal for a small amount of water to come out of the salt container.

D

After fil ling the container , screw the cap tightly back clockwise.

E

Usually, the salt warning light will stop being illuminated within 2-6 days afte r the salt contain er ha s be en fi lled with

salt.

F

Immediately after filling the salt into the salt container, a washing program should be started

program

Otherwise the filter syst em, pump or other important parts of the machine may be damaged

by salty water. This is out of warranty.

(We su ggest to use the

soak or rapid

).

Summary of Contents for DW0945IA

Page 1: ...DW0945IA ...

Page 2: ... Programme button until the selected programme lights up See the section entitled Operationg instruction When the working cycle has finished the buzzer of the dishwasher will sound 8 times then stop Turn off the appliance using the ON OFF button If the appliance is switched off during a wash cycle Open the door carefully Hot steam may escape when the door is opened If the appliance is switched off...

Page 3: ... At the End of the Wash Cycle 14 Before calling for service 24 Error codes 25 Technical information 26 Control Panel 3 17 Installation preparation 18 Aesthetic panel s dimensions and installation 20 Tension adjustment of the door spring 20 Connection of drain hoses 21 Dishwasher installation steps About Electricity Connecting 22 Cold Water Connection 23 Dear Customer Please carefully read this man...

Page 4: ... sharp items so that they are not likely to damage the door seal 2 Warning Knives and other utensils with sharp points must be loaded in the basket with their points down or placed in a horizontal position When using your dishwasher you should prevent plastic items from coming into contact with the heating element This instruction is only applicable to machines with a visual heating element If the...

Page 5: ...e Therefore cut off the power supply cable and make the door closing device unusable Cardboard packaging is manufactured from recycled paper and should be disposed in the waste paper collection for recycling By ensuring this product is disposed of correctly you will help prevent potential negative consequences for the environment and human health which could otherwise be caused by inappropriate wa...

Page 6: ...ed to be refilled 3 6 Delayed Start Button and Delayed start indicator lights To preset the wash timer and delay the starting time to 3 hours 6 hours 9 hours or 12 hours Every press of this button change the delay time shown by the delay start indicator lights Program button To select one of the 5 programs 4 All in1 button and indicator light To select and show All in1 function 11 12 Back View 1 2...

Page 7: ...ld be made in accordance with the following scheme WATER SOFTENER The hardness of the water varies from place to place If hard water is used in the dishwasher deposits will form on the dishes and utensils The appliance is equipped with a special softener that uses a salt container specifically designed to eliminate lime and minerals from the water Contact your local water board for information on ...

Page 8: ...our dishes which can leave spots and streaks It also improves drying by allowing water to roll off the dishes Your dishwasher is designed to use liquid rinse aids The rinse aid dispenser is located inside the door next to the detergent dispenser To fill the dispenser open the cap and pour the rinse aid into the dispenser until the level indicator turns completely black The volume of the rinse aid ...

Page 9: ...dicator changes as illustrated below Full 3 4 full 1 2 full 1 4 full Should refill to eliminate spotting Empty When to Refill the Rinse Aid Dispenser If there is no rinse aid warning light in the control panel you can estimate the amount from the colour of the optical level indicator C located next to the cap When the rinse aid container is full the whole indicator will be dark As the rinse aid di...

Page 10: ...tarting the dishwasher otherwise it could get damp and will not dissolve properly Concentrated Detergent Detergent Tablets Detergent Dispenser Always add the detergent just before starting each wash cycle Only use branded detergent aid for dishwasher If the lid is closed press release button The lid will spring open conventional alkaline detergents with caustic components low alkaline concentrated...

Page 11: ... Close the lid and press until it locks in place If the dishes are heavily soiled place an additional detergent dose in the pre wash detergent chamber This detergent will take effect during the pre wash phase A B Fill in Detergent You find information about the amount of detergent for the single programme on the last page Please aware that according to the level soiling and the specific hardness o...

Page 12: ...ups glasses pans etc With the opening facing downwards so that water cannot collect in the container or a deep base Use a mild detergent that is described as kind to dishes If necessary seek further information from the detergent manufacturers For particular items select a program with as low a temperature as possible Consider buying utensils which are identified as dishwasher proof To prevent dam...

Page 13: ...t to clean items are to be placed into the lower basket such as pots pans lids serving dishes and bowls as shown in the figure below It is preferable to place serving dishes and lids on the side of the racks in order to avoid blocking the rotation of the top spray arm Pots serving bowls etc must always be placed top down Deep pots should be slanted to allow water to flow out Please be reminded tha...

Page 14: ......

Page 15: ...n be adjusted by placing the wheels on different height of the rails Long items serving cutlery salad servers and knives should be placed on the shelf so that they do not obstruct the rotation of the spray arms The shelf can be folded back or be removed when not required for use Do not let any item extend through the bottom Always load sharp utensils with the sharp point down For personal safety a...

Page 16: ...he test cycle The information for comparability test in accordance with EN 50242 as follows Capacity 9 setting Position Upper basket upper wheels on rails Rinse aid setting 6 The power consumption of off mode is 0W left on mode is 0 4W For heaviest soiled crockery and normally soiled pots pans dishes etc with dried on soiling For normally soiled loads such as pots plates glasses and lightly soiled...

Page 17: ... load the dishes and push them back It is commended to load the lower basket first then the upper one see the section entitled Loading the Dishwasher Pour in the detergent see the section entitled Salt Detergent and Rinse Aid Insert the plug into the socket The power supply is 220 240 VAC 50 HZ the specification of the socket is 10A 250VAC Make sure that the water supply is turned on to full press...

Page 18: ...filter 2 Fine filter 3 2 3 1 Filter assembly The filter efficiently For best performance and results the filter must be cleaned regularly this reason it is a good idea to remove the larger food particles trapped in the filter after each wash cycle by rinsing the semicircular filter and cup under running water To remove the filter device pull the cup handle in the upward direction removes food part...

Page 19: ...h Reassemble the filter parts as shown in the figures on the last page and reinsert the entire assembly in the dishwasher positioning it in its seat and pressing downwards The entire filter assembly should be cleaned once a week When cleaning the filters don t knock on them Otherwise the filters could be contorted and the performance of the dishwasher could be decreased To clean the edge around th...

Page 20: ...the socket To clean the exterior and rubber parts of the dishwasher do not use solvents or abrasive cleaning products Only use a cloth with warm soapy water To remove spots or stains from the surface of the interior use a cloth dampened with water an a little vinegar or a cleaning product made specifically for dishwashers After Every Wash Remove the Plug No Solvents or Abrasive Cleaning Moving the...

Page 21: ...her and cabinet and the outer door aligned to cabinet 1 The aesthetic wooden panel could be processed according to the Figure 3 The aesthetic panel should be processed in accordance with the illustrated dimensions Figure3 Unit mm 90 90 450 mm 820mm 100 580mm 80 Space between cabinet bottom and floor Electrical drain and water supply line entrances 15 444 390 418 179 175 38 ...

Page 22: ...4a After positioning of the panel fix the panel onto the outer door by screws and bolts See figure 4b Installation of aesthetic wooden panel Figure4b 1 2 3 Take away the cover Pin up the screw Get back the cover Hop hook St4 countersunk head screw Lower hook Furniture door Hook for aesthetic door Outer door of dishwasher Spacer for furniture door Cover 4X18 screw ...

Page 23: ...o a close with the slight lift of a finger relax PLEASE HANG UP THE DRAIN HOSE EITHER WAY OF A B C φ 40mm A B C Counter Front Drain pipe Drain hose hook Close the drain hose hook to the counter Insert the drain hose into a drain pipe with a minimum diameter of 4cm or let it run into the sink making sure to avoid bending or crimping it Use the special plastic support that comes with the appliance T...

Page 24: ...ork surface of cabinet Please ensure the condensation strip is flush with edge of work surface Place the dishwasher into position Level the dishwasher The rear feet can be adjusted from the front of the dishwasher by turning the screws on the left and right hand side of the cabinet Illustration 6A To adjust the front feet use a wrench and turn the front feet until the dishwasher is level Illustrat...

Page 25: ... is earthed properly If the electrical socket to which the appliance must be connected is not appropriate for the plug replace the socket rather than using a adaptors or the like as they could cause overheating and burns Please look at the rating label to know the rating voltage and connect the dishwasher to the appropriate power supply Use the required fuse 10 amp time delay fuse or circuit break...

Page 26: ...king materials and printings should be taken out from the dishwasher Connect the cold water supply hose to a threaded 3 4 inch connector and make sure that it is fastened tightly in place If the water pipes are new or have not been used for an extended period of time let the water run to make sure that the water is clear This precaution is needed to avoid the risk of the water inlet to be blocked ...

Page 27: ...the programme and rearrange the items of crockery This has no influence on the dishwasher function if in doubt contact a suitably qualified plumber Detergent with colourant was used Make sure that the detergent is the one without colourant Improper detergent Make sure the dishwasher is turned on and the door is closed securely Check that the water supply is connected properly and the water is turn...

Page 28: ...s cleaning performance Choose a program with a long washing time Water drainage is more difficult with these items Cutlery or dishes of this type are not suitable for washing in the dishwasher The programme was not powerful enough Not enough detergent was dispensed Items are blocking the path of sp ay arms r The filter combination in the base of wash cabinet is not clean or is not correctly fitted...

Page 29: ...Height 820mm adjustable 60mm Width 445mm Depth 540mm Voltage connected Load see rating label Water pressure 0 04 1 0MPa Power supply see rating label Capacity 9 Place settings ...

Page 30: ...l energy consumption will depend on how the appliance is used Water consumption 2940 litres per year based on 280 standard cleaning cycles Actual water consumption will depend on how the appliance is used A highest efficiency to G lowest efficiency This program is suitable for cleaning normally soiled tableware and is the most efficient programme in terms of its combined energy and water consumpti...

Reviews: