5(9(56,1*7+('22523(1,1*
This appliance has the capability of having the door open from the left or right hand side. The unit is
delivered with the door opening from the left hand side. Should you desire to reverse the opening direction,
please follow the instructions below.
NOTE: Before reversing the door, please ensure that the power is switched off.
All parts removed must be saved for the reinstallation of the door.
It is recommended that an 8mm spanner is used to remove the screws that fix the
top and bottom hinges.
1. First remove the top cover. This is secured by either 2 screws at the rear or 2 screws at the top, under
plastic inserts. Remove the screws and then slightly lift up the rear of the top cover and push it forwards
to remove it.
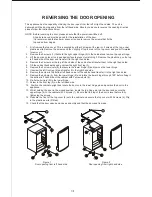
2. Remove the 3 screws (1) that hold the right upper hinge (5) to the cabinet and remove the upper hinge.
3. Lift the door and place it on a padded surface to prevent scratching it. Remove the plastic cap on the top
left hand side of the door and transfer it to the right hand side.
4. Remove the 2 screws at the top left hand side of the cabinet and transfer them to the right hand side.
5. Tilt the cabinet backwards and unscrew the right front leg (3).
6. Remove the 2 screws/nuts (8) that secure the lower hinge (2) and remove the lower hinge.
7. Unscrew the left front leg (4) and transfer it to the right hand side.
8. Remove the screw in the bottom left hand corner of the cabinet and transfer it to the right hand side.
9. Remove the bolt-pin (9) from the lower hinge (2) and rotate the lower hinge through 180° before fixing it
the bottom left hand side of the cabinet with 2 screws/nuts (8).
10. Re-fix the bolt-pin (9) to the lower hinge.
11. Screw in the front leg (3) on the left hand side.
12. Position the cabinet upright and locate the door onto the lower hinge pin and position the door to the
appliance.
13. Whilst holding the door in the closed position, locate the top hinge pin into the door and secure the
upper hinge (5) to the cabinet with 3 screws (1). Ensure that the top of the door is level before fully
tightening the screws.
14. Relocate the front of the top cover (6) onto the cabinet and secure the top cover with 2 screws (6). Clip
in the plastic inserts (if fitted).
15. Check that the door opens and closes smoothly and that the door seal is made.
Figure 1
Figure 2
Door opening from left hand side
Door opening from right hand side

