background image

25740-2-1013

Page 6

Before you begin: Do not, handle these logs with your bare 

hands! Always wear gloves to prevent skin irritation. After 

handling logs, wash your hands gently with soap and water.

All Logs

The positioning of the logs is critical to the safe and clean 

operation of this heater. Sooting and other problems may 

result if the logs are not properly and firmly positioned in the 

appliance.

refer to figure 1 and figure 1A for the following warning.

warning:

 Failure to position the parts in accordance 

with this diagram or failure to use only parts specifically 

approved with this appliance may result in property damage 

or personal injury.

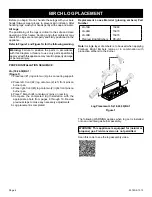
PrOPer INSTALLATION SeQueNce: 

LS-(18,24,30)B2-1:

(figure 1)


  1. Place rear (#1) log onto two (2) pins on rear log support.

  2. Place left, front (#2) log onto two (2) left, front pins on 

burner pan.

  3. Place right, front (#3) log onto two (2) right, front pins on 

burner pan.

  4. Place Y Branch (#4) onto two (2) pins on rear log.

  5. Compare the completed log installation with the 

appropriate photo from pages 8 through 10. Review 

previous steps to make any necessary adjustments.

  6. Log placement is completed.

replacement Loose Material (glowing embers) Part 

Number

Note:

 A single layer of embers is to be used when applying 

Platinum Bright Embers (alone or in combination with 

production embers) to the burner.

Log Placement LS-(18,24,30)B2-1

figure 1

The following WARNING applies when log set is installed 

onto an unvented gas burner assembly.

wArNINg: This appliance is equipped for (natural or 

propane) gas. field conversion is not permitted.

Scan this code to see the log assembly video.

1

2

3

4

LS-18B

15999

LS-24B

15970

LS-30B

15970

Platinum Bright Embers

PE-20-1

BIrcH LOg PLAceMeNT

Summary of Contents for BIRCH

Page 1: ...ED WARNING If the information in this manual is not followed ex actly a fire or explosion may result causing property damage personal injury or loss of life Do not store or use gasoline or other flammable vapors and liquids in the vicinity of this or any other appliance WHAT TO DO IF YOU SMELL GAS Do not try to light any appliance Do not touch any electrical switch do not use any phone in your bui...

Page 2: ...nformation 4 Requirements for Canada 5 Birch Log Placement 6 Ember Placement LS 18B2 1 Photos 7 Ember Placement LS 24B2 1 Photos 8 Ember Placement LS 30B2 1 Photos 9 Birch Parts List and Parts View 10 Master Parts Distributor List 11 How to Order Repair Parts 11 TABLE OF CONTENTS ...

Page 3: ...possibly eliminate flame impingement and the floor fan could be redirected Upon installation be aware of any cold air returns or vents in the proximity of the log set Any draft created around a vent free log set can cause the flame to impinge on the log and create a sooting situation WARNING Donotallowfanstoblowdirectlyintothefireplace Avoid any drafts that alter burner flame patterns WARNING Do n...

Page 4: ...h all precautions required and that has complied with all the requirements of the authority having jurisdiction The installation must conform with local codes or in the absence of local codes with the National Fuel Gas Code ANSI Z223 1 NFPA54 Available from the American National Standards Institute Inc 11 West 42nd St New York N Y 10018 State of Massachusetts The installation must be made by a lic...

Page 5: ... than those sup plied for use with the log set 6 Also refer to IMPORTANT SAFETY INFORMATION in the fireplace Owner s Manual WARNING DO NOT OPERATE THIS GAS LOG SET WITH GLASS DOORS CLOSED Clothing or other flammable material should not be placed on or near the appliance Do not place trash or other articles on the log set during operation During manufacturing fabricating and shipping various compon...

Page 6: ...r log support 2 Place left front 2 log onto two 2 left front pins on burner pan 3 Place right front 3 log onto two 2 right front pins on burner pan 4 Place Y Branch 4 onto two 2 pins on rear log 5 Compare the completed log installation with the appropriate photo from pages 8 through 10 Review previous steps to make any necessary adjustments 6 Log placement is completed Replacement Loose Material g...

Page 7: ...13 Page 7 Photo 1 Photo 2 Photo 3 Photo 4 Do not cover any large rear ports with loose material glowing embers Do not cover any large front ports with loose material glowing embers EMBER PLACEMENT LS 18B2 PHOTOS ...

Page 8: ...13 Page 8 Photo 1 Photo 2 Photo 3 Photo 4 Do not cover any large rear ports with loose material glowing embers Do not cover any large front ports with loose material glowing embers EMBER PLACEMENT LS 24B2 PHOTOS ...

Page 9: ...13 Page 9 Photo 1 Photo 2 Photo 3 Photo 4 Do not cover any large rear ports with loose material glowing embers Do not cover any large front ports with loose material glowing embers EMBER PLACEMENT LS 30B2 PHOTOS ...

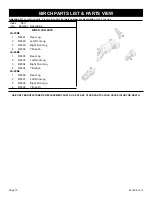
Page 10: ...arts Could Cause Injury Or Death 1 2 3 4 Index No Part Number Description BIRCH LOG SETS LS 18B2 1 R8331 Rear Log 2 R8329 Left Front Log 3 R8330 Right Front Log 4 R8332 Y Branch LS 24B2 1 R8335 Rear Log 2 R8333 Left Front Log 3 R8334 Right Front Log 4 R8336 Y Branch LS 30B2 1 R8288 Rear Log 2 R8337 Left Front Log 3 R8338 Right Front Log 4 R8339 Y Branch BIRCH PARTS LIST PARTS VIEW ...

Page 11: ...rranty parts All parts listed in the Parts List have a Part Number When ordering parts first obtain the Model Number and Serial Number from the name plate on your equipment Then determine the Part Number not the Index Number and the Description of each part from the fol lowing illustration and part list Be sure to give all this information Appliance Model Number Part Description Appliance Serial N...

Page 12: ...ms Empire Comfort Systems Inc 918 Freeburg Ave Belleville IL 62220 If you have a general question about our products please e mail us at info empirecomfort com If you have a service or repair question please contact your dealer www empirecomfort com ...

Reviews: