background image

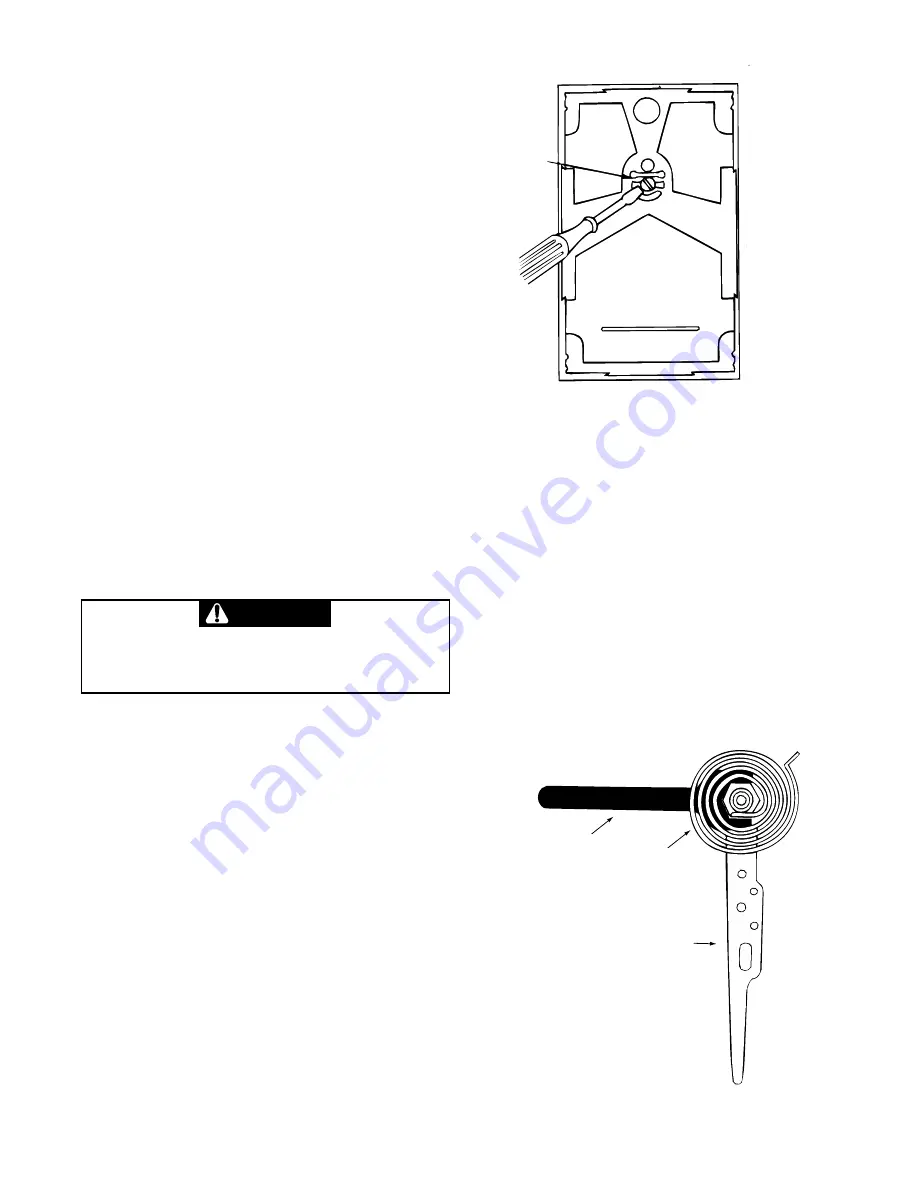
CALIBRATING THERMOMETER ON

THERMOSTAT COVER

If thermometer reading on cover does not match
thermostat:
1. Remove thermostat cover.

2. Set cover on table near an accurate thermometer.

3. Allow at least 10 minutes for thermometer to sense

room temperature.

4. If the thermometer readings are different, insert a small

screwdriver blade into the thermometer shaft in the
back of the cover. Adjust until the cover thermometer
matches the other thermometer (see Fig. 5).

5. Replace thermostat cover.

CALIBRATING THERMOSTAT

This thermostat has been carefully adjusted at the factory
and should not require recalibration.

Due to enivronmental conditions, during normal operation
there may be a few degrees difference between the
indicator setting of the thermostat and actual room
temperature. If the disagreement is appreciable, however,
first make sure that the thermostat is properly located and
leveled. Then, if recalibration still seems necessary,
proceed as follows:

CAUTION

To prevent electrical shock and/or equipment
damage, disconnect electric power to system
until recalibration is complete.

1. The anticipator's heat may adversely affect thermostat

recalibration. To prevent this, disconnect electrical
power to thermostat at furnace, main fuse, or breaker
box.

2. Move temperature adjustment lever to a setting about

5

°

 above room temperature.

3. Remove thermostat cover. Slip 7/32" wrench onto hex

nut beneath bimetal. While holding temperature
adjustment lever stationary, turn hex nut clockwise
until mercury shifts to right end of tube (see Fig. 6).

4. Move temperature adjustment lever to lowest setting.

5. Replace thermostat cover. Wait 10 minutes for bimetal

temperature to stabilize. Do not stand near thermostat
during this period as your breath and body heat will
affect bimetal temperature.

6. Move temperature adjustment lever to correspond to

actual room temperature. Then remove thermostat
cover.

7. Slip 7/32" wrench onto hex nut. While holding

temperature adjustment lever stationary, turn hex nut
counterclockwise until mercury just barely shifts to left
end of tube (see Fig. 6).

8. Replace cover and set thermostat to desired

temperature. Turn on electrical power to system.

7/32" Calibration

Wrench

Bimetal

Temperature

Adjustment

Lever

Figure 6. Calibrating Thermostat

Figure 5. Calibrating Thermostat Thermometer

Back Side of Thermostat Cover

Thermometer

Adjustment

Summary of Contents for 1E30(W)

Page 1: ...personal injury and or property damage ATTENTION This product contains mercury There will not be any exposure to mercury under normal conditions of use This product may replace a unit which contains mercury Do not open mercury cells If a cell becomes damaged do not touch any spilled mercury Wearing non absorbent gloves take up the spilled mercury with sand or other absorbent material and place int...

Page 2: ...ndition use existing wiring If in doubt rewire 2 If a new location is chosen or if this is a new installation thermostat cable must first be run to the location selected Allwiringmustconformwithlocalandnational electrical codes and ordinaces 3 Probe for obstructions in partition before drilling 1 2 hole in wall at selected location Take up quarter round and drill a small guide hole for sighting se...

Page 3: ...cal power to the system Figure 2 Wiring Diagram CAUTION ADJUSTING HEAT ANTICIPATOR The adjustable heat anticipator WILL BURN OUT if 25vAC is applied directly to the thermostat because of incorrect wiring or by shorting out the primary control during testing This may cause personal injury and or property damage This thermostat is equipped with an adjustable heat anticipator and was preset at the fa...

Page 4: ...1 The anticipator s heat may adversely affect thermostat recalibration To prevent this disconnect electrical power to thermostat at furnace main fuse or breaker box 2 Move temperature adjustment lever to a setting about 5 above room temperature 3 Remove thermostat cover Slip 7 32 wrench onto hex nut beneath bimetal While holding temperature adjustment lever stationary turn hex nut clockwise until ...

Page 5: ... de base en électricité et en câblage Ne dépassez pas les charges nominales Tout le câblage doit être conforme aux codes et règlements locaux et nationaux qui régissent les installations électriques Cette commande est un instrument de précision qui doit être manipulé avec soin Elle peut se détraquer si elle est manipulée de façon négligente ou si des composantes sont déformées ATTENTION Afindeprév...

Page 6: ...à 24 C 40 F à 75 F Différentiel 1 2 C 1 F ACHEMINEMENT DU CÂBLAGE AU SITE Tout le câblage doit être conforme aux codes et règlements locaux et nationaux qui régissent les installations électriques 1 Si vous remplacez un thermostat dont l emplacement est adéquat et si le câblage semble être en bon état servez vous du câblage déjà en place En cas d incertitude câblez à neuf 2 Si vous choisissez un n...

Page 7: ... niveau Serrez ensuite les vis pour le fixer Si les trous de montage sont trop grands et ne vous permettent pas de fixer solidement le socle servez vous des chevilles de plastique pour l assujettir 8 Replacez le couvercle sur le socle et réglez le point de consigne au niveau désiré 9 Rétablissez le courant qui alimente le système Bornes à vis COUVERCLE CAUTION RÉGLAGE DE L ANTICIPATION DE CHAUFFAG...

Page 8: ...que au panneau dedistributionélectriqueprincipalpendantl installation 1 Lachaleurdel élémentanticipateurpeutaffecterl étalonnage du thermostat Dans le but d éviter ce problème coupez l alimentation en provenance de l appareil de chauffage ou du panneau de distribution électrique 2 Placez la manette de réglage du point de consigne environ à 5 au dessus de la température ambiante 3 Détachezlecouverc...

Reviews: