background image

9

General Cleaning

 (continued)

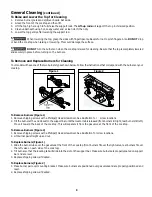
To Raise and Lower the Top for Cleaning

1.

Remove burner grates and spillover bowls. Set aside.

2.

Grasp the front of the cooktop and then lift.

3.

Lift the top high enough to fully raise the support rods. The 

Lift-up rods

 will support the top in its raised position.

4.

Clean underneath using hot, soapy water and a clean cloth; then dry.

5.

Lower the top gently after lowering the support rod.

  When lowering the top, grasp the sides with fingertips only. Be careful not to pinch fingers. Also, 

DO NOT

 drop

or bend the cooktop when raising or lowering. This could damage the surface.


DO NOT

 turn the burners on when the cooktop is raised  for cleaning. Be sure that the top is completely lowered

and securely in place before turning on the burners.

To Remove and Replace Burners for Cleaning

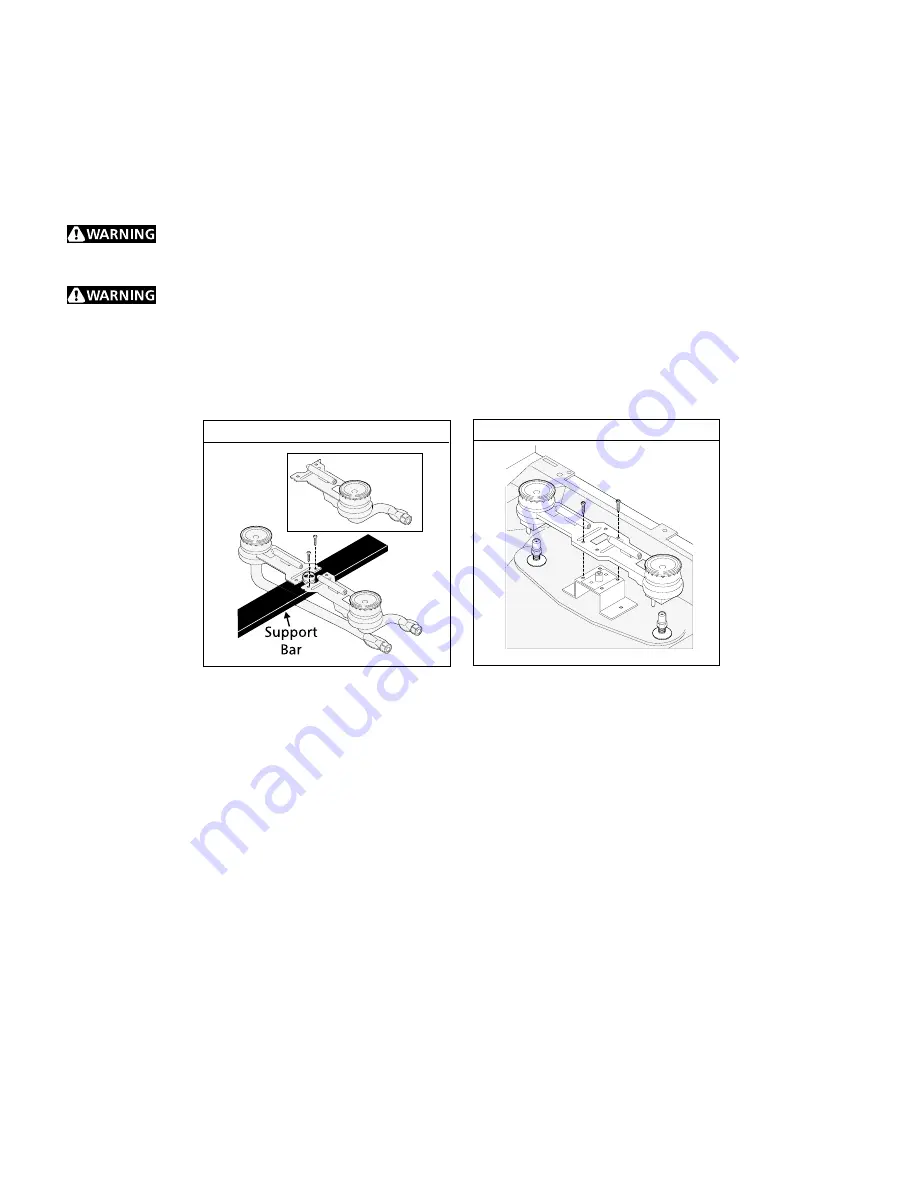
Your model will have one of the two burners types shown below. Follow the instructions that correspond with the burners on your
cooktop.

To Remove Burners (Figure 1)

1. Remove shipping screws with a Phillips® Head screwdriver. See illustration for

screw locations.

2. Tilt the burner at the end closest to the support bar until the locator tab is released (front burners tilt right, rear burners tilt left).

Move it toward the back of the cooktop. This will separate it from the gas valve at the front of the cooktop.

To Remove Burners (Figure 2)

1. Remove shipping screws with a Phillips® Head screwdriver. See illustration for screw locations.
2. Lift burner pair straight up and out.

To Replace Burners (Figure 1)

1. Slide the burner tube over the gas valve at the front of the cooktop (front burners fit over the right valve, rear burners fit over

the left valve on each side of the cooktop).

2. Tilt burner so that the locating tab will slide into the slot on the support bar. Make sure burners are properly seated on support

bar and are level.

3. Replace shipping screws if desired.

To Replace Burners (Figure 2)

1. Place burner pair over mounting bracket. Make sure burners are positioned over gas valves and are properly positioned and

level.

2. Replace shipping screws if desired.

Figure 1

Figure 2

Summary of Contents for 318200659

Page 1: ...Recycled paper Printed in Canada 318200659 0011 Rev A ...

Page 2: ...WHAT TO DO IF YOU SMELL GAS Do not try to light any appliance Do not touch any electrical switch do not use any phone in your building Immediately call your gas supplier from a neighbor s phone Follow the gas supplier s instructions If you cannot reach your gas supplier call the fire department Installation and service must be performed by a qualified installer servicer or the gas supplier If the ...

Page 3: ...endedintheareawhereanappliance is in use They should never be allowed to sit or stand on any part of the appliance DONOTTOUCHSURFACEBURNERS GRATES ORAREAS NEAR THESE BURNERS Surface burners may be hot even though the flames are not visible Areas near surface burners maybecomehotenoughtocauseburns Duringandafteruse do not touch or let clothing or other flammable materials touch these areas until th...

Page 4: ...roper relationship of utensil to flame will also improve efficiency Useproperpansize Thisapplianceisequippedwithone or more surface burners of different sizes Select utensils havingflatbottomlargeenoughtocoverthesurfaceburner The use of undersized utensils will expose a portion of the surfaceburnertodirectcontactandmayresultinignitionof clothing Properrelationshipofutensiltothesurfaceburner will a...

Page 5: ...nt of food being cooked will influence the setting needed for cooking For deep fat frying use a thermometer and adjust the surface control knob accordingly If the fat is too cool the food will absorb the fat and be greasy If the fat is too hot the food will brown so quickly that the center will be undercooked Do not attempt to deep fat fry too much food at once as the food will neither brown nor c...

Page 6: ... on top of the range when it is in use These items could melt or ignite Potholders towels or wood spoons could catch fire if placed too close to a flame Pans should have flat bottoms Check for flatness by rotating a ruler across the bot tom There should be no gaps between the pan and ruler Note Always use a utensil for its intend ed purpose Follow manufacturer s in structions Some utensils were no...

Page 7: ...al Cooperative Agricultural Extension Service or a manufacturer of glass jars for the latest canning information 2 Use flat bottomed canners only Heat is spread more evenly when the bottom surface is flat 3 Center canner on the burner grate 4 Start with hot water and a high heat setting to reduce the time it takes to bring the water to a boil then reduce the heat setting as low as possible to main...

Page 8: ...heating and cannot be removed Clean burner grates in the dishwasher and dry upon removal If soils are not removed follow the cooktop cleaning instructions below Gentle scouring with a soapy nylon pad will remove most spots Rinse with a 1 1 solution of clean water and ammonia If necessary cover difficult spots with an ammonia soaked paper towel for 30 to 40 minutes Rinse with clean water and damp c...

Page 9: ...ve Burners Figure 1 1 Remove shipping screws with a Phillips Head screwdriver See illustration for screw locations 2 Tilt the burner at the end closest to the support bar until the locator tab is released front burners tilt right rear burners tilt left Move it toward the back of the cooktop This will separate it from the gas valve at the front of the cooktop To Remove Burners Figure 2 1 Remove shi...

Page 10: ... models Be sure cord is plugged securely into outlet Electrical power outage electric ignition models Burners can be lit manually See Setting Surface Controls in this Owner s Guide Burner ports or slots are clogged With the burner off clean ports with a small gauge wire or needle to clean ports or slots Moisture is present after cleaning Lightly fan the flame and allow burner to operate until flam...

Page 11: ...11 Notes ...

Page 12: ...xpenses for making the appliance accessible for servicing such as removal of trim cupboards shelves etc which are not a part of the appliance when it was shipped from the factory 5 Damages to finish after installation 6 Replacement of light bulbs and or fluorescent tubes on models with these features This warranty does not cover the following 1 CONSEQUENTIAL OR INCIDENTAL DAMAGES SUCH AS PROPERTY ...

Reviews: