EN -8-
• Do not place glass bottles or cans in the ice-making compartment as
they will burst when the contents freeze.
• Do not place explosive or flammable material in your fridge. Place drinks
with high alcohol content vertically in the fridge compartment and make
sure their tops are tightly closed.
• When removing ice from the ice-making compartment, do not touch it. Ice may
cause frost burns and/or cuts.
• Do not touch frozen goods with wet hands. Do not eat ice-cream or ice cubes
immediately after they are removed from the ice-making compartment.
• Do not re-freeze thawed frozen food. This may cause health issues such as food
poisoning.
Installing and operating your fridge freezer
Before using your fridge freezer for the first time, please pay attention to the
following points:
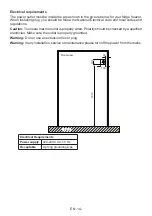
• The operating voltage for your fridge freezer is 220-240 V at 50Hz.
• The plug must be accessible after installation.
• Your fridge freezer may have an odour when it is operated for the first time. This is normal
and the odour will fade when your fridge freezer starts to cool.
• Before connecting your fridge freezer, ensure that the information on the data plate
(voltage and connected load) matches that of the mains electricity supply. If in doubt,
consult a qualified electrician.
• Insert the plug into a socket with an efficient ground connection. If the socket has no
ground contact or the plug does not match, we recommend you consult a qualified
electrician for assistance.
• The appliance must be connected with a properly installed fused socket. The power
supply (AC) and voltage at the operating point must match with the details on the name
plate of the appliance (the name plate is located on the inside left of the appliance).
• We do not accept responsibility for any damages that occur due to ungrounded usage.
• Place your fridge freezer where it will not be exposed to direct sunlight.
• Your fridge freezer must never be used outdoors or exposed to rain.
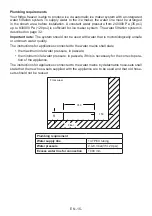
• Your appliance must be at least 50 cm away from stoves, gas ovens and heater cores,
and at least 5 cm away from electrical ovens.
• If your fridge freezer is placed next to a deep freezer, there must be at least 2 cm between
them to prevent humidity forming on the outer surface.
• Do not cover the body or top of fridge freezer with lace. This will affect the
performance of your fridge freezer.
• Clearance of at least 150 mm is required at the top of your appliance. Do
not place anything on top of your appliance.
• Do not place heavy items on the appliance.
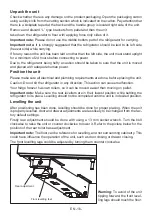
• Use the adjustable front legs to make sure your appliance is level and stable.
You can adjust the legs by turning them in either direction. This must be done before
placing food in the appliance.
• Clean the appliance thoroughly before use (see Cleaning and Maintenance).
Summary of Contents for WR 747 SS
Page 1: ...Fridge Freezer User manual WR 747 SS...
Page 43: ...5 4 10 1 1 2 2 3 3 4 4 5 5 6 6 7 7 45...
Page 44: ...E41 ZONE 4 E42 E43 1 2 E44 170 E50 No Frost 44...
Page 45: ...E01 E02 E11 E12 E13 1 2 3 E14 E15 E16 E17 E31 ZONE 3 E32 E33 1 2 E34 43...
Page 47: ...3 2 3 13 10 12 8 6 12 10 8 9 6 12 10 2 12 10 12 10 8 6 4 12 8 10 12 12 8 3 2 8 6 6 41...
Page 48: ...39 42 41 40 8 6 8 6 8 6 8 6 8 4 3 1 3 1 6 4 6 4 2 5 8 6 2 4 4 2 6 4 40...
Page 49: ...38 5 5 1 4 6 C 5 2 2 39...
Page 50: ...37 4 4 4 4 1 38...
Page 51: ...36 4 3 6 16 24 37...
Page 52: ...35 4 3 5 36...
Page 53: ...34 4 3 3 4 3 4 35...
Page 54: ...33 4 3 2 34...
Page 55: ...32 4 3 4 3 1 33...
Page 58: ...29 4 2 5 Sabbath Sabbath ON OFF 15 4 2 6 Fridge Zone OFF Fridge Zone ON OFF 15 30...
Page 60: ...27 4 2 4 2 1 15 24 C 16 C 2 C 8 C 12 28...
Page 61: ...26 4 4 1 1 2 LCD 3 4 5 6 7 8 9 10 11 LED 12 LED 13 14 27...
Page 62: ...25 50 5 3 3 26...
Page 63: ...24 il gov sviva www 3 2 3 3 220 240V 50Hz 25...
Page 64: ...23 3 3 1 R600a R600a 16 24...
Page 65: ...22 2 13 6 2 14 23...
Page 66: ...21 2 12 22...
Page 67: ...20 2 11 21...
Page 68: ...19 2 10 2 20...
Page 69: ...18 2 9 Loctite 270 120 19...
Page 70: ...17 2 8 18...
Page 71: ...16 2 7 1 4 1 4 PEX 37 17...
Page 72: ...15 2 6 2 L 8 D4X20 16...
Page 73: ...14 2 6 4 2 8 D4X20 4 L 2 M5X16 2 4 D4X35 4 2 6 1 L L M5 L 6 D4X35 15...
Page 74: ...13 2 5 13 14...
Page 75: ...12 2 3 L 24 2 4 13...
Page 76: ...11 2 2 2 240 000 Pa 35 psi 830 000 Pa 120 psi 37 PEX 1 4 2 4 8 3 35 120 psi 1 12...
Page 77: ...10 2 2 1 220 240V AC 50Hz 11...
Page 78: ...9 GT 850 350 10...
Page 79: ...8 2 2 1200 1216 2120 2136 580 600 9...
Page 80: ...7 2 1 400 13 M4 6 Loctite 270 8...
Page 81: ...6 2 7...
Page 82: ...5 1 304 LCD LED LED 6...
Page 83: ...50 220 240 16 5 50 2 15 90 75 3 5...
Page 84: ...CFC HFC WEEE 4...
Page 85: ...8 8 3 3 0 8 3 14 8 2000 3...
Page 86: ...R600a R600a 16 2...
Page 87: ...mA 30 OFF 1...
Page 88: ...52309147...


