background image

2. EZ MOUNT SYSTEM

7.

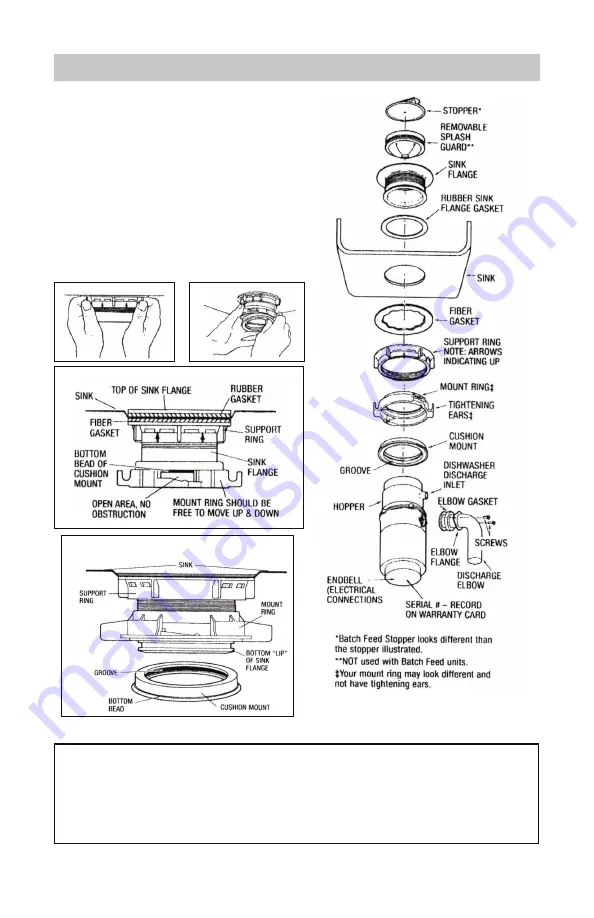
 From underneath the sink, slip fiber gasket (see 1) 

onto exposed sink flange. With arrows pointing up, screw 

support ring (see 2) onto the sink flange, hand tighten 

until the sink flange will not move (see photo H). At this 

point you may want to insert stopper in sink and fill with 

water to check sink flange seal and ensure there are no 

leaks.

8. 

Place mount ring (see 3) over sink flange and hold in 

place while installing cushion mount (see 4) (large side 

down) so the groove on the inside of cushion mount fits 

over lip on sink flange, similar to putting the lid on a 

plastic container (see photo I, J and K). 

H

I

J

K

CUSHION MOUNT DETAIL

3

1

2

3

4

When the cushion mount is installed correctly, the lip of the sink flange fits into the groove on 

the inside of the cushion mount and mount ring can be pulled downward over cushion mount 

and will be free to rotate. The bottom bead of the cushion mount acts as a gasket between the 

bottom of the sink flange and the top of the disposal. See photo D.

IMPORTANT NOTICE: CUSHION MOUNT DETAIL

Summary of Contents for WH007

Page 1: ...ay affect the garbage disposal IMPORTANT Read all instructions thoroughly Keep this guide for future reference CAUTION Review safety instructions first to avoid risk of fire electrical shock or injury...

Page 2: ...h guard is in place 10 For proper grounding instructions see the Electrical Connection portion of this manual THE CYCLONEHAUS GARBAGE DISPOSAL COMES WITH THE EZ MOUNT SYSTEM 1 INSTALLATION OF MOUNTING...

Page 3: ...ile installing cushion mount see 4 large side down so the groove on the inside of cushion mount fits over lip on sink flange similar to putting the lid on a plastic container see photo I J and K H I J...

Page 4: ...FAMILIAR WITH ELECTRICAL POWER AND PROCEDURES CALL A QUALIFIED ELECTRICIAN DANGER IMPROPER CONNECTION OF THE EQUIPMENT GROUNDING CONDUCTOR CAN RESULT IN A RISK OF ELECTRIC SHOCK CHECK WITH A QUALIFIED...

Page 5: ...the end bell for the ground wire see photo C 2 If your power supply does not include a ground wire you must provide one unless metal cable is used Attach a copper wire securely to disposal ground scr...

Page 6: ...TO EZ MOUNT 1 Line up disposal under mounting assembly Guide hopper projections into mount ring slots Turn mount ring about 1 4 to right so that the disposal is temporarily supported see photo O 2 Tu...

Page 7: ...r or sharp instrument When knockout plug falls into garbage disposal remove it 2 Connect dishwasher hose using hose clamp If hose size is different you will need a Dishwasher Connector Kit Make sure a...

Page 8: ...using your dishwasher so it may drain properly 2 You may want to leave the stopper in the drain when not in use to prevent utensils and foreign objects from falling in 3 Your disposal is ruggedly buil...

Reviews: