background image

INSTALLATION 


Note: Greater back clearance will improve the ease of serviceability of the stove. 
 

PAGE 16 

INSTALLING YOUR FREESTANDING PELLET STOVE 
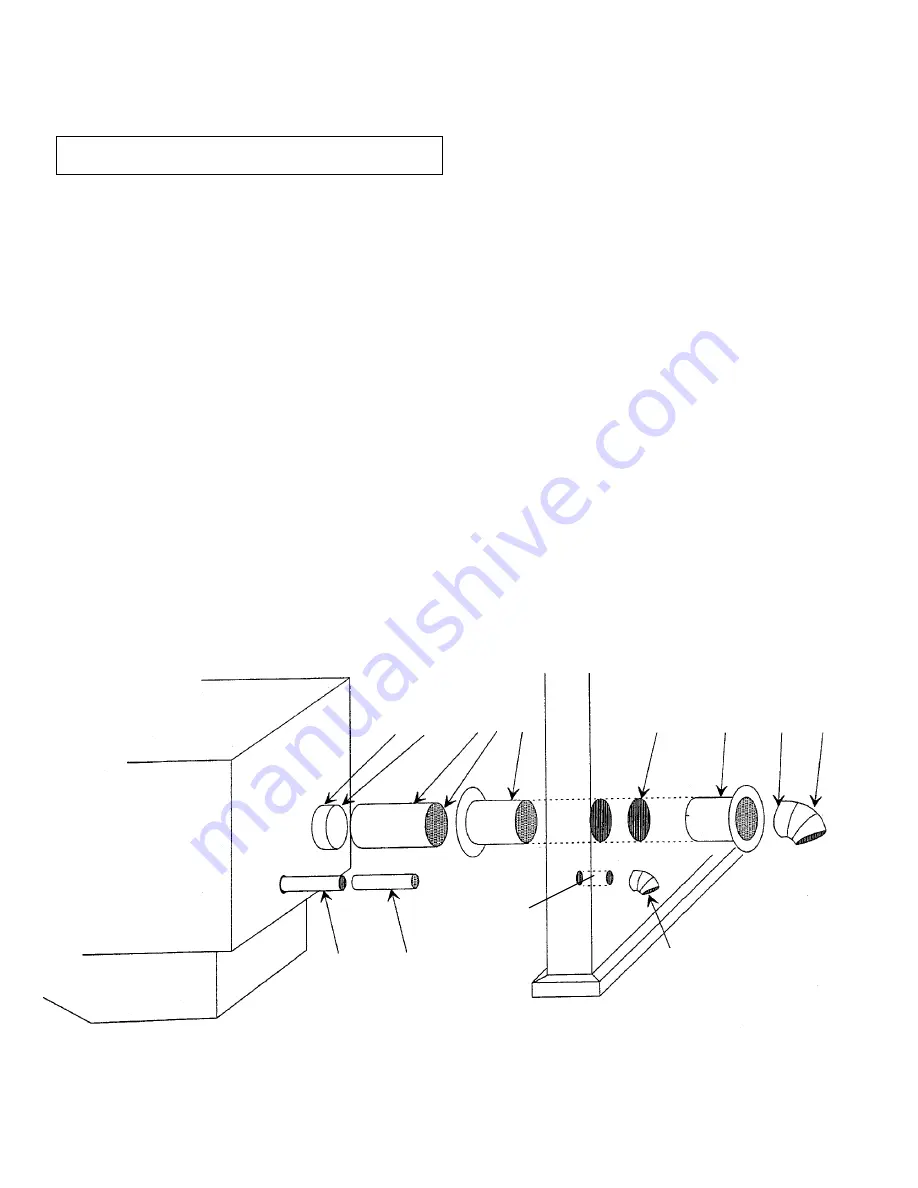
Standard Horizontal Vent Installation 

 
All PL Venting Components must be listed to UL 641 
or ULC S609 


1.  Locate the proper position for the listed type “PL” wall 

thimble.  Avoid cutting wall studs when installing your 
pipe. Use a saber saw or keyhole saw to cut the 
proper diameter hole through the wall to accommo-
date the wall thimble. Use extreme caution to avoid 
cutting into power lines within the wall of the home.  
The hole size will depend on the brand of pellet vent 
that you are using. Install the wall thimble in the hole.  

2.  ALL INTERLOCKING PIPE CONNECTIONS WITH-IN 

THE ROOM MUST BE SEALED WITH HIGH TEM-
PERATURE RTV AND SECURED WITH A MINIMUM 
OF 3 FASTENERS PER CONNECTION. Position the 
stove approximately 12” (305 mm) from the wall on 
the floor pad. Push the “PL” pipe through the wall 
thimble. Squeeze a bead of high temperature silicone 
(RTV) sealer around the end of the machined portion 
of the 3” (76mm) pipe connector on the back of the 
stove. Firmly push on a section of  “PL” pipe until in-
ner pipe liner pushes into the bead of RTV sealer. 

3.  Push the stove with pipe attached towards the wall 

(the pipe will go through the wall thimble).  Do not 
position the back of the stove closer than 2” (51mm) 
from the wall (see clearances, page 6). Note: 
Greater back wall clearance will improve the ease of 
serviceability of the stove. 

4.  Install listed type “PL” 45 degree elbow with optional 

rodent screen or cap (recommended) on outside end 
of pipe. The rodent screen should be no less than 
1/2” (13 mm) mesh and may clog with soot and ash if 
left unattended during the burn season.  


NOTE: The end of the exhaust pipe must extend a 
minimum of 12” (305 mm) from the outside of the 
building. 


5. If the installation includes a source of outside com-

bustion air; cut a separate hole through the wall for 
the fresh air tube. Use a galvanized or stainless steel 
pipe for the duct.  The minimum size for the duct 
shall be not less than 50% of the cross sectional flue 
area. Connect outside air pipe to air inlet on stove. 
This tube must be terminated with a 45 degree elbow 
or hood. 

 
NOTES:  
Combustion air may also be drawn from a vented crawl 
space under the home.  
 
All joints for connector pipe are required to be fastened 
with at least three screws. If vented horizontally, joints 
shall be made gas-tight (air tight, sealed connection) in a 
manner as specified on this page (see instruction #2). 
Install vent at clearances specified by the vent manufac-
turer. 


Inlet Air 

Port 

Metal 

Fresh Air 

Pipe 

45 Degree Elbow Joint 

For Fresh Air Pipe 

Hole Through the  Wall for the Thimble  

Pipe Connector   on Stove 

 Wall T

himble 

Use RTV High  Temp Silicone 

Hole 

Through 

the Wall for 

the Fresh 

Air Pipe 

Use RTV High 

Temp Silicone 

45

°

 Elbow 

Horizontal l  Pipe  Use RTV High  T

emp Silicone


Wall T

himble 


www.PelletKing.com

Summary of Contents for Advantage II-T C FS

Page 1: ...ossibility of a house fire Please read this entire owner s manual before installing and using your pellet stove Fail ure to follow these instructions could result in property damage bodily injury or even death Contact your local building or fire offi cials to obtain a permit and information on any installation require ments and inspection requirements in your area P N 775096M Rev E 11 03 Freestand...

Page 2: ...f the winter The room air blower speed control should be turned to high when operating the stove on the high heat setting 11 CAUTION NEVER PUT FINGERS NEAR AUGER Pellet fuel is fed to the UltraGrateTM by a screw au ger This auger is driven by a high torque motor The auger is capable of doing serious harm to fin gers Keep pellets in the hopper at all times and keep fingers away from auger The auger...

Page 3: ... OF YOUR NEW PELLET STOVE MANUFACTURED BY LENNOX HEARTH PRODUCTS When you purchased your new pellet stove you joined the ranks of thousands of concerned individuals whose answer to their home heating needs reflects their concern for aesthetics efficiency and our envi ronment We extend our continued support to help you achieve the maximum benefit and enjoyment available from your new pellet stove I...

Page 4: ... combustion air required 5 Rooms where the installation is not allowed INSTALLATION MAINTENANCE STANDARDS National Fire Protection Association The primary NFPA standard that refers to installation and mainte nance of pellet appliances and venting is NFPA 211 Latest Edition Chimneys Fireplaces Vents and Solid Fuel appliances SELECTING A LOCATION The design of your home and where you place your stov...

Page 5: ...Example Durock Cement is to be used for the floor protec tion How thick must this material be The following formulas give the means of determining minimum thickness required TM minimum thickness required for alternate material kM k value per inch of alternate material TL minimum thickness of listed material rM r value per inch of alternate material Using the k formula Minimum k value per Inch Spec...

Page 6: ...Sidewall to unit Corner 2 50 mm 2 50 mm D Alcove to Fuel Hopper 6 150 mm 6 150 mm E Max Depth of Alcove 16 406 mm 16 406 mm F Flue to Wall n a 3 77 mm Measured to fuel hopper Alcove Requirements Minimum Height 50 127 cm Minimum Width 36 966 mm Maximum Depth 16 406 mm Minimum clearances specified may not allow for ease of operation and maintenance please take this in to account when planning the in...

Page 7: ...r than removing bolted or screwed together pieces such as smoke shelf deflectors ash lips screen or door tracks and damper assemblies Any fireplace component which is removed must be retained so they can be rein stalled to restore the fireplace to its original operating con dition The removal of any part must not alter the integrity of the outer shell of the pre engineered fireplace cabinet in any...

Page 8: ...dards CSA C22 1 in Canada as well as any local codes Model Advantage II T C FS Pedestal Air Inlet MANUFACTURED MOBILE HOME EXHAUST VENT PIPE INSTALLATION GUIDELINES Use only PL pellet vent pipe listed to UL 641 and ULC S609 The pipe should extend at least 3 feet above the part of the roof through which it passes The top of the pipe should be at least 2 feet above the highest required elevation of ...

Page 9: ... ASSEMBLY Remove the ash pan cover trim from hopper Remove polyfoam wrapping and press into place as shown in il lustration below The ash pan cover trim has two mag nets attached which will secure it in place Ash Pan Cover INSTALLING PEDESTAL TO BODY If your stove is a freestanding model secure the pedes tal to the stove body as follows 1 Remove the pedestal from the box and place it be side the s...

Page 10: ...sten or set up the stove permanently Prior to lighting your stove Review the Important Warnings section page 2 Review Fuel Specifications page 25 Review and follow instructions in the Care and Op eration Section pages 21 to 25 Plug power cord connector into corresponding con nector on the back of appliance see illustrations on page 12 showing connector locations Note Advantage II T C INS Route pow...

Page 11: ...place 9 Set the top surround panel in place over the two side pan els Carefully slide the panel downward into the U clips attached to the back of the Advantage II T C INS Tip Be careful to align the notched cutouts in the top surround panel with the stove side panels Adjust side to side if nec essary to align with the surround side panels 10 Unwrap the control board carefully without touching any ...

Page 12: ...nal block on the back of the stove 3 Loosen the two terminal screws on the terminal block and remove jumper 4 Connect the two wires from your thermostat to the terminals one per terminal Ensure that the purple wires from the harness remain connected to the ter minal block and tighten the terminal screws Make sure the wires are firmly connected to the thermo stat 5 Plug in the stove and you are rea...

Page 13: ...tal runs accumulate fly ash and soot which reduces the exhaust flow and per formance of the stove Total Offsets in venting system should not exceed 270 total in direction change Horizontal Runs The maximum total horizontal run must not exceed 10 feet 3 1 meters Horizontal run of pipe requires 1 4 7 mm rise per foot Pipe Clearances Requirements See pipe manufac turers instructions for installation ...

Page 14: ...y of the termination although they should be a minimum of 3 92m away The grade surface under the termination must not be a lawn F Since sparks may escape from the exhaust pipe of any stove use caution when positioning the vent pipe Refer to pipe manufacturer s instructions when installing and terminating the exhaust The vent pipe should be horizontal and never run the pipe in a downward direction ...

Page 15: ...l Equivalent Feet 90 o Elbows Tee A G x 5 Ft 1 5m 45 o Elbows C x 3 Ft 1m Horizontal B F x 1 Ft 3m Vertical E x 5 Ft 15m A 90 Degree Elbow E 8 Vertical Pipe B 1 Horizontal Pipe F 2 Horizontal Pipe C 45 Degree Elbow G 90 Degree Tee D Standoff Braces H Wall Thimble NOTE All equivalent pipe styles shown below are stan dard for all freestanding models SAMPLE INSTALLATION CHART Type of Pipe of Elbows o...

Page 16: ...he wall see clearances page 6 Note Greater back wall clearance will improve the ease of serviceability of the stove 4 Install listed type PL 45 degree elbow with optional rodent screen or cap recommended on outside end of pipe The rodent screen should be no less than 1 2 13 mm mesh and may clog with soot and ash if left unattended during the burn season NOTE The end of the exhaust pipe must extend...

Page 17: ...lustration 3 75 mm Minimum clearance between wall and pipe If you vent to the furthest wall the vent pipe must maintain a 3 clearance par allel to the other wall 6 152 mm Minimum Horizontal Vent Through the Wall Side View Illustration 2 51 mm Minimum 45 Degree Elbow 12 305 mm Minimum 12 305 mm from Ground or Other Surface Hearth Pad Floor Protector 2 2 Wall www PelletKing com ...

Page 18: ...or Vertical Vent Vertical Vent Into A Masonry Flue Preferred Installation Vertical Vent Through the Roof This venting configuration allows for the best stove performance The vertical pipe promotes natural draft and with the chimney inside the dwelling the flue gases stay warm thus rising at a consistent rate Interior Vertical Vent into an Existing Class A Chimney Wall Straps Re quired Every 4 ft M...

Page 19: ... acceptable methods for sealing chimney throat Approved Methods of Achieving a Positive Flue Connection A qualified installer should evaluate the existing fireplace to determine the best method for achieving a positive flue connection between the vent pipe or liner and the chimney The most common method for achieving a positive flue connection in masonry fireplaces is to secure a seal off plate i ...

Page 20: ...p 18 Min 457 mm to Mantel 1 Min 25 mm to Trim 6 Min Floor Protection Optional Posi tive Flue Connection Clean Out Tee USA The insert may be installed as a Hori zontal Vent through chimney structure in Masonry Fireplaces if local code permits IN CANADA Installing as a Horizon tal Vent is NOT allowed The fireplace chimney must be fully lined 18 Min 457 mm to Mantel 6 Min Floor Protection 1 Min 25mm ...

Page 21: ... the combustion air supply simultaneously Blower Speed Button The Blower Speed Button con trols the speed of the Room Air Blower Pressing this button will increase or decrease the amount of heat exit ing the stove THE BLOWER SPEED MUST BE AT THE MAXIMUM 5 SETTING WHEN THE HEAT OUTPUT BUTTON IS ON THE 5 POSITION Combustion Air Trim The Combustion Air exhaust blower Trim is located just above the He...

Page 22: ... wall thermostat adjust the HEAT OUTPUT selector button to the desired demand mode 2 through 5 on the HEAT OUTPUT selector button Next adjust the wall mounted thermostat to the desired heat and your stove will automatically switch between a demand mode and a pilot mode GENERAL OPERATING CONSIDERATIONS Proper Burn Characteristics Your flame should be bright yellow under normal operation If your fla...

Page 23: ... damper may need to be adjusted from the standard setting Adjustment Procedure Loosen setscrew on set collar see illustrations on this page then adjust in 1 4 incre ments until optimum combustion air flow is achieved For less air push in and for more air pull out After adjust ment position set collar against side panel and tighten setscrew Damper In less air Damper Out more air The damper rod loca...

Page 24: ...Routine Maintenance on pages 26 through 30 for information on cleaning the stove Excessive Combustion Air By closing the damper this will reduce combustion air delivery Symptoms of exces sive air include fuel burns too quickly results in smoking or smoldering pellets white to yellow flame etc If the damper is open too much the burning pellets will lift off the UltraGrateTM and fly up into the air ...

Page 25: ...of the stove Caution The use of unapproved dirty wet and or high salt content fuel will void the warranty Wood pellets manufactured to the pellet fuels institute P F I certification standard are available in two grades Standard and Premium The primary difference between the two is the ash content of the pellets The P F I specification for standard grade premium grade residential pellet fuel is as ...

Page 26: ...linkers The UltraGrateTM can easily be cleaned with the grate scraper tool or it can be removed for cleaning It is very important to monitor the ash build up under the Ultra GrateTM as excessive amounts of ash will block combus tion air from entering the UltraGrateTM causing pellets to pile up in the UltraGrateTM The ash build up under the Ul traGrateTM is easily dumped into the ash pan by pulling...

Page 27: ... performance and a dirty burn Handy Hint After the first 10 20 bags of fuel you may want to remove the firebrick and determine the rate at which the fly ash is building build up within the Stove Contact your dealer for more information HEAT EXCHANGER TUBES ONLY CLEAN HEAT EXCHANGER TUBES AFTER STOVE HAS COOLED DOWN A rod located above the combustion chamber door is used for cleaning the tubes Use ...

Page 28: ... normal to feel only a slight amount of friction The door gasket does not need to be tight in all areas since a small amount of leakage is not hazardous or detrimental to the perform ance of your stove Door Rope Gasket check seal at points indicated by arrows Minimum Frequency of 3 months to 1 year Visually inspect gasket often If it becomes frayed or damaged it should be replaced CREOSOTE REMOVAL...

Page 29: ...NNECT ELEC TRICAL CORD PRIOR TO CLEANING STOVE Any household dust pet hair or sawdust should be vacuumed or wiped out of the rear compartment of the stove room air blower and combustion blower paying special atten tion to vacuuming out the intakes of both blowers The electrical components should be wiped clean OPENING SIDE PANELS Advantage II T C FS For right hand side panel open the glass door lo...

Page 30: ...on the metal surface If there are any scratches use 600 grit sandpaper instead Mask off surfaces you do not want painted Paint lightly over the bare surface first as this will act as an undercoat Then paint over a larger area in smooth even strokes to blend MOTOR LUBRICATION Room Air Blower The room air blower is permanently lubricated by the manufacturer Do not apply oil to any part of the blower...

Page 31: ...0 VAC Heat Input Max 11 000 38 000 BTU hr Emissions 2 3 gr hr varies w size and type of fuel EPA Certified Ship Weight 225 lbs Room Air Blower 150 CFM 1 5 Amps 3000 rpm Auger Motor 1 RPM 55 Amps Exhaust Blower 95 CFM 95 Amps 3000 rpm Options Log Set Gold Trivet SIDE VIEW ILLUSTRATION BACK VIEW ILLUSTRATION Note Dimensions shown are approximations only 1 4 Non combustible thermal rated floor protec...

Page 32: ...e Self Igniter Wall Thermostat wire included Hopper Capacity 60 lbs Burn time 13 46 hours Fuse Control Board 5 Amp 250 VAC Fuse Igniter 6 Amp 125 volt Heat Input Max 11 000 38 000 BTU hr Emissions 2 3 gr hr varies w size and type of fuel EPA Certified Ship Weight 200 lbs Auger Motor 1 RPM 55 Amps Room Air Blower 150 CFM 1 5 Amps Exhaust Blower 95 CFM 95 Amps 3000 rpm Options Log Set Gold Trivet Su...

Page 33: ... Air Blower jacket and is designed to detect an overfire condition Disc for Combustion Air Inlet This disc is lo cated on the combustion air inlet and is designed to detect reversed flow If negative pressure in the dwelling i e An extremely tight house which may not supply adequate combustion and ventilation air causes the exhaust to pull back from the combus tion air inlet the heat from the exhau...

Page 34: ...WIRING DIAGRAM PAGE 34 www PelletKing com ...

Page 35: ...disc is not locked in Refill hopper See Pellets will not feed on following page Allow stove to cool for 1 hour and re light If the stove has been operating at a medium to high burn rate and the Room Air Blower has been turned down low then the Exhaust Blower should be turned up higher If this problem persists particularly at lower burn rates then the high limit disc should be replaced by your auth...

Page 36: ...wer housing If the auger starts to feed the pressure switch is sensing back pres sure After test reconnect hose to blower NEVER operate the ap pliance with hose removed Clean venting system and exhaust flow passages as outlined in Routine Maintenance section of this man ual Note Multiple elbows are more susceptible to collecting ash resulting in restriction 5 Blowers will not shut off after the fu...

Page 37: ...ir Blower or turn off stove before cleaning to prevent dispersion of ash and soot into the room Seal leaks in the exhaust system using high temperature RTV Sili cone sealer silicone should be at room temperature Pull insert away from fireplace opening Thoroughly clean the fire place firebox recommend painting with latex or spray paint to hold down the finer particles Wear a protective mask when pa...

Page 38: ...it Bakolite L250 30F 60T21 3 per pkg 12057601 Disc Low Limit Ceramic F140 30F 3 per pkg 12155908 Fuse Control Board 3 5 amp Fast blow 250 vac 12 per pkg 12055908 Fuse Igniter 6 amp Fast blow 12 per pkg 12155907 Fuse In Line Holder With Fuse 12056003 Hose Pressure Switch WP2 orange silicone 1 4 dia X 4 5 3 per pkg 12150213 Igniter Cartridge probe 380W 3 3 A 12040003 Igniter Cartridge 6 pack 1204630...

Page 39: ...nt Black 12352901 Trim Kit Brass for Side Panel Insert 2 per pkg Miscellaneous Parts 12150003 Accessory Package 12141920 Baffle Kit Ash Trap Left and Right 12151307 Collar Damper Rod 61050003 Gasket Auger End Plate 5 per pkg 61057210 Gasket Exhaust Blower Mounting 1 8 lytherm 5 per pkg 61057203 Gasket Room Air Blower 5 per pkg neoprene rubber gasket 12154201 Handle Damper 3 per pkg 12151308 Plate ...

Page 40: ...REPLACEMENT PART DIAGRAMS PAGE 40 Firebrick Kit UltraGrateTM Kit Power Cord Kit Wall Thermostat Kit Door Assembly Glass Order each pc separately Gasket Included 3 Piece Set www PelletKing com ...

Page 41: ...REPLACEMENT PART DIAGRAMS PAGE 41 Pressure Switch Kit hose not included Auger Set Collar Auger End Plate Gasket Control Board Auger Motor Room Air Blower Exhaust Blower Damper Rod www PelletKing com ...

Page 42: ...TKMAIIT G Surround Trim Kit Medium 32 x 44 Gold Insert H0429 STKLAIIT G Surround Trim Kit Large 36 x 48 Gold Insert H0452 HEK AIIT Hearth Extension Support Kit for elevated hearths Insert H0430 DLS AIIT Log Set All Surround Kit Approx Sizes Large Cat H0426 36 91 4cm height 48 121 9cm width Medium Cat H0425 32 81 3cm height 44 111 75cm width Small Cat H0424 28 72 4cm height 40 103 5cm width 36 Lg T...

Page 43: ...STOVE SAFETY LABEL PAGE 43 Note that your stove s serial number is printed on the safety label which is located near the inside of the hopper Your stove s serial number is preceded by a WH Example WH 0000000 www PelletKing com ...

Page 44: ...ADVANTAGE II T C EPA LABEL COLORADO COMPLIANCE LABEL PAGE 44 www PelletKing com ...

Page 45: ...SIMPLE OPERATING INSTRUCTIONS LABEL PAGE 45 www PelletKing com ...

Page 46: ...INSTALLATION TIPS PAGE 46 www PelletKing com ...

Page 47: ...ORDS PAGE 47 Dealer s Name Dealer s Address City State Zip Code Serial Number Date of Purchase Date Installed Notes SERVICE AND MAINTENANCE LOG Service Service Service Date Technician Description www PelletKing com ...

Page 48: ...1110 West Taft Avenue Orange CA 92865 www PelletKing com ...

Reviews: