background image

3ROLWLTXHGHVHUYLFH

1RXVUHPSODFHURQVWRXWHV

OHVSLqFHVGpIHFWXHXVHVPDQTXDQWHVRXHQGRP
PDJpHVSHQGDQWOHPRQWDJH9HXLOOH]FRQWDFWHU
GLUHFWHPHQWOHVHUYLFHFOLHQWqOHGH:KLWWLHU:RRG
3URGXFWVSDUWpOpSKRQHID[FRXUULHURXHPDLO
SRXUREWHQLUOHVSLqFHVGHUHPSODFHPHQW

+RUDLUHV

/HSHUVRQQHODFFXHLOODQWGHQRWUHVHUYLFH

FOLHQWqOHHVWMRLJQDEOHGXOXQGLDXYHQGUHGLGHKj
KKHXUHQRUPDOHGX3DFLILTXH9RXVSRXYH]ODLVVHU
XQPHVVDJHKHXUHVVXUMRXUVVXU

3RXUSODFHUYRVFRPPDQGHV

)RXUQLVVH]OH

QXPpURFRPSOHWGHPRGqOHGXPHXEOHODOHWWUHGH
ODSLqFHOHFRGHGHSURGXFWLRQODTXDQWLWpQpFHV
VDLUHODUDLVRQGXUHPSODFHPHQWDLQVLTXHYRWUH
QRPFRPSOHWHWYRWUHDGUHVVHDYHFXQQXPpURGH
WpOpSKRQHDXFDVRQRXVDXULRQVEHVRLQGHYRXV
FRQWDFWHU

/HVSLqFHVVRQWH[SpGLpHVGHQRWUHXVLQHVLWXpHj
(XJHQH2UHJRQGDQVOHVRXMRXUVRXYUDEOHV
jFRPSWHUGHODUpFHSWLRQGHYRWUHGHPDQGH/D
OLYUDLVRQSUHQGUDGHjMRXUVRXYUDEOHV

¬O¶H[WpULHXUGHVeWDWV8QLVRXGX&DQDGD

&RXUULHU32%R[‡2UHJRQ86$

,QVWUXFWLRQVGH0RQWDJH

32%R[
(XJHQH2586$

)pOLFLWDWLRQV

&HMROLPHXEOHV¶LQWqJUHUDDJUpDEOHPHQWjYRWUHLQWpULHXU
3RXUREWHQLUGHVUpVXOWDWVRSWLPXPFRPPHQFH]SDUOLUHOHV
,QVWUXFWLRQVGH0RQWDJHHWOHV&RQVHLOVGH)LQLWLRQDYDQW
GHFRPPHQFHUYRWUHSURMHW

1HSDVPRQWHUV¶DVVHRLUQLVHPHWWUHGHERXWVXU
FHWDUWLFOHG¶DPHXEOHPHQW

1HSDVGpSODFHUFHWDUWLFOHG¶DPHXEOHPHQWV¶LOHVWFKDUJp
/HGpFKDUJHUDYDQWGHOHGpSODFHU
1HSDVVXUFKDUJHUOHVpWDJqUHVGHFHWDUWLFOHG¶DPHXEOHPHQW
$YDQWGHFKDUJHURXGHGpSODFHUFHWDUWLFOHG¶DPHXEOHPHQW
YpULILHUVLWRXWHVOHVYLVHWWRXVOHVVXSSRUWVVRQWVROLGHPHQW
DWWDFKpV
3RXUXQHVWDELOLWpPD[LPXPIL[H]O¶XQLWpDXPXUDO¶DLGH
GXSHWLWRXWLOODJHIRXUQLHQVXLYDQWOHVLQVWUXFWLRQV

&RGHSURGXLW

/LVH]FRPSOqWHPHQWOHVLQVWUXFWLRQVHWOHV&RQVHLOVGH
ILQLWLRQDYDQWGHFRPPHQFHUOHPRQWDJH

 &RQVHUYH]OHVSDQQHDX[GDQVOHXUERvWHjXQ

HQGURLWVHFjGHVWHPSpUDWXUHVYDULDQWHQWUH

R

HW

R

1RQVXUXQVROHQFLPHQWIURLGpYHQWXHOOHPHQWKXPLGH

,QVSHFWH]UpJXOLqUHPHQWYRWUHPHXEOHSRXUYRLUVLOHV
SLqFHVVHGpFROOHQWRXVLOHVYLVVHGHVVHUUHQWRXVLYRXV
UHPDUTXH]WRXWDXWUHSUREOqPHULVTXDQWG¶DIIHFWHUOD
VWDELOLWpGXPHXEOH5HVVHUUH]RXUpSDUH]DXEHVRLQ

3RXUXVDJHPpQDJHUQRUPDOVHXOHPHQW

UHFRPPDQGpSRXUXVDJHFRPPHUFLDO

:

+XFKH
6WDQGDUGj
eWDJqUHV

:

+XFKH

6WDQGDUGj

eWDJqUHV

)D[‡ZZZ#ZKLWWLHUZRRGFRP

5pY

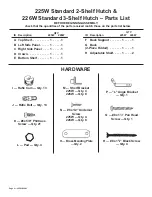
Summary of Contents for 225W

Page 1: ...H 25 86 R QRW FOLPE VLW RU VWDQG RQ WKLV SLHFH RI IXUQLWXUH 8QORDG LWHPV IURP WKLV XQLW SULRU WR PRYLQJ R QRW RYHUORDG VKHOYHV RQ WKLV XQLW HIRUH ORDGLQJ RU PRYLQJ WKLV XQLW FKHFN DOO VFUHZV DQG VXSSRUWV IRU WLJKWQHVV RU PD LPXP VWDELOLW DWWDFK XQLW WR WKH ZDOO XVLQJ WKH HQFORVHG KDUGZDUH DV SHU LQVWUXFWLRQV 3URGXFWLRQ RGH 5HDG ERWK WKH VVHPEO QVWUXFWLRQV DQG LQLVKLQJ LQWV FRPSOHWHO EHIRUH EHJLQQL...

Page 2: ... M Shelf Bracket 225W Qty 4 226W Qty 8 J Rafix Bolt Qty 13 N 6x1 2 Undercut Screw 225W Qty 4 226W Qty 8 ID Description 225W 226W A Top Shelf 1 1 B Left Side Panel 1 1 C Right Side Panel 1 1 D Crown 1 1 E Bottom Shelf 1 1 QTY ID Description 225W 226W F Back Support 1 1 G Back 2 Piece Folded 1 1 H Adjustable Shelf 1 2 QTY K 6x5 8 Philtruss Screw Qty 21 L Pad Qty 4 R 8x15 8 Black Screw Qty 4 O Brass ...

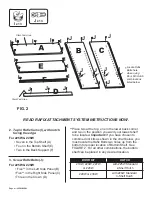
Page 3: ...he enclosed Finishing Hints sheet Note Due to the fact that more than one type of hardwood is used we recommend testing for desired color To test for desired color on a Veneer parts apply stain to unexposed portion of the Top See FIGURE 2 b Alder pieces apply stain to back of Crown See FIGURE 2 226W Standard 3 Shelf Hutch shown in all drawings 1 Lay out the wood parts in their approximate location...

Page 4: ...st Area Place two at the top one in the lower back corner and two in the position you want your lowest shelf to be located Important If you have chosen to combine door kits as shown in the chart below you must locate the Rafix Bolts two holes up from the bottom for proper location of Bottom Shelf See FIGURE 2 For all other combinations the bottom shelf can be placed in any desired location Locate ...

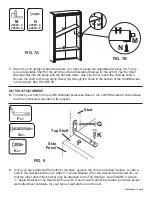
Page 5: ...ding it onto the Rafix Bolts J in the lower back corners of each side panel Make sure the rounded edge of the Back Support F is facing up and towards the front of the unit Tighten the cams See FIGURE 5 FIG 5 F E 6 With the unit laying face down on a protective surface measure from top left to bottom right and from bottom left to top right Measurements should be equal If the line is longer tap bott...

Page 6: ...W 4 226W 8 M 9 Once you have attached the hutch to the base position the unit at a desired location Locate a stud in the wall behind the unit Attach L Angle Bracket P to the wall stud with Screw Q so that the other half of the bracket may be attached to the Top Shelf A See FIGURE 9 Attach L Angle Bracket to Top Shelf with Screw K If stud in wall cannot be located purchase proper wall attachment ha...

Page 7: ... XVR GRPpVWLFR VH UHFRPLHQGD SDUD XVR FRPHUFLDO HOLFLWDFLRQHV VWH ILQR PXHEOH VHUi XQD EHOOD DGLFLyQ SDUD VX KRJDU 3DUD REWHQHU HO PHMRU UHVXOWDGR FRPLHQFH OH HQGR WDQWR ODV QVWUXFFLRQHV SDUD UPDU FRPR ODV 6XJHUHQFLDV SDUD HO FDEDGR DQWHV GH FRPHQ DU VX SUR HFWR 1R VH VXED QR VH VLHQWH QL VH SDUH VREUH HVWH PXHEOH 1R PXHYD HVWH PXHEOH PLHQWUDV HVWp OOHQR 9DFtHOR DQWHV GH PRYHUOR 1R FDUJXH HQ H FHV...

Page 8: ...rante al área no expuesta del Panel Superior Consulte la FIGURA 2 b Piezas de madera de aliso aplique colorante a la parte posterior de la Corona Consulte la FIGURA 2 FIG 1 Todas las ilustraciones muestran la 226W Unidad de 3 Estantes Tamaño Estándar 1 Coloque las piezas de madera en su ubicación aproximada de ensamble para facilitar en la identificación y el ensamble FIG 2 Coloque aquí los Pernos...

Page 9: ...es mayor dé golpecitos en la parte inferior del Panel Lateral Izquierdo B hasta que las distancias sean iguales Si la distancia es mayor dé golpecitos en la parte inferior del Panel Lateral Derecho C 225W 226W PAGE 3 SP Desdoble el Panel Posterior G y fíjelo al mueble utilizando Tornillos K Cerciórese de que el borde superior del panel posterior esté al ras con el borde superior del estante superi...

Page 10: ...qJUHUD DJUpDEOHPHQW j YRWUH LQWpULHXU 3RXU REWHQLU GHV UpVXOWDWV RSWLPXP FRPPHQFH SDU OLUH OHV QVWUXFWLRQV GH 0RQWDJH HW OHV RQVHLOV GH LQLWLRQ DYDQW GH FRPPHQFHU YRWUH SURMHW 1H SDV PRQWHU V DVVHRLU QL VH PHWWUH GHERXW VXU FHW DUWLFOH G DPHXEOHPHQW 1H SDV GpSODFHU FHW DUWLFOH G DPHXEOHPHQW V LO HVW FKDUJp H GpFKDUJHU DYDQW GH OH GpSODFHU 1H SDV VXUFKDUJHU OHV pWDJqUHV GH FHW DUWLFOH G DPHXEOHPHQW...

Page 11: ...essus Voir la FIGURE 2 b Des pièces en aulne appliquez la teinture sur l arrière de la couronne Voir la FIGURE 2 225W Huche Standard à 2 Étagères et 226W Huche Standard à 3 Étagères J Boulons Rafix 13 13 K Vis Philtruss no 6 x 5 8 po 21 21 L Tampon 4 4 M Support d étagère 4 8 N Vis à tête évidée no 6 x po 4 8 O Plaque de fixation en laiton 2 2 P Support angulaire en L 1 1 Q Vis à tête cylindrique ...

Page 12: ...oit et entre le coin inférieur gauche et le coin supérieur droit Les mesures doivent être égales Si la ligne est plus longue tapez sur le bas du panneau latéral gauche B jusqu à ce que les mesures soient égales Si la ligne est plus longue tapez sur le bas du panneau latéral droit C Dépliez l arrière G et fixez le au meuble au moyen des vis K Assurez vous que le bord supérieur de l arrière est à ra...

Page 13: ...base Retighten the Rafix Cams and reattach the back with Screws METHOD 2 Optional Place Pads L in each corner on the bottom of the hutch side panels where they will come in contact with the base unit Use the Mending Plates provided with the hutch To do so remove the two outer screws that hold the back to the hutch See FIGURE 11 for correct location Reattach the screws adding the brass mending plat...

Page 14: ...ángulo de 45 grados Alinee el orificio del otro lado de la placa de unión de manera que quede centrado en el estante superior de la base Fije la placa de unión al panel superior de la base utilizando Tornillos K REMARQUE Si vous prévoyez de fixer les huches 225W ou 226W aux bases 223W ou 224W lisez le texte qui suit Il y a deux méthodes pour fixer la huche MÉTHODE 1 Pour retirer le dessus de la ba...

Reviews: