background image

3505AUFb McKenzie Lift Top Coffee Table 

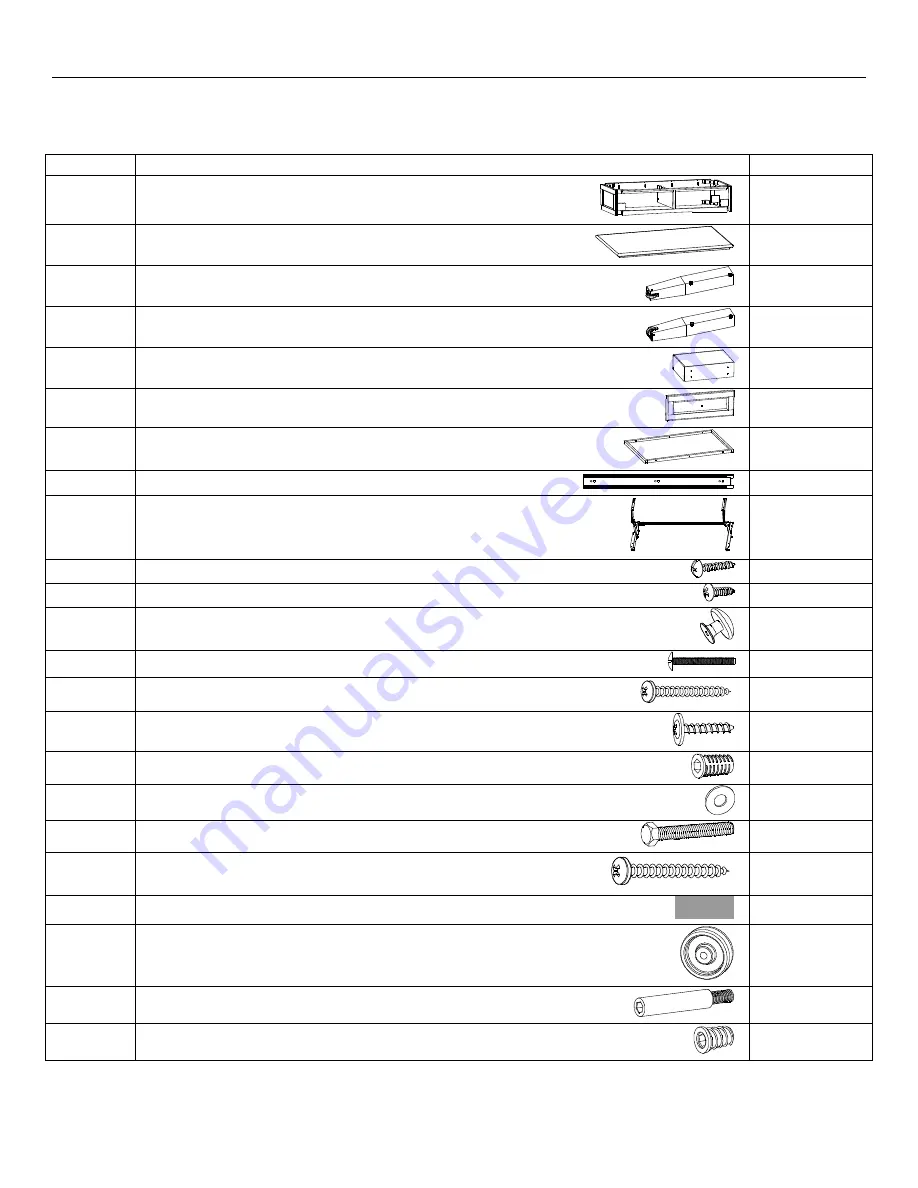
Parts List


3505AUFb — Page 2 — 03/17 

Please identify the parts and check that quantities received match those on this list. 

If you need to replace a part, refer to the following letter and part name. 


Part 

Description 

Quantity 


Case Assembly 


Top Assembly (attached) 


Ca 

Left Front/Right Back Leg 


Da 

Right Front/Left Back Leg 


Drawer (inserted) 


Drawer Face (installed) 


Tray Assembly (attached) 


16" Drawer Slide (installed sets) 


Lift Up Mechanism (attached)


#6 x 3/4" Philtruss Screw (inserted) 


28 


#6 x 1/2" Philtruss Screw (inserted) 


12 


Knob (attached) 


Mb 

#8 x 1-1/2" Machine Screw Tuscan (installed) 


#8 x 1-1/4" Pan Head Screw (inserted) 


68 

Ob 

#8 x 7/8" Black Lo-Profile Screw (inserted) 


3/8” X 1” Insert Nut (inserted) 


5/16" Flat Washer 


3/8" x 2-1/2" Hex Bolt 


#10 x 2" Pan Head Screw (inserted) 


Velvet Pad 100 x 38mm 


PVC Wheel (installed) 


Axle Pin (inserted) 


4 x 10mm Insert Nut (inserted) 


Summary of Contents for 3505AUFb

Page 1: ...can expose you to chemicals including formaldehyde which are known to the State of California to cause cancer For more information go to www p65warnings ca gov furniture DESIGN SUBJECT TO CHANGE WITHOUT NOTICE CUSTOMER SERVICE If you ever have questions about your furniture please do not hesitate to contact us In the unlikely event you need a replacement part we can make those parts available thro...

Page 2: ...r inserted 2 F Drawer Face installed 2 G Tray Assembly attached 1 H 16 Drawer Slide installed sets 2 I Lift Up Mechanism attached 1 J 6 x 3 4 Philtruss Screw inserted 28 K 6 x 1 2 Philtruss Screw inserted 12 L Knob attached 2 Mb 8 x 1 1 2 Machine Screw Tuscan installed 2 N 8 x 1 1 4 Pan Head Screw inserted 68 Ob 8 x 7 8 Black Lo Profile Screw inserted 8 P 3 8 X 1 Insert Nut inserted 8 Q 5 16 Flat ...

Page 3: ...the right Drawer Release Lever See Figure 1a Note where each drawer came from to ensure correct installation 2 Turn the unit upside down on a clean protected surface Lift upward and back on the Case Assembly A until it rests in its opened position Peel off the backings on the Velvet Pads T and apply them to the bottom of the Top Assembly B Return the Case Assembly to its closed position See Figure...

Page 4: ...egs face toward the Corner Blocks It is important the side of the leg exposing the wheel face each other Insert two 3 8 x 2 1 2 Hex Bolts R with two Flat Washers Q through the Corner Blocks and into the leg and fasten securely See Figures 3 and 3a Repeat for the other three legs 4 Firmly hold the lift top closed and turn the table upright then reinsert the drawers See Figure 4 Fig 4 Fig 3 Fig 3a Q...

Page 5: ...3505AUFb McKenzie Lift Top Coffee Table Assembly Instructions 3505AUFb Page 5 03 17 5 The wheels allow the table to easily move away from or toward your seating Fig 5 Fig 5a ...

Page 6: ...the Assembly Instructions for detailed information on how to glue your specific product Use wood glue such as Elmer s Wood Glue Titebond Wood Glue or the equivalent Some instructions call for a slow drying glue Carefully read the label and instructions of the glue manufacturer Your unit may not need glue 1 We strongly recommend that you lay out all the parts and familiarize yourself with how they ...

Page 7: ...follow all label directions Stir your top coat gently do not shake Shaking the can creates bubbles that are hard to remove 2 All surfaces including the underside of table tops and inside drawers must be sealed with at least one layer of a top coat This will help minimize wood swelling shrinkage warping and cupping due to changes in moisture content or temperature 3 Apply a minimum of two coats whe...

Reviews: