background image


P.O. Box 2827 
Eugene, OR 97402 USA


Production Code: 


VN 

08/18 


Addison Platform Beds


DUET finish 
Assembly Instructions 

Model #


IMPORTANT NOTES: 

  Wood can be susceptible to changing color over time when exposed to 

strong sunlight. Use window shades, drapes or blinds to protect your 
furniture. To help the surface age evenly and avoid dark and light 
spots, periodically move items to expose the entire surface to an even 
amount of light so it may develop a uniform patina. 

  For normal household use only. 

Not

 recommended for commercial use. 

  Remove items before you move this unit. 

  This assembly requires two people.


  This item has a total maximum combined weight limit 

of 850 lbs. inclusive of foundation and people. 


WARNING


Drilling, sawing, sanding or machining wood products can expose you to 
wood dust, a substance known to the state of California to cause cancer. 
Avoid  inhaling  wood  dust  or  use  a  dust  mask  or  other  safeguards  for 
personal protection.


For more information go to: www.p65warnings.ca.gov/wood


This  product  can  expose  you  to  chemicals,  including  formaldehyde, 
which are known to the State of California to cause cancer.


For more information go to: www.p65warnings.ca.gov/furniture 


DESIGN SUBJECT TO CHANGE WITHOUT NOTICE. 
 

 CUSTOMER SERVICE


If you ever have questions about your furniture, please do not hesitate to contact us. In the unlikely event you need a 
replacement part; we can make those parts available through an authorized Whittier Wood Furniture dealer. If you 
cannot order replacement parts through your dealer, please contact our customer service department. 

Hours:

 Our friendly customer service staff can be reached: 

Monday-Friday 8:00 a.m. to 5:00 p.m. (Pacific Time)

You may leave a message 24 hours a day, seven days a week. 

Customer Service: 

800-653-

3336 • 

Outside the U.S.: 

541-687-0213 


Fax:

 541-687-

2060• 

Email:

 info@whittierwood.com


3816DUET 
Addison Queen Platform Bed


Thank you for allowing us to help you furnish your 
home. We are certain you will be delighted with 
your new furniture for many years to come.  


3818DUET 
Addison King Platform Bed


3820DUET 
Addison Cal-King Platform Bed


Summary of Contents for 3816DUET

Page 1: ... more information go to www p65warnings ca gov wood This product can expose you to chemicals including formaldehyde which are known to the State of California to cause cancer For more information go to www p65warnings ca gov furniture DESIGN SUBJECT TO CHANGE WITHOUT NOTICE CUSTOMER SERVICE If you ever have questions about your furniture please do not hesitate to contact us In the unlikely event y...

Page 2: ...er part letter and name 3802DUET Addison Queen Platform Kit x1 3806DUET Addison King Platform Kit x1 3809DUET Addison Cal King Platform Kit x1 Part Description Quantity J End Platform Assembly 1 K Headboard Platform Assembly 1 L 8 x 1 1 8 Lo Profile Screw inserted 12 M 8 x 1 3 4 Pan Head Screw inserted 12 N 8 x 1 5 8 Black Screw inserted 33 O 1 4 T Nut inserted 44 P Wood Dowel inserted 2 Please no...

Page 3: ...er 40 D 1 4 x 22mm Hex Bolt 24 E 1 4 x 35mm Hex Bolt 16 Q Foot Assembly 4 R 6 x 3 4 Brass Flat Head Screw Inserted 24 S Wool Felt Pad Glide Attached 4 T Metal Foot Bracket Attached 4 U 1500mm Channel 4 3817DUET Addison Queen Platform Filler Strip x1 3819DUET Addison King Platform Filler Strip x1 3821DUET Addison Cal King Platform Filler Strip x1 Part Description Quantity N 8 x 1 5 8 Black Screw 7 ...

Page 4: ...atform portion of the bed Open the 3803 Platform Connector Kit which attaches the two Platforms together 1 Open and unfold the Platform Kit carton in the approximate location where the bed will be placed This will help protect the flooring and the faces of the platform components Place the Headboard Platform Assembly K face down in the approximate location where the headboard will be located with ...

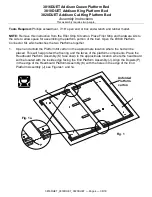
Page 5: ...ET Page 5 08 18 2 Slide the two sections together so that the flat edges touch as shown in Figure 2 Using the hardware from the 3803 Connector Kit place the 1500mm Channels U on the Platform and align over the predrilled holes in the platform Attach the Channels U with 1 4 X 22mm Hex Bolts D and 18mm Flat Washers B See Figures 2 and 2a Fig 2 U B Fig 2a D U B D x 24 x 24 Hardware bag step 2 ...

Page 6: ...818DUET_3820DUET Page 6 08 18 3 Place the Foot Assemblies Q onto the Platform Assembly so that the holes in the metal brackets align over the predrilled holes The legs should angle outward toward the corner of the platform Attach the Foot Assemblies Q with 1 4 X 35mm Hex Bolts E and 18mm Flat washers B See Figures 3 and 3a Fig 3 E Fig 3a B Q B E x 16 x 16 Hardware bag step 3 ...

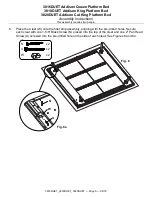
Page 7: ...816DUET_3818DUET_3820DUET Page 7 08 18 4 Place two Wooden Dowels P into the Filler Strip V Gently hammer in the dowels so that they are entirely seated in the wood Insert the dowels of the Filler Strip assembly V into the dowel holes of the Headboard Platform Assembly K See Figures 4 4a and 4b Fig 4 Fig 4a P V Fig 4b P x 2 V Hardware bag steps 4 5 6 N x 7 X x 2 W x 2 ...

Page 8: ... Cal King Platform Bed Assembly Instructions This assembly requires two people 3816DUET_3818DUET_3820DUET Page 8 08 18 5 Attach the Filler Strip V to the Headboard Platform Assembly with five 1 5 8 Black Screws N screwed into the pre drilled holes See Figures 5 and 5a Fig 5 Fig 5a N N x 5 ...

Page 9: ... people 3816DUET_3818DUET_3820DUET Page 9 08 18 6 Place the Cleat W onto the filler strip assembly aligning with the pre drilled holes Secure each cleat with one 1 5 8 Black Screw N placed into the top of the cleat and one 2 Pan Head Screw X screwed into the pre drilled hole on the side of each cleat See Figures 6 and 6a Fig 6 Fig 6a N X W N x 2 X x 2 W x 2 ...

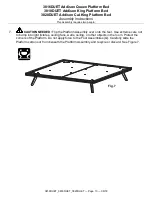
Page 10: ...820DUET Page 10 08 18 7 CAUTION NEEDED Flip the Platform Assembly over onto the feet Use extreme care not to bump into light fixtures ceiling fans walls ceiling or other objects in the room Protect the corners of the Platform Do not apply force to the Foot Assemblies Q Carefully slide the Platform carton out from beneath the Platform Assembly and recycle or discard See Figure 7 Fig 7 ...

Reviews: