background image

Model #

558KFDH 

Eastport  

Storage Shelf

Assembly Instructions

For normal household use only. 

 recommended for commercial use.

Production Code:

  Completely read the Assembly Instructions and

Gluing Hints before beginning your project.

  Store the parts: 1) in their box; 2) in a dry place; 

3) in temperatures ranging from 40° to 90°. (Not on 

a cold, possibly damp, cement floor.) 

  Inspect your furniture periodically for any loose glue 

joi

affect the stability of your furniture. Tighten or

repair as needed.

nts or screws, or any other problem which may 

Congratulations!

This fine piece of furiture will make a handsome

addition to your home. For the best results, start by

reading the Assembly Instructions and Gluing Hints

before 

you begin your project.

Service Policy:

We will replace any 

parts which are defective, missing or 

damaged during assembly. Please contact 

Whittier Wood Products customer service 

department directly (by phone, fax, mail or 

email) for replacement parts.

Hours:

 Our friendly customer service staff 

can be reached Monday-Friday 7:00 a.m. to 

5:00 p.m. (Pacific Time). A message can be 

left 24 hours a day, 7 days a week. 

To Order:

 Provide the complete furniture 

model number (upper left corner of this 

page), part letter/number, production code, 

quantity needed, reason for replacement 

and your full name and address along with 

a telephone number in case we need to 

contact you.

Parts ship from our Eugene, Oregon factory 

within 1 or 2 business days from the time 

we receive the request. Please allow 5-10 

business days for delivery.

O

Ouuttsside 

ide U

U..S. or Canada: 

S. or Canada: 554411--668877--00221133

FFaax: 

x: 554411--668877--2200660 • 

0 • www

www..w

whhiittttie

ierrw

woo

oodd..ccom

om

M

Maaiill: : P

P.O

.O. . B

Boox 28

x 28227 • 

7 • E

Eugen

ugenee, , O

Orregon 

egon 997744002, 

2, U

U..S

S..A

A..

01/09

VN

Do not climb or stand on this piece of 

furniture.

Unload items from this unit prior to moving. 
Do not overload this unit.   


Before loading or moving this unit, check all screws 

and supports for tightness. 

P.O. Box 2827

Eugene, OR 97402 USA

Summary of Contents for 558KFDH

Page 1: ...l or email for replacement parts Hours Our friendly customer service staff can be reached Monday Friday 7 00 a m to 5 00 p m Pacific Time A message can be left 24 hours a day 7 days a week To Order Pr...

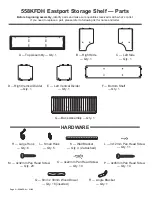
Page 2: ...e and letter Q 8mm x 30mm Wood Dowel Qty 18 inserted L 3x12mm Pan Head Screw Qty 11 A Top Assembly Qty 1 D Right Vertical Divider Qty 1 H Large Hook Qty 6 I Small Hook Qty 5 K Wall Bracket Qty 4 2 att...

Page 3: ...square notches face the back as shown in Figure 1 Tap with a rubber mallet and quickly wipe away any excess glue with a damp rag Using the pocket holes as guides attach with four 4x32mm Pan Head Scre...

Page 4: ...ue Using the pocket holes as guides attach using two 4x32mm Pan Head Screws M See Figures 3 and 3a 4 Spread a thin layer of glue in the three dowel holes on the Right Side B Insert the Back Shelf Asse...

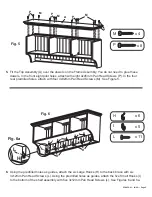
Page 5: ...oles attach with eight 4x45mm Pan Head Screws P In the four rear predrilled holes attach with four 4x32mm Pan Head Screws M See Figure 5 6 Using the predrilled holes as guides attach the six Large Hoo...

Page 6: ...ith 4x22mm Pan Head Screws O See Figure 7 8 Determine where you want the bottom of your storage shelf to end and draw a faint pencil line on the wall Using a tape measure measure up 15 inches from tha...

Page 7: ...4x45mm Pan Head Screws P IF YOU CANNOT LOCATE ENOUGH STUDS TO SECURE THE BRACKETS purchase the proper wall attachment hardware for your type of wall and secure the brackets according to those instruc...

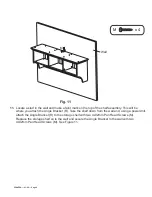
Page 8: ...ly This will be where you attach the Angle Bracket R Take the shelf down from the wall and using a power drill attach the Angle Bracket R to the storage shelf with two 4x32mm Pan Head Screws M Replace...

Page 9: ...roporcione el n mero completo del modelo del mueble se encuentra en la esquina superior izquierda de esta p gina la letra n mero de la pieza el c digo de producci n la cantidad que necesita la raz n d...

Page 10: ...TAQUETES EN ESTE PASO Vista frontal Front View Coloque el estante inferior F sobre una superficie limpia y protegida de manera que los orificios miren hacia arriba Aplique una capa delgada de cola en...

Page 11: ...abeza troncoc nica 4x32mm M Coloque de nuevo el estante sobre la pared y fije el soporte angular a la pared con dos tornillos de cabeza troncoc nica 4x32mm M Vea la Figura 11 10 11 Pared Wall Poste St...

Page 12: ...t de mod le du meuble angle sup rieur gauche de cette page la lettre le num ro de la pi ce le code de production la quantit n cessaire la raison du remplacement ainsi que votre nom complet et votre ad...

Page 13: ...E Placez l tag re inf rieure F sur une surface prot g e et propre de mani re ce que les petits trous soient face vers le haut talez une fiche couche de colle dans les trous de chevilles m nag s dans l...

Page 14: ...e R l tag re de rangement au moyen de deux vis t te cylindrique 4x32mm M Remettez l tag re de rangement sur le mur et fixez le support angulaire au mur au moyen de deux vis t te cylindrique 4x32mm M V...

Page 15: ...Glue or the equivalent unless the instructions call for a special type such as a slow drying epoxy glue Carefully read the glue manufacturer s label and follow all instructions 5 Avoid getting glue on...

Page 16: ...aler uniform ment la colle l int rieur des trous En raison de l adaptation des goujons ou barreaux dans les trous le goujon ou barreau pousse la colle au fond du trou Si vous utilisez trop de colle el...

Reviews: