background image

5600RGB Stonewood Queen Manor Upholstered Storage Bed; 

5609RGB Stonewood King Manor Upholstered Storage Bed; 

5627RGBc Stonewood Queen Manor Upholstered Bed; 

5635RGBc Stonewood King Manor Upholstered Bed 

Assembly Instructions 

This assembly requires two people. 

5600RGB_5609RGB_5627RGBc_5635RGBc 

Page 16 

— 08/18 

 
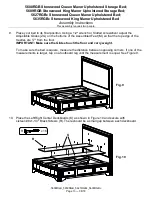
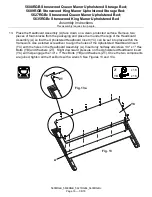
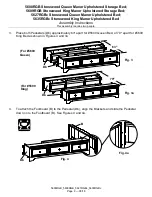
13.  Place the Headboard Assembly (A) face down on a clean, protected surface. Remove two 

pieces of foam blocks from the packaging and place them under the legs of the Headboard 
Assembly (A) so that the Upholstered Headboard Insert (YC) can be set into place within the 
framework. Use a slotted screwdriver to align the holes of the Upholstered Headboard Insert 
(YC) with the holes in the Headboard Assembly (A). Insert only halfway all sixteen 1/4" x 1" Hex 
Bolts (YB) and Washers (ZT).  Slight downward pressure on the Upholstered Headboard Insert 
(YC) will help engage the 1/4" x 1" Hex Bolts (YB) and Washers (ZT). Once the two components 
are joined, tighten all the Hex Bolts with a wrench. See Figures 13 and 13a. 


YC 

Fig. 13 

Fig. 13a 

YB 

ZT 

x 16 

x 16  

ZT 

YB 
Summary of Contents for 5600RGB

Page 1: ...rniture DESIGN SUBJECT TO CHANGE WITHOUT NOTICE CUSTOMER SERVICE If you ever have questions about your furniture please do not hesitate to contact us In the unlikely event you need a replacement part...

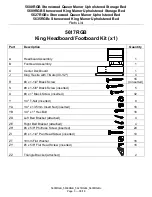
Page 2: ...mbly 1 B Footboard Assembly 1 I Queen Trestle with T Nuts 24 3 8 4 R 8 x 1 1 4 Black Screw inserted 4 S 8 x 1 5 8 Black Screw inserted 5 U 8 x 1 Black Screw inserted 32 Y 1 4 T Nut inserted 8 YA 1 4 x...

Page 3: ...Headboard Assembly 1 B Footboard Assembly 1 C Center Deckboard 1 J King Trestle with T Nuts 40 1 2 4 R 8 x 1 1 4 Black Screw 16 4 inserted S 8 x 1 5 8 Black Screw inserted 5 U 8 x 1 Black Screw insert...

Page 4: ...onewood King Manor Upholstered Bed Parts List 5600RGB_5609RGB_5627RGBc_5635RGBc Page 4 08 18 5666UWT Stonewood Queen Manor Insert Woven Taupe x1 5667UWT Stonewood King Manor Insert Woven Taupe x1 Part...

Page 5: ...awer Face attached 2 Hb Large Drawer Face attached 1 K Left Right Center Deckboard 1 L Notched Deckboard attached 1 M Assembled Foot attached 2 N 20 Drawer Slides pre installed sets 3 O 6 x 3 4 Philtr...

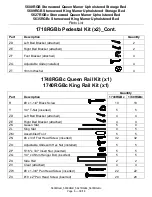
Page 6: ...djustable Glide installed 4 ZT 18mm Washer 4 1748RGBc Queen Rail Kit x1 1740RGBc King Rail Kit x1 Part Description Quantity 1748RGBc 1740RGBc R 8 x 1 1 4 Black Screw 10 10 Y 1 4 T Nut inserted 5 5 ZD...

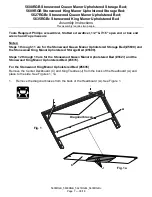
Page 7: ...x end wrench and Tape measure Notes Steps 1 through 11 are for the Stonewood Queen Manor Upholstered Storage Bed 5600 and the Stonewood King Manor Upholstered Storage Bed 5609 Steps 12 through 19 are...

Page 8: ...the packaging and place them under the legs of the Headboard Assembly A so that the Upholstered Headboard Insert YC can be set into place within the framework Use a slotted screwdriver to align the h...

Page 9: ...ns This assembly requires two people 5600RGB_5609RGB_5627RGBc_5635RGBc Page 9 08 18 3 Place both Pedestals Db approximately 63 apart for 5600 Queen Bed or 79 apart for 5609 King Bed as shown in Figure...

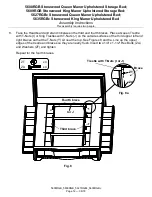
Page 10: ...d 5635RGBc Stonewood King Manor Upholstered Bed Assembly Instructions This assembly requires two people 5600RGB_5609RGB_5627RGBc_5635RGBc Page 10 08 18 5 Repeat step four for the other side See Figure...

Page 11: ...d in between the first and second braces Place a Queen Trestle with T Nuts I or King Trestles with T Nuts J on the outside surfaces of the first upper left and right braces so that the T Nuts Y sit ne...

Page 12: ...Headboard and stand in between the third and fourth braces Place a Queen Trestle with T Nuts I or King Trestles with T Nuts J on the outside surfaces of the third upper left and right braces so that t...

Page 13: ...crewdriver adjust the Adjustable Glides ZG on the bottoms of the Assembled Feet M so that the top edge of the trestles are 17 from the floor IMPORTANT Make sure the Glides touch the floor and carry we...

Page 14: ...Step 11 is for the Stonewood King Manor Upholstered Storage Bed 5609 11 Place the Center Deckboard C as shown in Figure 11 and secure with twelve 8 x 1 1 4 Black Screws R If you need to adjust the As...

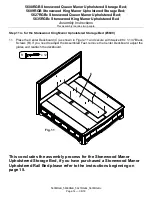
Page 15: ...Bc Stonewood Queen Manor Upholstered Bed 5635RGBc Stonewood King Manor Upholstered Bed Assembly Instructions This assembly requires two people 5600RGB_5609RGB_5627RGBc_5635RGBc Page 15 08 18 12 Remove...

Page 16: ...the packaging and place them under the legs of the Headboard Assembly A so that the Upholstered Headboard Insert YC can be set into place within the framework Use a slotted screwdriver to align the ho...

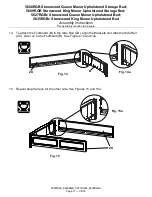
Page 17: ...g Manor Upholstered Bed Assembly Instructions This assembly requires two people 5600RGB_5609RGB_5627RGBc_5635RGBc Page 17 08 18 14 To attach the Footboard B to the Side Rail ZU align the Brackets and...

Page 18: ...d King Manor Upholstered Bed Assembly Instructions This assembly requires two people 5600RGB_5609RGB_5627RGBc_5635RGBc Page 18 08 18 16 Align the Brackets on both sides and slide the Side Rail Footboa...

Page 19: ...s two people 5600RGB_5609RGB_5627RGBc_5635RGBc Page 19 08 18 18 Move the bed assembly to its final position Position the Queen Slats ZK or the King Slats ZL on the bottom edges of the rails Attach wit...

Reviews: