background image


P.O. Box 2827 
Eugene, OR 97402 USA


Production Code: 


VN 09/11 


Model # 

7131GDRC


Northgate Queen Storage Bed 

Glazed Dark Chestnut finish 

Assembly Instructions


Congratulations! 

This fine piece of furniture will make a gorgeous  
addition to your home. For the best results, read the 
Assembly Instructions before you begin your project. 

IMPORTANT NOTES: 


For normal household use only. 

Not

 recommended for 

commercial use. 


Remove items before you move this unit. 


Do not overload the drawers. 


Before you load or move this unit, tighten all screws  
and supports. 

  Before you begin your project, completely read the 

Assembly Instructions. 

  Store this item: 1- in its box; 2- in a dry place; 3- in 

temperatures that range from 40°F to 90°F (not on a cold 
and possibly damp cement floor). 

  Periodically inspect your furniture for any loose glue 

joints, screws or any other problem that might affect the 
stability of your furniture. Tighten or repair as needed.


  This assembly requires two people. 


DESIGN SUBJECT TO CHANGE WITHOUT NOTICE


 CALL US FIRST! Do not return this item to the store


Service Policy:

 We will replace any part that is defective, 

missing or damaged during assembly. For a replacement 
part, contact Whittier Wood Products customer service 
department by phone, fax, mail or email. 
 

Hours:

 Our friendly customer service staff can be reached 

Monday-Friday 7:00 a.m. to 5:00 p.m. (Pacific Time). You 
may leave a message 24 hours a day, seven days a week.

To Order:

 Provide the finish and furniture model number 

(upper portion of this page), the part letter, production 
code, quantity needed, reason for replacement and your 
full name, address and telephone number. 
 

Parts ship from our Eugene, Oregon factory within one or 
two business days from the time we receive your request. 
Please allow five to ten business days for delivery


800-653-3336

 •


Outside the U.S. or Canada: 541-687-0213 • Fax: 541-687-2060 

www.whittierwood.com • P.O. Box 2827 • Eugene, Oregon 97402, U.S.A.


Summary of Contents for 7131GDRC

Page 1: ...ffect the stability of your furniture Tighten or repair as needed This assembly requires two people DESIGN SUBJECT TO CHANGE WITHOUT NOTICE CALL US FIRST Do not return this item to the store Service Policy We will replace any part that is defective missing or damaged during assembly For a replacement part contact Whittier Wood Products customer service department by phone fax mail or email Hours O...

Page 2: ...t refer to the following letter and part name 7135GDRC Headboard Kit x1 Part Description Quantity A Headboard Assembly 1 B Headboard Accent attached 1 C Left Bracket attached 2 D Right Bracket attached 2 E 90o Steel Brace attached 2 F 6 x 3 4 Brass Flat Head Screw inserted 14 G 8 x 1 Black Screw inserted 16 H 8 x 1 3 16 Pan Head Screw inserted 9 I 8 x 1 1 4 Pan Head Screw inserted 2 ...

Page 3: ... Assembly 1 K Top Slat 3 L Bottom Slat 2 M Drawer Box assembled 2 N Drawer Face attached 2 O Bottom Deckboard 2 P Top Deckboard 1 Q Top Notched Deckboard 1 R Small Assembled Foot 2 S 1 4 x 20mm Insert Nut inserted 6 T Hanger Bolt inserted 2 U Small Adjustable Glide installed 2 V Large Foot Assembly 2 W Foot Bracket attached 2 X Large Adjustable Glide installed 2 Y Pull attached 2 ZA M4 x 25mm Mach...

Page 4: ... 7134GDRC Footboard Kit x1 Part Description Quantity ZE 1 4 x 1 1 2 Hex Bolt 4 ZF Washer 4 ZG 90o Bracket 2 ZH 6 x 5 8 Philtruss Screw 32 8 inserted ZI 1 4 x 1 2 Insert Nut inserted 2 ZJ 8 x 1 Lo Profile Screw inserted 12 ZK Lever Lock attached 2 ZL Pad Strip attached 6 ...

Page 5: ...ge 5 09 11 7133GDRC Queen King Bed Rail Kit x1 Part Description Quantity C Left Bracket attached 4 D Right Bracket attached 4 F 6 x 3 4 Brass Flat Head Screw inserted 4 G 8 x 1 Black Screw inserted 32 ZM Left Side Rail 1 ZN Right Side Rail 1 ZO Plate attached 2 ...

Page 6: ...lign the inserts in the Footboard Assembly J with predrilled holes in the Large Foot Assemblies V Attach as shown in Figure 1 with 1 4 x 1 1 2Hex Bolts ZE and Washers ZF 2 To attach the Footboard Assembly J to the Left Side Rail ZM align the Brackets C and slide the Left Side Rail down on to the Footboard Assembly J See Figures 2 and 2a C Fig 2 ZM Fig 2a J ZE Fig 1 ZE ZF x 4 x 4 ZF J V ...

Page 7: ...tructions 7131GDRC Page 7 09 11 3 Repeat step two for the Right Side Rail ZN and Brackets D See Figures 3 and 3a 4 Align the Brackets on both sides and slide the Rail Footboard assembly down on to the Headboard A See Figure 4 Fig 3 ZN Fig 3a D Fig 4 A ...

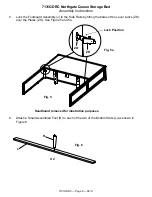
Page 8: ...rd Assembly J to the Side Rails by fitting the bales of the Lever Locks ZK over the Plates ZO See Figure 5 and 5a 6 Attach a Small Assembled Foot R to each of the two of the Bottom Slats L as shown in Figure 6 L Fig 6 X 2 R Headboard removed for illustration purposes Fig 5a Lock Position Fig 5 ZK ZO ...

Page 9: ... Foot R so they bear weight See Figure 8 9 The Bottom Deckboards O has a notch cut on the corner to clear the brackets of the Headboard and a notch cut centered at the end to clear the Large Foot Assemblies Slide the notched corners of the Bottom Deckboards O over brackets at the headboard end of the assembly as shown in Figure 9 There should be a small gap between each deckboard Secure with 6x5 8...

Page 10: ...tted brackets of both the Headboard and Footboard as shown in Figure 10 Note that this open area can be used for storage 11 Attach the center Top Slat K to the Headboard and Footboard bracket using a 90 bracket ZG and 6 x 1 2 Philtruss Screws ZC as shown in Figure 11 and 11a Fig 10 K K Fig 11 ZG ZC x 2 x 4 ZG ZC ZC Fig 11a K ...

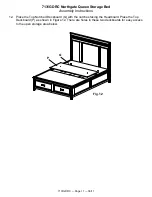
Page 11: ...ructions 7131GDRC Page 11 09 11 12 Place the Top Notched Deckboard Q with the notches facing the Headboard Place the Top Deckboard P as shown in Figure 12 There are holes in these two deckboards for easy access to the open storage area below Fig 12 P Q ...

Reviews: