2.
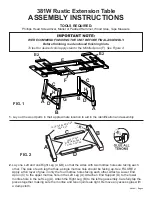
Lay one Left and one Right Leg (A & B) so that the sides with two mortise holes are facing each
other. The side of each leg that has a single mortise hole should be facing up. See FIGURE 2.
Apply a thin layer of glue in only the four mortise holes facing each other. Attach a Lower End
Apron (C) to the upper mortise hole in the Left Leg (A). Attach an End Support (D) to the lower
mortise hole in the Left Leg (A). Attach the Right Leg (B) to the left leg assembly. Carefully tap the
pieces together, making sure the mortise and tenon joints are tight. Remove any excess glue with
a damp cloth.
FIG. 2
C
D
B
A
FACE THESE
MOR
TISE
HOLES UP
.
FACE THESE
MOR
TISE HOLES
TO EACH OTHER.
381W — Page 3
381W Rustic Extension Table
ASSEMBLY INSTRUCTIONS
TOOLS REQUIRED:
Phillips Head Screwdriver, Mallet or Padded Hammer, Wood Glue, Tape Measure
FIG. 1
WE RECOMMEND FINISHING THE UNIT BEFORE FINAL ASSEMBLY.
Before finishing, read enclosed finishing hints.
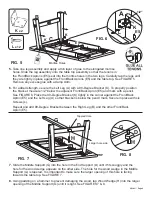
To test for desired color apply stain to the Middle Apron (F). See Figure 4.
D
E
2
G
A
B
A
H
C
B D
H
C
E
2
E
F
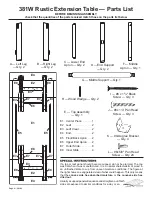
1.
Lay out the wood parts in their approximate location to aid in the identification and assembly.


