H
5.
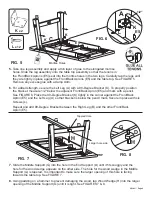
Take one leg assembly and apply a thin layer of glue to the elongated mortise
holes. Slide the leg assembly onto the table top assembly so that the tenons in
the Front/Back Aprons (E5) seat into the mortise holes in the two legs. Carefully tap the legs until
they are tightly in place against the Front/Back Aprons (E5) and the table top. See FIGURE 5.
Remove any excess glue with a damp cloth.
6.
For added strength, secure the Left Leg (A) with a 90-Degree Bracket (K). To properly position
the bracket, measure 1/2" below the adjacent Front/Back Apron (E5) and mark with a pencil.
See FIGURE 6. Place the 90-Degree Bracket (K) tightly in the corner against the Front/Back
Apron (E5) and the Left Leg (A) so that bracket is below the pencil mark. Secure in place with six
Screws (L).
Repeat and add 90-Degree Bracket between the Right Leg (B) and the other Front/Back
Apron (E5).
K
x 2
L
x 12
FIG. 7
7.
Slide the Middle Support (G) into the hole in the End Support (D) until it fits snuggly and the
hole for the wood wedge appears on the other side. The hole for the wood wedge in the Middle
Support (G) is tapered. It is important to make sure the larger opening of this hole is facing
towards the table top. See FIGURE 7.
8.
Using padding on a hammer to prevent damaging the wood, tap Wood Wedge (H) into the larger
opening of the Middle Support (G) until it is tight. See FIGURES 7 & 8.
K
K
K
L
B
A
C
E5
E5
FIG. 5
FIG. 6
1/2"
G
D
H
FIG. 8
Tapered Hole
E5
A
D
G
TOP
Larger hole side.
Mortise Holes
381W — Page 5


