background image

Operation and Controls 


It is recommended that you install the wine cooler in a place where the ambient temperature is between  
(68°F - 78°F). If the ambient temperature is above or below recommended temperatures, the performance  
of the unit may be affected. For example, placing in extreme cold or hot conditions may cause interior  
temperature to fluctuate thus the set temperature may not be achievable.  


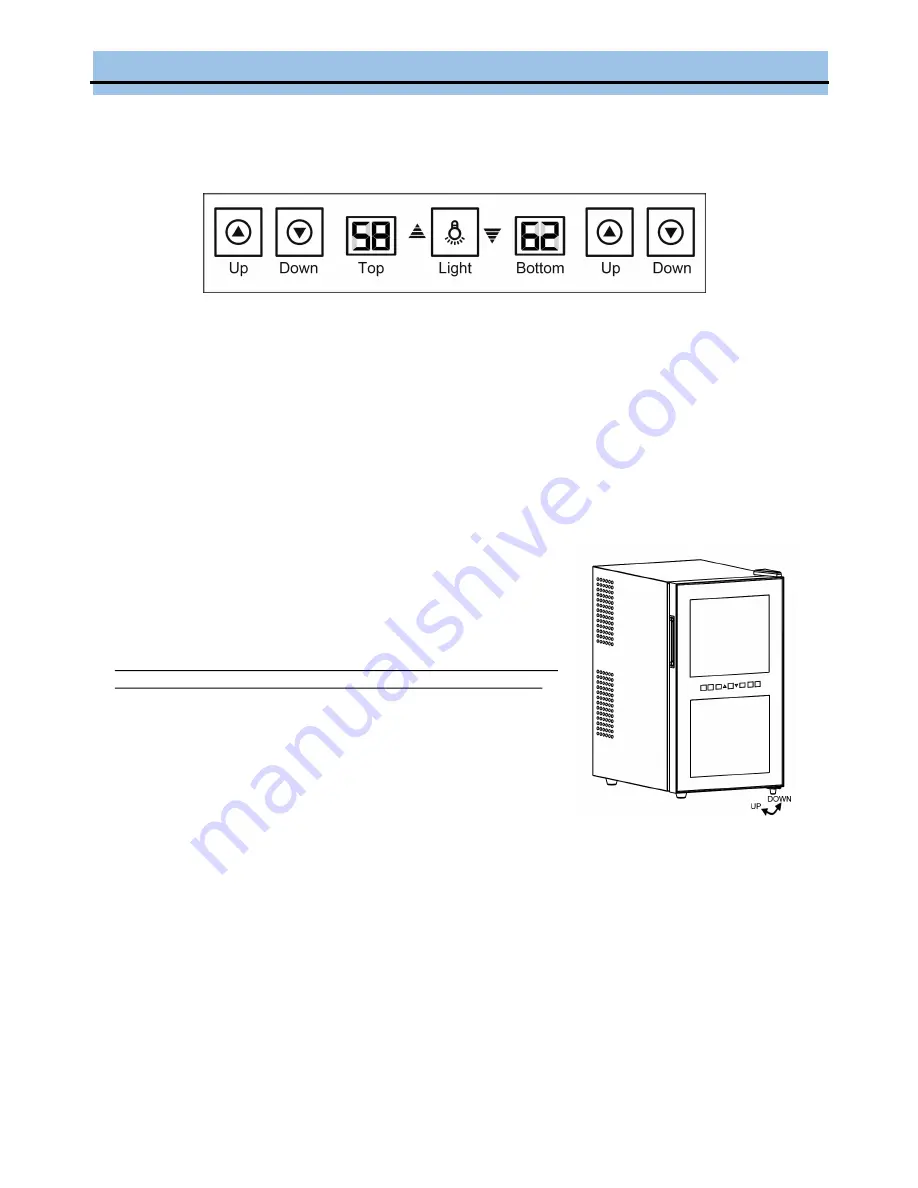
SETTING THE TEMPERATURE  

The unit has two separate temperature zones. The temperature range of upper zone can be set between 
54ºF and 66ºF while the bottom zone can be set between 46ºF and 66ºF. To set the desired temperature, 
press the “▼” button to lower the temperature or “▲” button to raise the temperature on the control panel.  
The temperature display will flash for 5 seconds indicating that the desired temperature is set and will revert 
back to its actual internal temperature. 

NOTE: The temperature inside the wine cooler is dependent on the ambient temperature (room tempera-
ture).  


INTERIOR LIGHT  

You can turn on and off the interior light by pressing the “Light” button on the control panel.  

Note: If zone divider is installed, only the upper zone will be illuminated when interior light is turned on.


LEVELING THE APPLIANCE


It is important for your appliance to be leveled in order to work properly. 
It can be raised or lowered by rotating each of the feet on the bottom of 
the machine. If you find that the surface is not level, rotate the feet until 
the appliance becomes level .You may need to make several adjust-
ments to level it. We recommend using a carpenter’s level to check the 
machine. 

Note: The WC-181DS has 3 large leveling legs and 1 small leveling leg 
under the door hinge while the WC-241DS has 4 large levelling legs. 

1.  Place a carpenter’s level on top of the product to see if the appliance 

is level from front to back and side to side. 

2. 

Adjust the height of the feet as follows: Turn the leveling feet to the 
right to lower that side of the refrigerator. Turn the leveling feet to the 
left to raise that side of the refrigerator.


BOTTLE CAPACITY 


The listed bottle capacity for your wine cooler is an estimated maximum capacity base on a standard 750ml 
wine bottle. For other size bottles, the capacity will vary. 
 

WINE SHELVES 


The WC-181DS wine cooler is equipped with 4 scalloped stainless shelves and 1 zone divider, while the WC
-

241DS wine cooler is equipped with 6 scalloped stainless shelves and 1 zone divider. If you are having 

trouble fitting the stated listed number of bottles of wine in the wine cooler, try flipping the wine racks over. 
To prevent damage to the door gasket, make sure the door is all the way opened when pulling the shelves 
out. 

 

For easy access of the wine bottles, you must pull the shelves approximately ⅓ out of the railing. 

 

When removing the shelves out of the railing, make sure to remove all items first. 

 

To remove the shelves, pull the shelf forward through the rail carefully. 

NOTE: It is recommended that the zone divider is installed in the middle of the cabinet. This setup creates 
an even temperature distribution for each zone which results in the most efficient operation. If the zone divid-
er is not installed in the middle of the cabinet, the wine cooler may not be able to achieve the set tempera-
ture of both zones.  

Summary of Contents for WC-181DS

Page 1: ...e Cooler Congratulations on your new Whynter product To ensure proper operation please read this Instruction Manual carefully before using this product Keep this manual in a safe place for future reference Model WC 181DS WC 241DS INSTRUCTION MANUAL WC 181DS WC 241DS ...

Page 2: ...ble of Contents PAGE Safety Precaution 3 4 Parts and Controls 5 Introduction Technical Data 6 Installation 7 8 Operation and Controls 9 10 Care and Maintenance 11 Troubleshooting 12 Warranty Information 13 ...

Page 3: ...o reduce the risk of fire electrical shock or injury when using the appliance follow basic precaution including the following Plug into a grounded 3 prong outlet do not remove grounding prong do not use an adapter and do not use an extension cord Do not use if the power supply cord is damaged If damaged it must be replaced by a qualified electri cian It is recommended that a separate circuit servi...

Page 4: ... is not intended for use by young children or physically challenged persons without supervision assistance Young children must be supervised to ensure safety around this or any appliance Do not use solvent based cleaning agents of abrasives on the interior These cleaners may dam age or discolor the interior Keep fingers out of the pinch point areas Clearance between the doors and between the doors...

Page 5: ...oor Hinge 16 Upper Zone Air Intake Filter 7 Bottom Door Hinge 17 Bottom Zone Air Vent 8 Small Leveling Leg for WC 181DS Regular Leveling Leg for WC 241DS 18 Bottom Zone Air Intake Filter 9 Tempered Double Pane Glass 19 Air Vent 10 Door Seal 20 Condensation Tray WC 181DS WC 241DS WC 181DS 4 premium stainless steel trimmed scalloped shelves WC 241DS 6 premium stainless steel trimmed scalloped shelve...

Page 6: ...l Range Upper Zone 54ºF 66ºF Bottom Zone 46ºF 66ºF Upper Zone 54ºF 66ºF Bottom Zone 46ºF 66ºF Shelves 4 chrome shelves 1 zone divider 6 chrome shelves 1 zone divider Unit Dimensions 14 W x 20 25 D x 25 75 H 14 W x 20 25 D x 33 5 H Packaging Dimensions 16 25 W x 22 D x 27 75 H 16 25 W x 22 D x 35 75 H Net Weight 33 5 lbs 46 5 lbs Gross Weight 37 25 lbs 53 lbs TECHNICAL DATA Whynter Thermoelectric W...

Page 7: ...c coating and heat sources may increase electrical consumption For best performance do not install the appliance behind a cabinet door or block the base grille Extreme cold ambient tempera tures may also cause the appliance not to perform properly Avoid locating the appliance in area that may be exposed to excessive moisture Plug in the appliance into an exclusive grounded wall power outlet Do not...

Page 8: ...ys grip the plug firmly and pull straight out from the receptacle Repair or replace immediately all power cords that have become frayed or otherwise damaged Do not use a cord that shows cracks or abrasion damage along its length or at either end When moving the appliance be careful not to damage the power cord EXTENSION CORD Because of potential safety hazards it is strongly recommended that you d...

Page 9: ... We recommend using a carpenter s level to check the machine Note The WC 181DS has 3 large leveling legs and 1 small leveling leg under the door hinge while the WC 241DS has 4 large levelling legs 1 Place a carpenter s level on top of the product to see if the appliance is level from front to back and side to side 2 Adjust the height of the feet as follows Turn the leveling feet to the right to lo...

Page 10: ...lug in the wine cooler and set the desired temperature PREPARING FOR STORAGE If the wine cooler will not be used for a long time or is to be moved to another place it will be necessary to defrost the unit and dry the interior 1 Disconnect the wine cooler from the power supply by removing the power plug from the wall socket 2 Leave the door open to allow for air circulation and to prevent mold mild...

Page 11: ...nce Turn the adjustable legs up to the base to avoid damage Tape we recommend using painter s tape the door shut Be sure the appliance stays secure in the upright position during transportation and protect the exterior of appliance with a blanket or similar item PREPARING FOR STORAGE If the appliance will not be used for a long time or is to be moved to another place it will be necessary to defros...

Page 12: ...of contents has been added to the appliance The door is opened too often The door is not closed completely The door gasket does not seal proper ly Decrease or increase the ambient room temperature To minimize internal temperature fluctua tion do not add large amount of contents at once Close the door tightly and do not open the door too frequently or for a long period of time Ensure the door gaske...

Page 13: ...age caused by consumer misuse tampering or failure to follow the care and special handling provisions in the instructions Damage to the finish of the case or other appearance parts caused by wear Damage caused by repairs or alterations to the product by anyone other than authorized by the manufacturer Freight and Insurance cost for the warranty service DISCLAIMER OF IMPLIED WARRANTIES LIMITATION O...

Reviews: