Aquatronic 3 ultra
REPLACING THE COVER
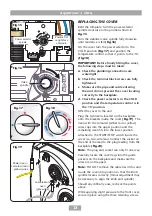
Refit the trimplate. Turn the power selector
spindle clockwise to the position shown in
fig.
.
Turn the stabiliser valve spindle fully clockwise
until resistance is felt
(fig.)
.
On the cover turn the power selector to the
COLD position
(fig.)
and position the
temperature control so that it points to the ‘10’
(fig.)
.
Important:
Before finally fitting the cover,
the following steps must be taken:
a.
check the plumbing connections are
watertight.
b.
check the terminal block screws are fully
tightened.
c.
make sure the pipe and cable entering
the unit do not prevent the cover locating
correctly to the backplate.
d.
check the power selector is in the colD
position and the temperature control is in
the ‘10’ position.
Offer the cover to the unit.
Plug the two neons located on the backplate
onto the brackets inside the cover
(fig.9)
. The
neon with the coloured (either red or yellow)
wires clips into the upper position and the
remaining neon fits into the lower position.
Attached to the START/STOP switch inside the
cover is a two-wire lead. Connect the socket on
the end of the lead to the plug leading from the
backplate
(fig.0)
.
note:
The plug and socket can only fit one way.
Carefully locate the cover tags into the guide
pockets on the backplate and make sure the
wires are not trapped.
note:
DO NOT remove the cable ties in this unit.
Guide the cover into position so that the knob
spindle locates correctly (minor adjustment may
be necessary to align the knob and spindle).
Should any difficulty arise, recheck the points
above.
While applying slight pressure to the front cover,
secure in place using the three retaining screws.
WARNING
WARNING
Power selector
spindle
Position flat
on right face
of spindle
!320*)
9DOYH
VSLQGOH
Fig.
Fig.
Fig.
Fig.
Power neon -
coloured (red or
yellow) wires
Low pressure
neon
(grey wires)
Fig.9
Summary of Contents for TRITON Aquatronic 3 ultra
Page 23: ...Aquatronic 3 ultra 21...


