background image

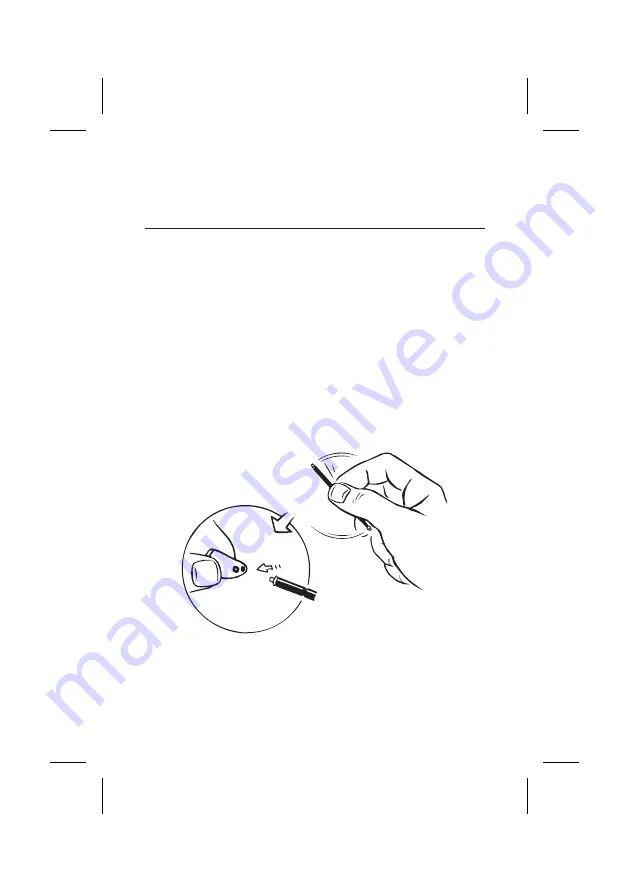
Inserting a new wax guard

Now turn the gray holder around so that the used
wax guard is away from the instrument and the new
one is in position to be inserted into your hearing in-
strument.

Gently press the new wax guard straight into the
opening of the sound outlet. Do not force the wax
guard into the sound outlet. The outer ring of the
wax guard should sit flat on the stainless steel bush-
ing.

29

Summary of Contents for SD-XM

Page 1: ...User s instructions The Senso Diva Series SD XM In the ear ...

Page 2: ...enso Diva listening programs 12 Listening programs 13 Placing Senso Diva in the ear 16 Removing Senso Diva 17 Caring for your hearing aid 18 Take good care of your hearing aid 18 Keeping Senso Diva clean 20 Cleaning the sound outlet 22 Cleaning the relief vent opening 23 Cleaning the microphone openings 24 The CeruSTOP wax guard 25 Removing the used wax guard 28 Inserting a new wax guard 29 Import...

Page 3: ...ible and automatically adjusts loudness according to your listening environ ment Through an analysis of the incoming sounds Senso Diva is able to reduce noise and enhance speech Furthermore Senso Diva effectively cancels feedback whistling an otherwise common com plaint of many hearing aid users In addition to the traditional listening programs Senso Diva may be equipped with a music program speci...

Page 4: ...s if neces sary 3 On off function which is integrated into the battery compartment cover 4 Nail grip on the battery compartment cover for easy opening 5 Sound outlet through which the amplified sound from the hearing aid reaches your ear 6 Front relief vent opening 7 Rear relief vent opening 8 Colored indicating dots Red dot for the right ear Blue dot for the left ear 4 ...

Page 5: ...5 1 2 4 5 7 8 3 6 Red Dot Right Blue Dot Left Serial The first two digits in the serial number indicate the year your instrument was manufactured ...

Page 6: ...e Because they are Zinc Air type batteries they need air to work Therefore do not remove the sealing label un til just before inserting the battery in the hearing aid Once the sealing label has been removed the battery will start functioning after a few seconds Placing the battery in the battery compartment Before inserting a new battery in your hearing aid remember to re move the battery sealing ...

Page 7: ...g the battery compartment cover open The plus sign of the battery must face upwards This means that the side of the battery with the small plus sign should face in the same direction as the plus sign on the battery compart ment cover If the battery compartment cover does not close easily the battery is incorrectly inserted 7 ...

Page 8: ...le as the battery is nearly exhausted Once the battery is totally ex hausted the hearing aid will be completely silent Never leave an exhausted battery in the hearing aid Exhausted batteries may leak which could damage the hearing aid When changing batteries hold the hearing aid over a table or a carpet to make it easier to find a dropped hearing aid or battery 8 ...

Page 9: ...aring aid is turned on when a battery is inserted correctly and the battery compart ment cover is com pletely closed The hearing aid is turned off when the battery com partment cover is open Please remember to switch the hearing aid off when it is not in use Remove the battery if the hearing aid will not be used again soon 9 ...

Page 10: ... in your hearing aid is too loud or too weak or if the reproduced sounds are distorted or you would like any further information consult the hearing healthcare professional where you received your hearing aid Fine tuning loudness Your Senso Diva hearing aid may also be equipped with a volume control so that you can fine tune the automatic loudness setting When you raise the volume you will hear a ...

Page 11: ...ortant If the volume in your hearing aid is too loud or too weak or if the reproduced sounds are distorted or you would like any further information consult the hearing healthcare professional where you received your hearing aid Left right identification If you are wearing hearing aids on both ears it is easy to tell them apart as the right ear hearing aid has a red dot and the left ear hearing ai...

Page 12: ...an help you select the programs that are of use to you and make them available on the hearing aid program switch If your needs change over time the combination of listening programs can be changed In these user s instructions the hearing healthcare professional can list the listening pro grams that are available on the program switch 12 ...

Page 13: ... can be used for telephone use and or for induction loop use for certain assistive listening devices M T M T stands for a combination of micro phone and telecoil M T If you activate M T you can use the telephone and still hear the sur rounding sounds Music The music program is optimized for listen ing to music The music program is not available in all Senso Diva models 13 ...

Page 14: ... program 1 two beep tones for program 2 three beep tones for program 3 and four beep tones for program 4 Please note that if for example you only have 3 programs program 3 will be followed by pro gram 1 as you switch programs If you in consultation with your hearing healthcare professional decide on other combinations of pro grams later these can be written on the blank forms found at the back of ...

Page 15: ...Program Chosen programs Application 1 2 3 4 15 ...

Page 16: ...aid with your thumb and forefin ger Slowly guide the hearing aid into your ear canal until you feel resistance Let go of the hearing aid and use the tip of your forefinger to gently push the hearing aid into your ear until it rests comfortably in your canal To ease the final adjustments it can be a help to pull the outer ear backwards and up wards with the opposite hand 16 ...

Page 17: ...d pull gently If it is difficult to loosen the hearing aid it may help to try to move the hearing aid gently from side to side It may also help to pull the outer ear upwards and backwards while applying a little pressure around the ear open ing with the opposite forefinger 17 ...

Page 18: ...rolong the life of your aid Treat your hearing aid as the valuable object it is with care Keep it in its case in a cool dry location where it cannot be reached by children or pets Switch your hearing aid off when it is not in use Should you not use it for a day or more take out the battery to avoid battery leakage Never expose it to extreme temperatures or high humidity 18 ...

Page 19: ...uring short wave diathermy x ray MR scans CT scans or similar radiation treatments Some types of ra diation can damage your hearing aid Other types of radiation from for example room sur veillance equipment burglar alarms and cellu lar telephones are weaker and will not damage your hearing aid Widex hearing aids are not certified for use in mines or other areas with explosive gases 19 ...

Page 20: ... a dry soft cloth to keep the outside dry and clean of residue wax etc We recommend that every time you take the hearing aid out of your ear you inspect the sound outlet and the microphone and relief vent openings to ensure that no dirt has gathered there Below is an example of how the sound outlet and the relief vent and micro phone openings can be positioned They may be placed in a slightly dif ...

Page 21: ...on of the bat tery into the battery compartment B Wax removing tool for cleaning the relief vent opening C Wax removing tool for cleaning the microphone openings D Small brush for removal of earwax from the area around the sound outlet E Soft cloth for drying and cleaning the hearing aid 21 A B C D E ...

Page 22: ...the small brush It is important that the sound outlet is never blocked Important Do not insert any objects into the sound outlet as this could damage the hearing aid Your Senso Diva may be equipped with a Ceru STOP wax guard to prevent earwax from working its way into the sound canal See page 25 22 ...

Page 23: ...the vent cleaning tool into the front relief vent open ing as shown in the illustration Gently push the cleaning tool completely through the shell pushing out any earwax Make sure the vent is thoroughly clean If the problem persists you should see your hearing healthcare professional for service Important Never insert the vent cleaning tool into the rear relief vent opening 23 ...

Page 24: ...s with the short wax removing tool Open the bat tery compartment cover and turn the hearing aid so the bat tery compartment cover is facing downwards Guide the wax removing tool through the microphone opening on the battery compartment cover from the inside as illustrated Do not insert any objects into the microphone itself 24 ...

Page 25: ...rwax can work its way into the sound outlet of your hearing aid and par tially or completely block the passage of sound Completely In The Canal CIC instruments are es pecially vulnerable to wax problems due to their placement deep in the ear canal By using a wax guard you can protect your CIC or In The Ear ITE instruments from earwax thereby minimiz ing earwax related problems 25 ...

Page 26: ...onsists of the following parts A Holder B Removal hook C Wax guard A white wax guard is mounted on one end of the holder At the other end is a hook for removing the used wax guard CeruSTOP wax guards come in a carrying case 26 A B C ...

Page 27: ...en should I change my wax guard Since the amount of earwax produced by each indi vidual can vary dramatically it is recommended that the wax guard be checked daily If the hearing aid is weak silent or if wax is visible in the wax guard it s time to change the wax guard 27 ...

Page 28: ... of the sound outlet With the gray holder perpendicular to the face of the bushing insert the removal hook into the used wax guard so that the shaft of the holder is touching the rim of the wax guard then slowly pull the wax guard straight out Do not pry or twist the wax guard from the bushing A Vent opening B Sound outlet C Used wax guard 28 A B C ...

Page 29: ...the instrument and the new one is in position to be inserted into your hearing in strument Gently press the new wax guard straight into the opening of the sound outlet Do not force the wax guard into the sound outlet The outer ring of the wax guard should sit flat on the stainless steel bush ing 29 ...

Page 30: ...new wax guard will automatically dismount from the holder and re main in place After inserting the new wax guard discard the holder with the used wax guard attached to the removal hook Never reuse a wax guard Note If the wax guard fits loosely discard it and insert another 30 ...

Page 31: ...any questions regarding your wax guard please contact your hearing healthcare professional The use of CeruSTOP wax guard does not elimi nate the need for daily cleaning procedures WARNING If the wax guard becomes dislodged from the hear ing aid while in the ear canal please contact your physician immediately Do not try to remove the wax guard from your ear canal yourself 31 ...

Page 32: ... you keep your supply Never put batteries in your mouth for any reason and never let a child obtain a battery or place it in his or her mouth In case of ingestion contact your physician immediately and The National Button Battery Ingestion Hotline at 202 625 3333 The hearing aid is made of modern non aller genic materials Still in rare cases skin irrita tion can occur If you notice skin irritation...

Page 33: ...hear and understand what other people are saying and to en joy many other sounds So don t give up The learn ing process will take time but millions of experi enced users can testify that the results are worth the effort Beginning to use the hearing aid When you wear a hearing aid for the first time you will hear sounds that you may not have heard for years It takes time to get used to hearing so m...

Page 34: ...ne bell clinking of dishes Try to identify and localize the sounds you are not accustomed to hear ing Once you are comfortable hearing sounds in your surroundings you can begin wearing your hearing aid during conversations with a person you know well Gradually you will become better able to par ticipate in conversations with several people at a time 34 ...

Page 35: ...rt a new battery Make sure the battery is placed cor rectly and that the battery compartment cover is closed correctly The sound outlet is blocked Earwax is often the cause of a blocked sound outlet If the hearing aid is equipped with a CeruSTOP wax guard change the wax guard If the hearing aid is not equipped with a wax guard clean the sound outlet of the hearing aid with the small brush See page...

Page 36: ...ck the microphone opening Do not in sert any objects into the microphone itself Remove wax and dirt with the short wax re moving tool Open the battery compartment cover and turn the hearing aid so the battery compartment cover is facing downwards Guide the wax removing tool through the mi crophone opening on the battery compartment cover from the inside See page 24 36 ...

Page 37: ...th a wax guard clean the sound outlet of the hearing aid with the small brush See page 22 Do not insert any objects into the sound outlet as this could damage the hearing aid If you cannot clean the sound out let completely we recommend that you contact your hearing healthcare professional Your ear canal is blocked by earwax Contact your hearing healthcare professional The hearing aid shell fit is...

Page 38: ...ng healthcare professional The hearing aid shell fit is too loose Contact your hearing healthcare professional If the hearing aid is uncomfortable to wear it could be because The hearing aid is not placed correctly in your ear canal Consult your hearing healthcare profes sional on how to place the hearing aid correctly in your ear canal The hearing aid shell has a poor physical fit This can be the...

Page 39: ... thin and may swell a little because of the pressure from the hearing aid Take 2 3 weeks to gradually get used to the hearing aid If the soreness continues con tact your hearing healthcare professional If the hearing aid performs intermittently it could be because The battery contacts are dirty Contact your hearing healthcare professional to have the battery contacts cleaned 39 ...

Page 40: ... P DX0 0501 1U1Y9 Printed by FB 10 01 P DX0 0501 1U1 Reorder CIB48 ...

Reviews: