Ku nst sto ffschweißtec hni k
Starting and operating
Chapter 5
03.03.2009
Working Instructions WIDOS PSM 15 with pneumatic clamping
Page 19 of 33
5.2. Welding process
B a s i c a l l y, t h e r e s p e c t i v e l y v a l i d w e l d i n g g u i d e l i n e s h a v e t o b e
r e s p e c t e d ( IS O / C E N / D V S . . . ) .
•
For the protection of being burnt wear safety gloves!
•
You have to use a stop watch for taking the actual time of heating up and cooling down.
•
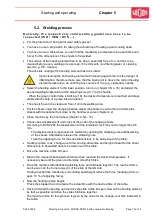
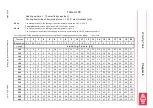
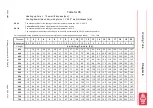
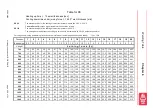
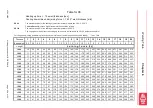
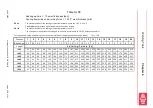
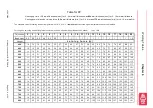
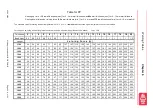
You have to use a table where you can find the mandatory parameters to be used (time and
force) for the dimensions of the sheets to be welded.
•
The surface of the heating element has to be clean, especially free of oil, and has to be
cleaned before every welding process resp. if it is dirty with non-fibering paper or cleaning
agent (e.g. PE - cleaner).
The ant-stick coating of the heating element has to be intact.
Upon cleaning the hot heating element with cleaning agents there is the danger of
inflammation, therefore make sure that the flash point is above the current heating
element temperature, do not bring any sources of fire (e.g. cigarettes) nearby.
•
Swivel the heating element to the lower position, turn it on (chapter 0 No. 16) and adjust the
needed welding temperature at the adjusting screw (17) at the handle.
- When the green control lamp is blinking (18), the desired temperature is reached and stays
stable with the help of a pulse-interval relation.
•
The sheets have to be clean and free of oil in the welding area.
•
Put the sheets under the clamping beams, adjust the sheets to each other and clamp the
sheets with the optional foot valve or the hand lever valve (chapter 4.2).
•
Close machine by the hand wheel (chapter: 4, No. 12).
•
Check sheet displacement and crack at the ends of the nudging sheets.
According to DVS 2207 the displacement of the tolerated crack may not be larger than 0,5
mm.
-
The displacement compensation is realized by opening the clamping nuts and displacing
of the sheets. Afterwards refasten the clamping nuts.
-
Take the adjusting force for the sheet dimensions to be welded out of the table.
•
Heating up time, max. change-over time, cooling-down time and height of bead for the sheet
dimensions to be welded have to be taken out of the table.
•
Drive the machine a little bit open.
•
Slew in the cleaned heating element when it has reached the desired temperature. If
necessary wait until the green control lamp smoothly blinks.
•
Drive the machine with identified adjusting force and hitchless together. The reached force
can be seen on the force range (4) of the slide of the left side.
Having reached the mandatory surrounding bead height reduce the force (heating up force =
appr. 10 % of adjusting force).
•
Now the heating up time begins.
Press the stopwatch and compare the actual time with the desired time of the table.
•
Having finished the heating up time drive the slide a little bit open, slew out the heating element
as fast as possible and drive the slides hitchless together.
The maximum time for this process is given by the value for the change-over time indicated in
the table.

